


Sewing Zipper Tutorial: Master Basic Types and Install


If you’re starting your journey in sewing, whether you’re making clothes, bags, or home decor items, mastering zipper installation is crucial. Zippers provide a secure closure and significantly impact the fit, appearance, and functionality of your projects.
Many beginners and even intermediate sewists often struggle with common problems like puckering fabric, uneven stitching, and zipper malfunctions. These issues not only affect the look of your final product but can also compromise its usability.
Through this comprehensive guide, readers will gain a thorough understanding of different zipper types, essential tools, detailed installation techniques, and solutions to common problems.
1. Understanding zippers: Types, parts, and selection
Before diving into the sewing process, it’s beneficial to become familiar with zippers. This knowledge helps you select the correct zipper for each project, ensuring a functional and professional finish.
1.1 Types of zippers
There are several types of zippers, each suited for specific applications:
- Coil zippers (Nylon/Polyester): These are lightweight and flexible, making them a good choice for dresses, skirts, and pouches. They are also relatively inexpensive.
- Metal zippers: Known for durability, metal zippers are best suited for heavy-duty applications like jeans, jackets, and zipper bags. However, they can be stiffer and more prone to snagging than coil zippers.
- Invisible zippers: Designed to be hidden within a seam, these zippers provide an elegant, seamless look. They require precision during installation and are commonly used in formal wear and fitted clothing.
- Other zipper types: Beyond the standard zipper, other variations offer specific functionalities. Separating zippers are essential for items like jackets, as they are designed to detach completely at the bottom, allowing the two sides of the garment to open fully. In contrast, two-way zippers, often found on long coats, sportswear, and luggage, provide enhanced versatility with sliders at both ends, allowing the zipper to be opened from either the top or the bottom.

1.2 Anatomy of a zipper
Understanding the different parts of a zipper helps in troubleshooting and ensures proper installation:
- Zipper tape: The fabric portion of the zipper that is sewn to the garment or item.
- Zipper teeth/elements: The interlocking metal or plastic pieces that form the closure.
- Zipper slider/pull: The mechanism that moves along the teeth to open and close the zipper.
- Top stop: The component at the top of the zipper that prevents the slider from coming off.
- Bottom stop: The component at the bottom of the zipper that prevents the slider from coming off.
1.3 Choosing the right zipper for your project
Selecting the correct zipper involves several considerations:
- Matching zipper type to fabric and use: Lightweight fabrics generally pair well with coil zippers, while heavy-duty fabrics require the strength of metal zippers.
- Considering zipper length: Measure the opening where the zipper will be installed to determine the appropriate zipper length.
- Choosing zipper color and material: Select a zipper color that complements or matches your fabric. Also, factor durability into your material choice.
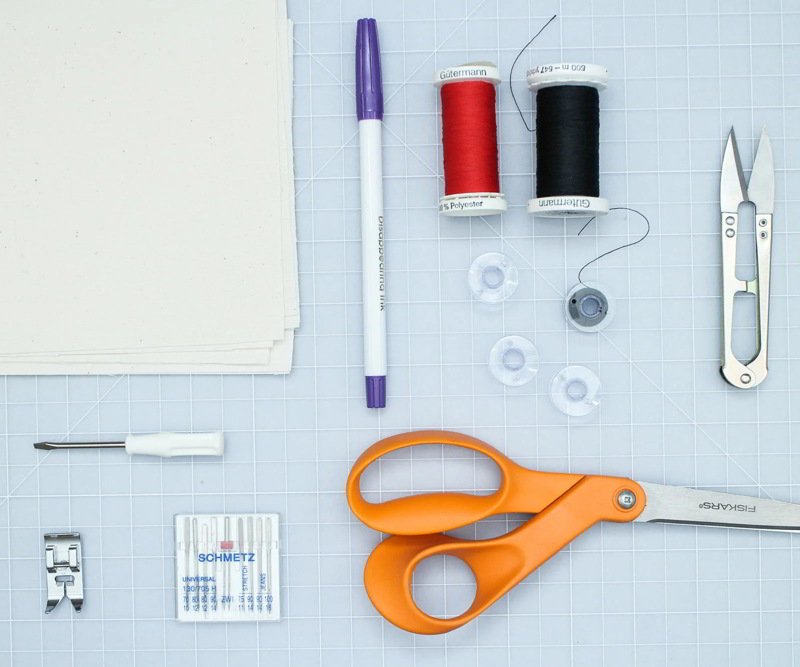
2. Essential tools and materials for sewing zippers
Having the right tools on hand streamlines the process and produces better results:
- Sewing machine: Provides consistent stitching.
- Zipper foot: A specialized presser foot designed to sew close to the zipper teeth.
- Invisible zipper foot: Specifically designed for installing invisible zippers.
- Pins: Hold the zipper and fabric in place during sewing.
- Scissors: For cutting fabric and thread.
- Seam ripper: Used to remove stitches if needed.
- Iron: Essential for pressing fabric and setting seams.
- Pressing cloth: Protects delicate fabrics from direct heat.
- Measuring tape: Ensures accurate measurements.
- Thread: Choose a thread that matches your fabric and zipper.
- Fabric tape: Helps secure and hold fabric better.
- Tailor’s chalk: For marking fabric.
3. Preparing your fabric and zipper
Proper preparation is crucial for success when sewing zippers. Prepping helps prevent issues like puckering and misalignment.
3.1 Pre-shrinking fabric and zipper (if necessary)
Some fabrics, especially natural fibers like cotton, may shrink after washing. Pre-shrinking the fabric and zipper (if it’s also made of a natural fiber) before sewing prevents distortion later. Wash and dry the fabric as you would the finished item. For zippers, you can hand wash them in warm water and let them air dry.
3.2 Marking seam allowances
Accurate seam allowances are essential for a well-fitting zipper. Use tailor’s chalk or a fabric marker to mark the seam allowance on the wrong side of the fabric. The standard seam allowance for zippers is typically 5/8 inch (1.6 cm), but always refer to your pattern’s instructions.
3.3 Interfacing (for lightweight fabrics)
Lightweight fabrics may require interfacing to provide additional stability and prevent the zipper from stretching the fabric. Apply a strip of fusible interfacing to the wrong side of the fabric along the seam allowance where the zipper will be attached.
4. Sewing a basic centered zipper (step-by-step)
The centered zipper application is a versatile and commonly used method. It’s suitable for various projects, including skirts, dresses, and bags.
4.1 Basting the seam
Basting is a temporary stitching technique used to hold fabric layers together before sewing the final seam. Set your sewing machine to a long stitch length (around 4-5 mm). With right sides together, baste the fabric pieces together along the seam line where the zipper will be inserted, leaving an opening for the zipper length.
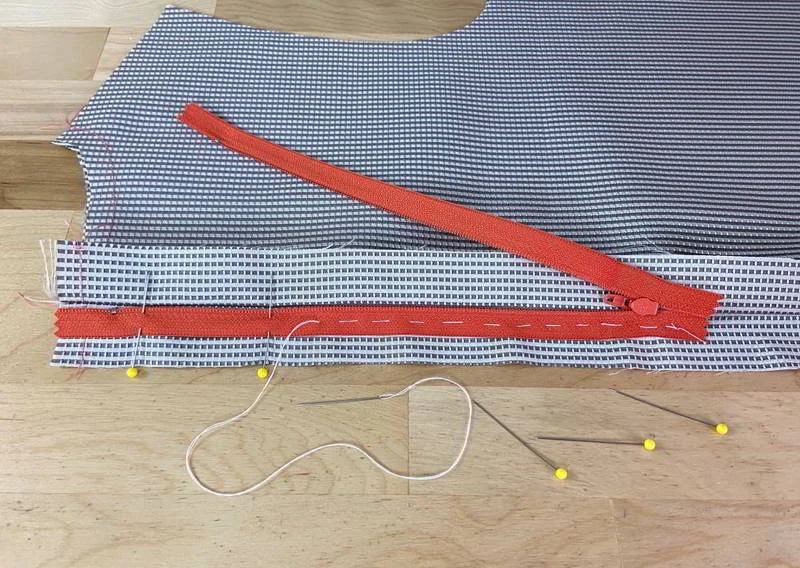
4.2 Positioning and pinning the zipper
Place the zipper face down on the seam allowance, centering it over the basted seam. The zipper teeth should align with the seam line. Pin the zipper tape to the seam allowance, ensuring it’s securely held in place.
4.3 Sewing the first side of the zipper
Attach the zipper foot to your sewing machine. Position the needle close to the zipper teeth. Begin sewing along one side of the zipper tape, starting from the top and stitching down to the bottom stop. Backstitch at the beginning and end to secure the stitching.
4.4 Sewing the second side of the zipper
Repeat the process for the other side of the zipper, ensuring that the zipper remains aligned with the seam line. Sew from top to bottom, backstitching at both ends.
4.5 Topstitching (optional but recommended)
Topstitching adds a professional finish and provides extra strength to the zipper installation. It involves stitching along the fabric close to the zipper opening. Use a slightly longer stitch length for topstitching.
4.6 Removing basting stitches
Once the zipper is securely sewn, carefully remove the basting stitches using a seam ripper.
5. Sewing an invisible zipper (step-by-step)
Invisible zippers create a clean, seamless finish, perfect for formal wear or any project where you want the zipper to be concealed.
5.1 Preparing the fabric and zipper
Unlike regular zippers, invisible zippers are sewn into an open seam. Press the zipper tape flat, and gently curl the teeth away from the tape with your fingers. This makes it easier to stitch close to the teeth.
5.2 Pinning the zipper
With the right sides of the fabric together, place one side of the open zipper face down on the seam allowance. The zipper teeth should align with the seam line. Pin the zipper tape in place.
5.3 Sewing the first side
Attach the invisible zipper foot to your sewing machine. This foot has grooves that guide the zipper teeth, allowing you to stitch very close to them. Sew along the first side of the zipper, starting from the top and stitching down to the bottom stop.

5.4 Sewing the second side
Repeat the process for the other side of the zipper, ensuring the zipper is not twisted. Align the teeth with the seam line and sew from top to bottom.
5.5 Stitching below the zipper stop
After sewing both sides of the zipper tape, switch back to a regular zipper foot. Close the zipper and stitch the remaining seam allowance below the zipper stop, getting as close to the stop as possible.
5.6 Removing basting stitches (if used)
If you used basting stitches to hold the fabric together initially, remove them now with a seam ripper.
6. Troubleshooting common zipper problems
Even experienced sewists encounter zipper problems. Here are some common issues and their solutions:
- Zipper won’t zip: Check for any thread or fabric caught in the teeth. If the slider is damaged, it may need to be replaced.
- Thread caught in zipper: Carefully remove the thread using a seam ripper or tweezers.
- Fabric caught in zipper: Gently pull the fabric away from the zipper teeth while wiggling the slider.
- Bent tooth: Use pliers to carefully straighten a bent tooth.
- Puckering: Ensure the fabric is properly interfaced and that the tension is correct.
- Misaligned zipper: Unpick the stitching and re-sew the zipper, paying close attention to alignment.
- Zipper pull comes off: Try to thread it back on using pliers, or replace with a new one.
- Stitches showing: Ensure your stitching is close enough to the zipper teeth (but not catching on them). Use a smaller stitch length if needed.
7. Advanced zipper techniques
Once you’ve mastered the basics, you can explore more advanced techniques:
- Sewing zippers on a curved seam: This requires careful clipping and easing of the fabric.
- Lapped zipper: A technique where one side of the fabric overlaps the zipper, creating a more concealed finish.
- Fly front zipper: Commonly used in trousers and jeans, this technique involves creating a placket to conceal the zipper.
8. Related questions
8.1 Can I hand-sew a zipper?
Yes, zippers can be hand-sewn, but it requires patience and precision. A backstitch is recommended for strength.
8.2 How do I shorten a zipper?
You can shorten a zipper from the top by creating new top stops using thread or metal zipper stops.
8.3 How do I replace a zipper?
Remove the old zipper by unpicking the stitches. Then, install the new zipper using the appropriate method (centered, invisible, etc.).
8.4 Can I sew a zipper into knit fabrics?
Yes, but use a stretch needle and a zigzag stitch to prevent the fabric from stretching. Stabilize the seam with interfacing.
Read more:
Mastering zipper installation opens up a world of possibilities in your sewing projects. This guide has covered the essentials, from choosing the right zipper and preparing your fabric to sewing different types of zippers and troubleshooting common problems. With practice and patience, you’ll be able to confidently tackle any project that requires a zipper. Don’t be afraid to experiment and continue learning.


