


Iron-On Rhinestones: Add Durable Sparkle and Value Easily


Elevate your apparel line with dazzling, durable embellishments. This guide teaches you exactly how to iron on rhinestone patches for professional results, boosting garment appeal and value. Learn to identify quality patches, properly test fabric heat tolerance, and gather the essential supplies.
Master the step-by-step application process using either a household iron or heat press, emphasizing crucial details like surface prep, pressure, and the vital cooling/peeling technique. Troubleshoot common issues like stones not sticking or scorched fabric, and understand proper washing care to ensure long-lasting sparkle. Add value and eye-catching detail to your clothing efficiently.
1. Why choose iron-on rhinestones for your apparel line?
Iron-on rhinestones offer a straightforward way to elevate apparel, adding a distinct sparkle effect that catches the eye and can significantly increase the perceived value of clothing items. For small businesses, especially those starting or managing diverse inventory, this method of garment embellishment provides notable efficiency.
Unlike screen printing or embroidery, which often require larger minimum orders or complex setups for varied designs, rhinestone patches allow for easy apparel customization on smaller batches or even individual pieces.
This flexibility is key for offering personalized options or testing different styles without significant upfront investment. Applying rhinestone patches is relatively quick, enabling businesses to respond faster to trends or customer requests for unique clothing customization.
The visual impact is immediate, transforming basic garments into more fashionable and desirable products with minimal additional labor compared to other techniques.

1.1 Identifying well-made rhinestone patches
When sourcing rhinestone patch supplies, certain visual and tactile cues indicate quality. Look closely at the arrangement of the stones; they should be evenly spaced without noticeable gaps or crowding. The rhinestone elements themselves ought to appear clear and bright, reflecting light well, rather than looking cloudy or dull.
A high standard, sometimes benchmarked against names like Preciosa crystal quality (a known brand indicating good clarity and cut), suggests better visual appeal.
Check that each stone is securely attached to the clear transfer film (the sticky plastic sheet holding the design). The adhesive backing on the transfer film is also important; gently touch the sticky side (where the stones are). The adhesive should feel consistently tacky across the entire surface, not overly gooey, dry, or patchy, as this ensures proper transfer to the fabric. Finally, understand the difference between options:
- Pre-made patches: These are ready-to-apply designs, ideal for standard embellishments or quick additions to inventory.
- Customizable patches: These offer the potential to create specific logos, motifs, or text designs, allowing for unique branding or personalized apparel.
1.2 Testing your fabric’s heat tolerance
Before applying any heat-activated embellishment, testing the fabric is a critical step to prevent irreversible damage like scorching, melting, or creating unwanted shine on the garment. Start by checking the garment care label symbols for ironing recommendations; these provide the manufacturer’s guidance on heat tolerance.
If the label is missing or unclear, perform a patch test. Choose an inconspicuous area of the garment, such as an inside hem, a seam allowance, or use a scrap piece of the identical material if available. Set your iron according to the suspected fabric type, but always start lower if unsure.
Place a protective sheet (like parchment paper) over the test spot and apply heat briefly (a few seconds). Check the fabric immediately for any signs of damage. Cotton fabric suitability is generally high, tolerating more heat, whereas synthetic materials require more caution.
Be particularly mindful of polyester blend precautions; these fabrics melt or develop a shine at lower temperatures. This testing process is fundamental for a reason—it protects your valuable inventory from damage.
2. Gathering your tools and materials
Ensure you have all necessary craft supplies and DIY project supplies ready before starting the application process. This preparation streamlines the workflow for efficient garment decoration methods.
- Rhinestone patches: Your chosen designs.
- Heat source: Either a household iron or a dedicated heat press.
- Parchment paper: Essential for protecting both the patch and your heat source. Note: Do not use wax paper, as the wax can melt onto the garment. Alternatives like a Teflon sheet are also commonly used.
- Firm, flat surface: Crucial for even pressure. An ironing board might have too much padding or give; a sturdy table covered with a thin, heat-resistant pad or cloth is often better.
- Garment/fabric item: The clothing piece you are embellishing.
- (Optional) Thin cardstock or Teflon sheet: For placing inside the garment layers.
- (Optional) Scissors: If trimming the transfer film is needed.
Your choice between an iron or heat press will determine the primary application method.
2.1 Clean and dry is non-negotiable
For the hotfix rhinestones (stones with pre-applied heat-activated glue) to create a strong, lasting adhesive bond, the fabric surface must be clean and free of any substances that could interfere. Sizing agents, fabric softeners, oils from handling, or even dust can weaken the adhesive’s grip.
Ideally, garments should be washed (without using fabric softener) and thoroughly dried before application. This step is particularly important for items intended for sale, ensuring better adhesion reliability from the start.
2.2 Achieving a smooth surface
Wrinkles or creases on the fabric create an uneven surface. This unevenness prevents the patch’s adhesive from making full, uniform contact with the material during the heating process, potentially leading to poor adhesion in certain spots.
Before patch placement, take a moment to pre-press the specific area where the patch will go. A few seconds under the heat source (with appropriate temperature and protection) will remove residual moisture and smooth out any wrinkles, creating the ideal flat surface for application.
2.3 Protecting your garment layers
When applying heat and pressure, the adhesive on the back of the rhinestones melts to bond with the fabric. There’s a possibility, especially with thinner fabrics or higher heat, that some melted adhesive could seep through the garment’s top layer.
To prevent the front and back layers of the garment from sticking together, place a protective barrier inside the item, directly underneath the application area. A piece of standard paper, thin cardstock, or a reusable Teflon sheet works well for this purpose.

2.4 Positioning your rhinestone patch
Accurate placement is key to the final look. Follow these steps carefully:
- Gently peel the white or opaque backing paper away from the clear transfer film (the sticky plastic sheet). Work slowly to ensure all rhinestones remain adhered to the clear film.
- The rhinestone elements should now be exposed on the sticky side of the clear transfer film.
- Carefully position the clear film onto the prepped fabric area. The sticky side with the stones goes down against the fabric, meaning the shiny side facing upwards (the top of the rhinestones) is visible through the clear film.
- Press the film down lightly with your hand to temporarily secure its position. Check the alignment and overall placement. At this stage, before heat is applied, the film can usually be lifted carefully and repositioned if necessary for the perfect rhinestone transfer.
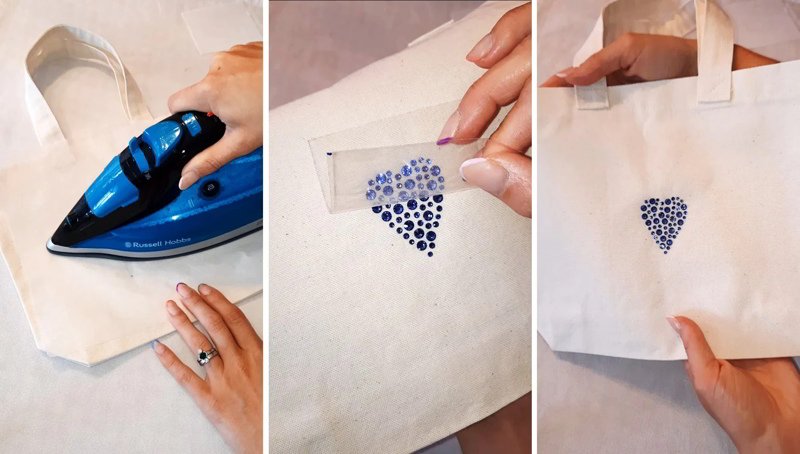
2.5 Applying with a household iron
Using a household iron requires careful attention to achieve good results.
- Settings: Set the iron to medium-high heat. This often corresponds to the cotton or wool setting (typically around 320-350°F / 160-175°C). Crucially, ensure the steam function is turned off (no steam), as steam introduces moisture which interferes with the adhesive.
- Protection: Place a sheet of parchment paper over the clear transfer film before applying the iron to protect both the patch and the iron’s soleplate.
- Pressure & technique: Apply firm, even downward pressure. Press straight down; do not wiggle the iron back and forth like regular ironing, as this can shift the stones or cause uneven heating. Adequate pressure ensures the melted adhesive penetrates the fabric.
- Time: Hold the pressure for the recommended duration, typically 15-30 seconds. Larger stones generally require more time as they need more heat energy to heat through fully.
- Coverage: Since household irons have uneven heat distribution, you must lift the iron completely and reposition it to cover the entire design. Overlap the pressed areas slightly to ensure all stones receive adequate heat and pressure.
2.6 Applying with a heat press
A heat press offers significant advantages for businesses needing consistency, especially for bulk orders.
- Settings: Typical heat press application settings are often around 320-350°F with medium pressure. However, always consult the manual for your specific machine and adjust based on the patch and fabric.
- Protection: Use a Teflon sheet or parchment paper as a protective layer between the heat platen and the transfer film.
- Time: The required application time is generally shorter than with a household iron, around 10-20 seconds, due to the consistent heat and pressure.
- Advantages: The main benefit is the even distribution of heat and pressure across the entire patch simultaneously. This leads to more reliable and consistent results, which is crucial for professional quality control.
2.7 The crucial cooling and peeling step
This step is vital for successful transfer film removal and patch longevity. Allow the patch and surrounding fabric to cool completely to room temperature before attempting to peel off the clear plastic film. Rushing this step is a common mistake.
The cooling period allows the molten adhesive to properly solidify and form a strong bond with the fabric fibers. This is typically a “cold peel” process, meaning it must be cool.
Once cool, begin peeling the clear transfer film away slowly and gently, pulling back at a low angle (almost parallel to the fabric), rather than straight up. Watch carefully as you peel. If you notice any stones lifting or staying attached to the film instead of the fabric, stop peeling immediately.
Carefully lay the film back down exactly where it was. Place your protective sheet (parchment/Teflon) over that specific area and re-press only that section with your iron or heat press for about 5-10 seconds. Let it cool completely again before attempting to peel the film once more.
2.8 Final check & press (optional but recommended)
As an extra quality assurance step, especially after using a household iron, consider a brief final press. Once the clear transfer film is successfully removed, place your protective layer (parchment paper or Teflon sheet) directly over the exposed hotfix rhinestones.
Apply heat (using the same settings) for just 2-5 seconds. This quick final press can help ensure maximum adhesion for any stones that might need a little extra heat bonding. Think of this as sealing the deal for durability.
3. Ensuring longevity: Washing and care instructions
Proper washing care is essential for maintaining the appearance and durability of rhinestone-embellished garments. Providing clear instructions to customers helps manage expectations and preserve the quality of your products. Recommend the following:
- Turn the garment inside-out before washing.
- Use machine wash cold water only. Hot water can weaken the adhesive.
- Select a gentle cycle to minimize agitation.
- Use a mild detergent. No bleach.
- No fabric softener. Fabric softeners contain chemicals that can degrade the patch adhesive over time.
- Crucially: Air dry or hang dry only. Lay flat or hang to dry.
- Do not machine dry. The heat from a tumble dryer can melt the adhesive and cause stones to detach.
- Do not dry clean. The chemicals used in dry cleaning can damage the rhinestones and adhesive.
Following these washing instructions significantly extends the life of the embellishment.
3.1 Stones not sticking / lifting after washing
Patch detachment, either immediately after application or later after washing, usually points to an issue in the application process or subsequent care.
Causes:
- Insufficient heat, application time, or pressure during the initial application.
- Uneven pressure or heat distribution (more common with household irons).
- The fabric type was unsuitable, contained interfering finishes (like water-repellents), or was not properly prepped (cleaned/smoothed).
- Incorrect washing method used (e.g., hot water, harsh cycle, machine drying).
Solutions:
- Review and meticulously follow the recommended application settings (heat, time, pressure) for your specific patch type and equipment.
- Focus on applying firm, consistent pressure across the entire patch area.
- Always test fabric suitability and ensure proper preparation (clean, dry, smooth).
- Reinforce correct washing instructions with the end-user.
- If a specific spot lifts after washing, carefully attempt to re-press only that area following the original method. However, success isn’t guaranteed once the garment has been washed. Adhering strictly to proper washing instructions is the best prevention.
3.2 Scorched fabric or adhesive residue
Seeing scorched fabric or unwanted adhesive residue around the patch area indicates excessive heat or duration issues.
Causes:
- Heat setting on the iron or press was too high for the specific fabric type.
- Iron/press was held in one spot for too long.
Solutions:
- Always test the fabric first to determine its heat tolerance. This is the most effective preventative measure.
- Lower the heat setting to one appropriate for the material being used.
- Always use a protective layer (parchment paper or Teflon sheet) between the heat source and the patch/fabric.
- Reduce the pressing time slightly if testing indicates a scorching risk.
- For minor adhesive residue, careful scraping with a fingernail might work once cool. Specialized adhesive removers should be used with extreme caution and always tested on an inconspicuous area first, as they can damage or discolor certain fabrics.
3.3 Inconsistent results across multiple items
Achieving identical results across a batch of garments can be challenging, particularly when using a household iron.
Causes:
- Difficulty in manually maintaining perfectly consistent pressure application from item to item.
- Natural temperature fluctuations across the soleplate of a household iron.
Solutions:
- Focus on developing a mindful and consistent technique when applying pressure with an iron. Ensure the entire patch area receives adequate dwell time and pressure.
- For businesses requiring reliable batch consistency, investing in a heat press is strongly recommended. A heat press provides uniform heat and pressure, significantly improving consistency and streamlining production.
4. Related questions
4.1 Can I apply rhinestone patches to stretchy fabrics like spandex?
Applying standard iron-on rhinestone patches to very stretchy fabric like spandex or lycra blends is possible but requires caution and may impact durability. These fabrics are often sensitive to heat and can easily scorch or melt, so lower temperature settings and shorter pressing times are necessary.
Use minimal pressure. A major consideration is that the rigid rhinestone patch will not stretch along with the fabric. When the fabric stretches during wear, significant stress is placed on the adhesive bond, potentially causing the patch to detach.
Application is best suited for areas of the garment with minimal stretch. Thorough testing on scrap fabric is absolutely essential before applying to finished garments.
4.2 What if a few rhinestones come off after washing? Can they be reattached?
Occasionally, individual rhinestones might detach. Reattaching single stones with an iron is often ineffective.
A more practical solution is to use a strong, clear-drying fabric glue specifically designed for bonding non-porous materials to fabric (like E6000 or Gem-Tac). Apply a tiny dot of glue to the fabric where the stone was, then carefully place the rhinestone using tweezers.
Allow the glue to cure fully according to its instructions. Reinforcing proper washing techniques remains the best way to minimize stone loss.
4.3 Is a special mini iron better for small patches or detailed areas?
Mini craft irons can seem appealing for small patches but often lack precise temperature control and make it difficult to apply the firm, even pressure needed for a durable bond. While they offer maneuverability, for professional results, a standard household iron or a heat press provides more reliable temperature accuracy and pressure distribution, leading to a better, longer-lasting adhesive bond.
Read more:
Mastering the application technique – from careful preparation and using the correct settings to applying adequate pressure and allowing for complete cooling – is the crucial factor distinguishing a temporary decoration from a professional, durable embellishment.
Well-applied iron-on rhinestone patches serve as a visually appealing and cost-effective tool for clothing businesses aiming to enhance brand identity and add visual interest to their apparel lines.
While the process requires attention to detail, practice leads to proficiency. Embracing this method can effectively elevate your apparel offerings. For sourcing quality patches or exploring customizable options tailored to your brand, resources dedicated to garment finishing supplies can offer specialized support.


