


Iron On Chenille Patches: Get Lasting Results Safely


Chenille patches, with their distinct fuzzy texture, offer a popular way to customize apparel and accessories. However, successfully applying these unique adornments using a household iron requires careful technique to ensure a strong bond without damaging the patch or the garment.
Many apparel businesses and DIY enthusiasts seek guidance on how to safely achieve lasting results, concerned about potential issues like poor adhesion, fabric incompatibility, or melting the chenille fibers. This expert guide provides clear, step-by-step instructions covering essential preparation, the ironing process, crucial precautions, and alternative methods.
By following these steps, you can confidently apply chenille patches using the iron-on method, achieving professional-looking garment customization and understanding the trade-offs in durability.
1. Understanding chenille patches and the iron-on process
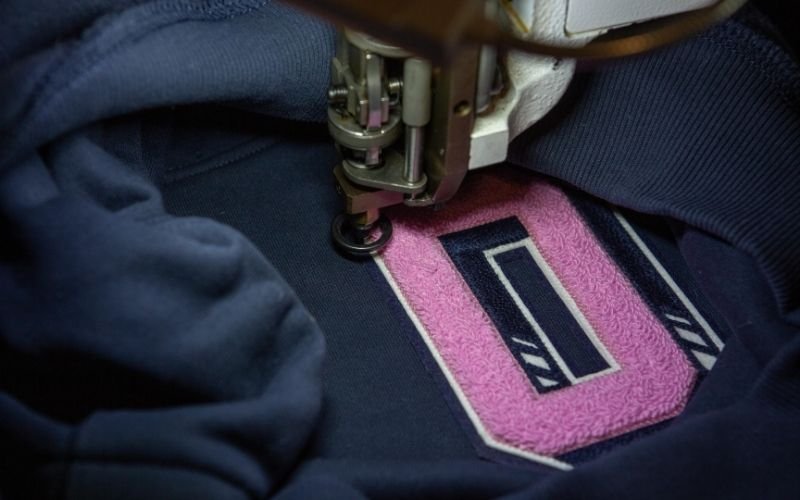
Chenille patches derive their characteristic look from looped chenille yarn, which creates a soft, fuzzy, and raised texture. This unique construction also makes them susceptible to damage from direct high heat, which can cause the delicate fibers to melt or flatten.
Most iron-on patches come with a backing layer coated with a heat-activated adhesive. The fundamental principle of the adhesion method is simple: applying sufficient heat and pressure activates this iron-on adhesive, causing it to melt slightly and bond with the fabric fibers upon cooling.
Keep in mind that patch quality and the specific type of adhesive used can influence the bonding strength and required application parameters. While ironing offers convenience, setting realistic expectations about its durability compared to other methods is important.

Chenille patches derive their characteristic look from looped chenille yarn, which creates a soft, fuzzy, and raised texture
2. Essential preparations: setting up for success
2.1. Check your fabric first: the foundation of good adhesion
Confirming fabric compatibility is a critical first step. Attempting to iron a patch onto an unsuitable material will likely result in poor adhesion or damage to the garment due to heat sensitivity. Different fabrics react differently to heat, and texture can also affect how well the adhesive bonds.
- Suitable fabrics: Generally include Cotton, Denim, Canvas, and stable Polyester blends that can tolerate medium-high heat.
- Unsuitable fabrics: Typically include heat-sensitive materials like Nylon, Rayon, Silk, Leather (both real and faux), Vinyl, fabrics with special water-resistant or performance coatings, and very stretchy materials (like spandex/elastane) which may distort or melt under the iron.
Always check the garment care label for fabric content information and any specific warnings about ironing temperature. If unsure, it’s best to err on the side of caution or choose an alternative application method.
| Suitable fabrics | Unsuitable fabrics |
|---|---|
| Cotton | Nylon |
| Denim | Rayon / Viscose |
| Canvas | Silk |
| Stable Polyester Blends | Leather / Faux Leather Vinyl Fabrics with Special Coatings Very Stretchy Fabrics (e.g., Spandex) Delicate Fabrics (e.g., Velvet, Corduroy) |

2.2. Gather your supplies for the task
Ensure you have the following items ready before you begin:
- Chenille patch: With iron-on backing.
- Garment: Clean, dry, and made of a compatible fabric.
- Household iron: With adjustable temperature settings and the ability to disable steam.
- Flat, heat-resistant surface: An ironing board is ideal. Avoid surfaces that could be damaged by heat or pressure.
- Protective cloth: A thin, plain cotton cloth like a tea towel, pillowcase scrap, or piece of parchment paper (baking paper). Avoid printed or textured cloths.
- Optional: Scissors: For trimming any stray threads before application.
2.3. Prepare your garment: smooth and ready
The garment must be clean (consider a pre-wash for new items prone to shrinking, like 100% cotton) and completely dry. Iron the area where you plan to apply the patch until it is perfectly smooth and wrinkle-free. Any creases or unevenness on the flat surface will prevent the adhesive from making full contact, compromising the adhesion quality when pressure is applied.
2.4. Plan your placement: measure twice, iron once
Decide on the exact patch placement before turning on the iron. Once heat is applied, repositioning the patch can be difficult and may damage the garment or the patch adhesive. Lay the patch on the garment, check its alignment visually, and consider the overall aesthetic.
Use a ruler for precision or temporarily secure the position with pins placed well outside the patch area if needed. This careful planning ensures the patch is exactly where you want it.
3. Step-by-step: safely ironing on your chenille patch
3.1. Step 1: Set your iron correctly – heat without harm
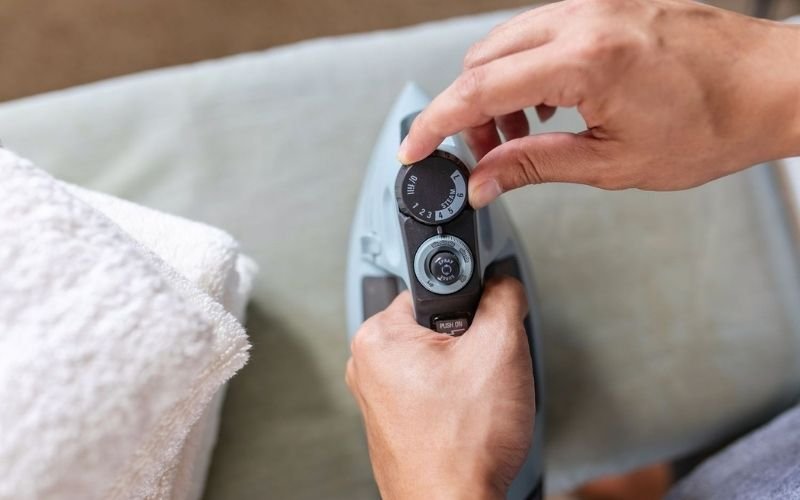
Preheat your iron to a medium-high setting, often indicated as “Cotton” (approximately 300-320°F / 150-160°C). Crucially, ensure the steam function is turned OFF. Steam introduces moisture that can interfere with the adhesive.
Steam introduces moisture which can interfere with the adhesive and potentially damage the chenille. If you are uncertain about your iron’s specific heat output or the fabric’s tolerance, start with a slightly lower setting and increase if necessary after testing. Avoid using the absolute highest setting initially.
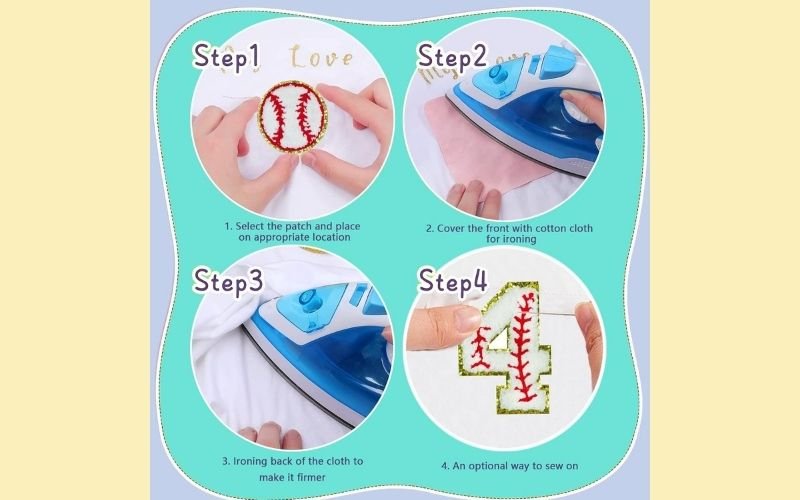
3.2. Step 2: Position the patch – adhesive side down
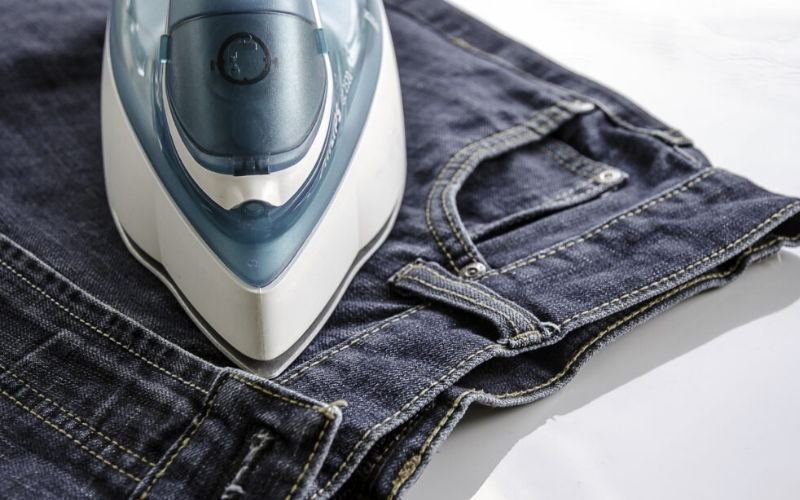
Carefully place the patch onto the pre-determined spot, ensuring the adhesive side (the flatter backing) is in direct contact with the garment.
3.3. Step 3: Use a protective barrier – shield the Chenille
This step is essential for preventing damage. Place your thin cotton cloth (or parchment paper) completely over the patch, creating a protective barrier between the iron and the patch surface. This layer shields the delicate chenille yarn from direct heat, preventing the fibers from melting, scorching, or flattening, thus helping to protect chenille yarn and prevent yarn burning.
3.4. Step 4: Apply heat and firm pressure – activate the bond
Press the fully heated iron firmly straight down onto the protective cloth. Hold steady with firm pressure for 10-15 seconds. Do NOT move the iron back and forth. This combination of heat and pressure activates the adhesive.
3.5. Step 5: Check adhesion & allow cooling – patience pays off
Carefully lift the protective cloth. Visually inspect the edges of the patch. You can gently try to lift an edge with a fingernail – do this cautiously. If you notice any patch lifting, replace the protective cloth and press firmly with the iron again for another 5-10 seconds, concentrating pressure on the area that didn’t adhere.
Once satisfied, leave the garment flat and allow the patch and surrounding fabric to cool down completely (this might take several minutes). The adhesive bond truly sets and strengthens during this cooling phase. Resist the urge to handle or flex the area while it’s still warm.
3.6. Step 6: Reinforce from the inside – lock it in (highly recommended)
For a more secure bond, reinforcing from the back is advisable. Once the garment has completely cooled, turn it inside out. Locate the area on the fabric directly behind where the patch is applied. Place the protective cloth over this area (optional here, but safer for the garment fabric) and press the hot iron firmly onto the fabric behind the patch for another 10-15 seconds.
This helps the melted adhesive further penetrate the garment fibers, improving the overall bond. Allow the garment to cool completely once more before handling.
4. Pro tips for flawless application & troubleshooting
4.1. Handling edges that won’t stick
If, after cooling, you find patch edges lifting, this is a common troubleshooting issue. Carefully place the protective cloth back over the patch. Using the tip of your iron, apply firm pressure specifically to the lifted edge for short bursts (5-10 seconds). Be cautious not to apply excessive heat to the center of the patch which has already adhered, as this could risk heat damage.
4.2. Working with curves or uneven surfaces
Applying patches to non-flat surface areas like sleeves, hats, bags, or curved seams requires ensuring even pressure. You can often achieve this by stuffing the item firmly with a rolled-up towel to create a stable backing. Alternatively, using a sleeve board (a small, narrow ironing board) can provide the necessary support for applying even pressure onto these uneven surfaces and curves.
4.3. The importance of testing (if possible)
Whenever possible, especially if working with an unfamiliar fabric or iron, perform a quick test. Apply the hot iron (with protective cloth) to an inconspicuous inside seam or a matching fabric scrap for the intended duration. This allows you to check the iron temperature’s effect on the fabric before committing to the main application area, helping with heat damage prevention.
5. Durability considerations: iron-on vs sewing vs heat press
5.1. Iron-on application reality
Iron-on application offers significant convenience and speed, making DIY patch ironing accessible without needing sewing skills. However, its primary drawback is durability. The adhesive bond can weaken over time, especially with repeated washing and drying cycles.
Success relies heavily on correct technique and fabric compatibility. If iron-on patches are not sticking, troubleshooting (like the fix mentioned above) might be needed. This method is best suited for items that won’t be subjected to frequent or harsh laundering.
5.2. Sewing application – the gold standard
Sewing provides maximum durability and creates a truly permanent attachment. Sewing application ensures a stronger hold that withstands washing and wear far better than adhesive alone. Crucially, sewing also helps preserve patch texture as there’s no risk of heat damage to delicate chenille fibers.
This method works on virtually any fabric, including heat-sensitive materials like leather. For items expected to endure significant wear, such as varsity jackets or letterman patches, sewing around the edges (even after initially ironing the patch on for placement) is strongly recommended. A simple running stitch or zigzag stitch using strong thread is usually sufficient.
5.3. Heat press application – consistency for batches
A heat press application offers a professional alternative, particularly beneficial for businesses applying multiple patches. Heat presses deliver precisely controlled temperature and even pressure across the entire patch surface, often resulting in a more consistent and potentially stronger bond compared to a household iron.
Using a heat press is more efficient for producing batches of customized garments. However, the downside is the initial investment in the machine and the need to understand the correct settings (time, temperature, pressure) specifically for chenille patches to avoid damage while ensuring proper adhesion and consistency.
Read more: Heat Press Iron-On Patches: Business Quality Guide
6. Caring for garments with ironed-on Chenille patches
Proper care is essential to maximize the lifespan of your ironed-on chenille patch. Follow these guidelines:
- Turn garment inside out: Always turn the garment inside out before washing to protect the patch surface from abrasion.
- Use gentle cycle & cold water: Wash on a gentle cycle using cold water wash settings. Hot water can accelerate adhesive degradation.
- Use mild detergent: Opt for a mild laundry detergent. Avoid bleach and fabric softeners, as these chemicals can weaken the adhesive bond.
- Air dry preferred: Air dry the garment by laying it flat or hanging it. This is the best way to preserve the adhesive. If tumble drying is absolutely necessary, use the lowest heat setting possible, but be aware that any heat can potentially shorten the patch’s lifespan.
- Never iron directly: Do not iron directly over the applied chenille patch again after the initial application. If the garment needs ironing, iron around the patch or from the inside (if absolutely necessary, using a protective cloth and low heat).
7. Related questions
7.1. Can I iron chenille patches onto hoodies or sweatshirts?
Yes, you generally can apply chenille patches to hoodies and sweatshirts, provided the fabric can tolerate the necessary heat. Check the care label; cotton and polyester blends are usually suitable. Due to the thicker nature of these garments, you might need to apply slightly more pressure or extend the pressing time by a few seconds. Always follow the main guide’s steps carefully, including using a protective cloth.
7.2. What do I do if my chenille patch starts peeling off after washing?
If a patch starts peeling off, especially after washing, the adhesive bond has likely weakened. You can attempt re-applying heat carefully: turn the garment inside out, place a protective cloth over the area behind the patch, and press with a medium-hot iron for 10-15 seconds. Allow it to cool completely. However, the most reliable and permanent fix at this stage is sewing down the edges of the patch to secure it mechanically.
7.3. Do I need to pre-wash the garment before applying the patch?
Pre-wash is recommended, particularly for new garments made of 100% cotton or other materials prone to shrinkage. Washing and drying the garment first prevents potential puckering around the patch if the fabric shrinks after the patch has been applied. Ensure the garment is completely dry before starting the application process.
7.4. How is applying a chenille varsity letter patch different?
The basic patch application method (heat, pressure, protective cloth) remains the same for varsity letter patches. However, their larger size and sometimes intricate shapes can present challenges in ensuring even heat and pressure across the entire surface.
You might need to press larger letters in sections, slightly overlapping the pressed areas, ensuring the entire adhesive area receives adequate heat. Given their typical placement on jackets subject to wear and their size, sewing is very common and highly recommended for varsity letters to ensure long-term durability.
Read more:
Successfully applying iron-on chenille patches hinges on careful preparation and precise execution. Remembering the critical elements – checking fabric compatibility, always using a protective cloth, setting the correct iron temperature without steam, applying firm pressure without moving the iron, and allowing adequate cooling time – will significantly increase your chances of success.
While ironing offers convenience, understand the trade-off with durability compared to sewing, which remains the most secure method for long-lasting garment customization. With attention to detail, you can achieve excellent, professional-looking results.
For businesses seeking expert advice on sourcing high-quality custom chenille patches or exploring wholesale options for garment decoration needs, further consultation can provide tailored solutions.


