


Ironing Instructions: Pro Garment Care And Settings


Getting clothes perfectly wrinkle-free can feel like a challenge, whether you’re a small apparel business owner needing impeccable presentation or simply someone wanting to keep their wardrobe looking sharp. Many struggle with common ironing mishaps – accidentally scorching delicate fabrics, leaving unwanted shine on darks, feeling confused by cryptic care label symbols, or simply not achieving that truly crisp, professional finish efficiently.
Incorrect techniques not only waste time but can permanently damage garments, leading to replacement costs and frustration. For businesses, inconsistent presentation can even impact brand perception. This guide provides practical ironing instructions to elevate your garment care routine.
1. Why proper ironing matters?
Effective ironing does more than just smooth out creases; achieving a crisp, smooth appearance is fundamental to professional presentation. For apparel businesses, consistently well-pressed garments communicate quality and attention to detail, enhancing brand image. For individuals, wrinkle-free clothing contributes significantly to looking put-together and making a positive impression in both personal and professional settings.
Beyond aesthetics, proper garment care through ironing contributes to clothing maintenance. Applying the correct heat and technique acts as a crucial fabric treatment, helping fibers relax and return to their intended shape, thus preserving the garment’s structure and fit over time. This careful handling extends the lifespan of clothes, protecting your investment or your business’s inventory.
Ultimately, taking the time to iron correctly fosters a sense of preparedness and boosts confidence. Wearing clothes that look sharp and well-maintained reflects care and competence, allowing you to present your best self – or your brand’s best image – to the world.
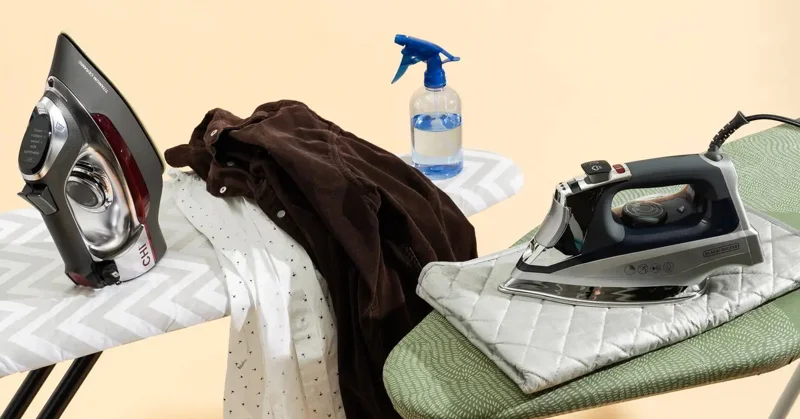
1.1 Your ironing toolkit
Having the right laundry equipment makes ironing easier and more effective. These are the laundry care basics you’ll need:
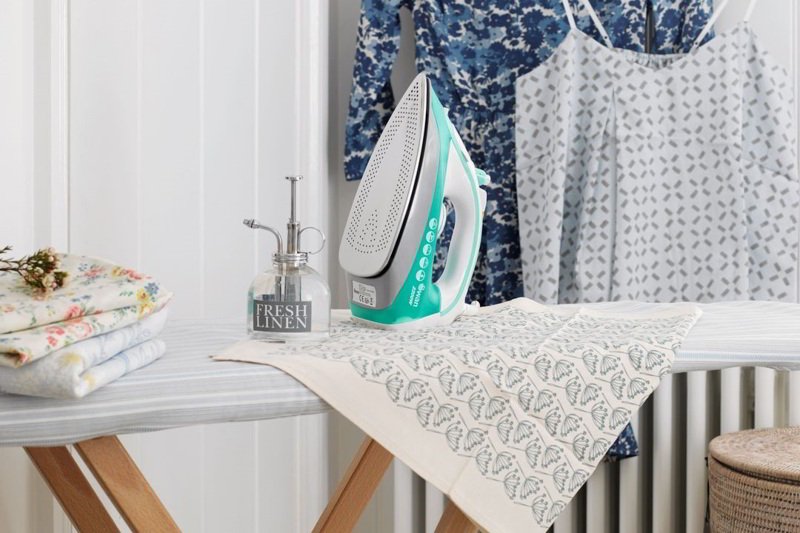
- Iron: Choose between a dry iron or a steam iron. Steam irons offer enhanced steam functionality, which helps relax fabric fibers for easier wrinkle prevention and removal, especially on natural fabrics.
- Ironing board/surface: A sturdy ironing board provides a stable, padded, and heat-resistant surface specifically designed for ironing. If a board isn’t available, a thick towel placed on a flat, heat-proof surface can work in a pinch, but use extreme caution as heat can transfer through the towel and potentially damage the surface underneath or pose a fire risk.
- Spray bottle: Useful for adding moisture to fabrics, keeping them slightly damp if they’ve dried too much before ironing. This aids significantly in smoothing out stubborn wrinkles.
- Pressing cloth: A piece of clean, lint-free cotton fabric (like a handkerchief or pillowcase) placed between the iron and the garment. This is crucial to protect fabric, especially delicates, dark colors, and items with embellishments.
- Water: While tap water can be used, distilled or demineralized water is often recommended. Tap water contains minerals that can build up inside the iron over time (limescale), clogging steam vents and potentially causing spitting or staining. Using distilled water helps maintain your iron’s performance and longevity.
- Clothes hangers: Have hangers ready immediately after ironing items like shirts, pants, and dresses. Hanging them promptly helps prevent new wrinkles from forming as the fabric cools and sets.
1.2 Decoding care labels
Understanding the garment care labels is essential for preventing heat damage. These universal icons provide clear ironing instructions. Look for the simple outline of an iron – this symbol indicates the item can be ironed.
The dots inside the iron symbol specify the recommended heat level or temperature settings:
- One dot: Indicates low heat (approximately 110°C / 230°F). Use this setting for delicate synthetics like acrylic, nylon, acetate, and also for silk.
- Two dots: Signifies medium heat (around 150°C / 300°F). This setting is generally suitable for polyester, wool, and rayon blends.
- Three dots: Represents high heat (roughly 200°C / 390°F). This is reserved for robust natural fibers like cotton and linen, which often require higher temperatures to remove wrinkles effectively.
A crossed-out iron symbol means “do not iron.” Attempting to iron these items can cause irreversible damage, such as melting or permanent distortion. Always adhere to these care label symbols for proper garment care; they serve as a reliable fabric types guide for selecting the correct heat settings chart on your iron.
1.3 Smart sorting
Before you begin ironing, sorting your laundry according to fabric types can significantly streamline the process and prevent accidental damage. Since different materials require different temperature settings, grouping similar items together allows you to work more efficiently. Start with garments needing the coolest setting (low heat) first.
As the iron heats up, you can progress to items requiring medium, and finally, high heat. This systematic approach not only saves time by eliminating the need to constantly adjust the temperature up and down (and wait for the iron to cool) but also acts as a safety measure, reducing the risk of scorching a delicate fabric with an iron that’s too hot. Consider your care labels the ultimate fabric types guide for this sorting step.
2. Core ironing techniques for best results
Mastering a few fundamental techniques can dramatically improve your ironing results and protect your garments. Here are key principles to keep in mind:
- Iron while slightly damp: Ironing damp fabric is often more effective than ironing completely dry clothes. The moisture helps relax the fibers, making them more pliable and easier to smooth out wrinkles. If clothes are too dry, use a spray bottle to lightly mist them before ironing.
- Iron inside out: This is particularly important for dark colors, delicate fabrics like silk, and items with prints or embellishments. Ironing inside out helps prevent fabric shine (a common issue on dark synthetics or wool) and protects surface details from direct heat.
- Use steam effectively (steam ironing techniques): Steam adds moisture and heat, making it highly effective for removing stubborn wrinkles, especially on natural fibers like cotton and linen. Use the steam function according to your iron’s settings, ensuring the water tank is filled (preferably with distilled water). Avoid excessive steam on delicate fabrics like silk, which can sometimes cause water spots.
- Pressing vs. gliding (ironing techniques): Understand the difference between these two motions. Gliding involves moving the iron smoothly back and forth across large, flat areas of fabric. Pressing is an up-and-down motion where you lift the iron and place it onto an area (like a seam, collar, cuff, or pleat) for a few seconds before lifting and moving to the next spot. Pressing sets details crisply and is gentler on fabrics prone to stretching.
- Start cool: If you’re ever unsure about the correct temperature setting for a garment (and the care label is missing or unclear), always start with low heat. You can gradually increase the temperature if needed. Beginning with a cooler setting minimizes the risk of scorching or melting the fabric if you accidentally overestimate the required heat.
2.1 How to iron a dress shirt perfectly
Achieving a crisp, professional look for a dress shirt involves a systematic approach. Follow these steps for the best ironing techniques on this common clothing item: the dress shirt
- Collar: Begin with the collar. Pop it up and iron the underside first, working from the outer points towards the center. Then, flip it over and iron the top side similarly. Fold it down and press the fold gently if desired.
- Cuffs: Unbutton the cuffs. Iron the inside first, then the outside, pressing out any wrinkles. Avoid ironing directly over the buttons; carefully work the tip of the iron around them.
- Sleeves: Lay one sleeve flat on the ironing board, ensuring the fabric is smooth. Iron from the shoulder down towards the cuff. You can iron one side, then flip the sleeve over carefully, keeping the fabric smooth, and iron the other side. Unless you specifically want a crease down the center of the sleeve, try to avoid creating one by repositioning the sleeve as needed.
- Front panels: Iron one front panel at a time. Carefully maneuver the iron around the button area. Pay attention to the placket (the strip where the buttonholes are), ensuring it’s pressed flat.
- Back and yoke: Lay the back of the shirt flat on the board. The yoke (the panel across the shoulders) often benefits from being positioned over the narrow end of the board. Iron the large back area smoothly. If there are pleats below the yoke, press them following their direction. Hang the shirt immediately on a hanger to prevent re-wrinkling.
2.2 How to iron pants and trousers like a pro
Properly ironed pants look sharp and professional. Use these ironing techniques for trousers:
- Pockets: Start by turning the front pockets inside out and pressing them flat. Then, turn them back in. Do the same for back pockets if applicable.
- Waistband and top section: Lay the top portion of the pants flat on the narrow end of the ironing board. Iron the waistband, followed by the area around the zipper, fly, and any pleats. Rotate the pants as needed to cover the entire top section smoothly.
- Legs (one at a time): Lay one pants leg flat on the board. If the pants have a seam on both the inside and outside, try to align these seams carefully so the leg lies perfectly flat. Iron the leg from the top down to the hem. Flip the leg over, keeping the seams aligned, and iron the other side. Repeat for the second leg.
- Crease (optional): To create a sharp center crease, carefully fold the leg along the desired crease line (often aligned with pleats at the top, or simply folded so the inseam and outseam meet). Press firmly along the fold from thigh to hem. If you prefer no crease, ensure you iron the leg completely flat without creating a fold line. Hang the pants immediately, usually by folding them over a hanger along the crease lines or using a clamp hanger on the waistband.
2.3 Ironing skirts and dresses with care
The approach to ironing skirts and dresses can vary greatly depending on their style and fabric. However, applying systematic ironing techniques helps manage different designs:
Start by ironing from the bottom hem upwards. This prevents re-wrinkling sections you’ve already smoothed as you move the garment around the board. Tackle the main body sections first, ironing the larger flat areas. Address the waistband or top section last, similar to how you would iron the top of pants.
Pay special attention to details. For pleats, consider using heat-resistant clips to hold them precisely in place while you press them section by section. For gathers or ruffles, use the tip of the iron carefully, working around the fullness rather than flattening it completely. If the dress or skirt has collars or sleeves, iron them using the same methods described for shirts. Always be mindful of the fabric type, especially with potentially delicate fabrics, using appropriate heat and a pressing cloth if necessary.
Cotton & linen
These durable natural fibers generally tolerate high temperature settings, but always double-check the care label first. For best results, iron cotton and linen while still slightly damp, or use plenty of steam. The combination of heat and moisture is highly effective at relaxing the fibers and smoothing out wrinkles characteristic of these fabrics.
Wool
Wool garments require more caution. Use a medium temperature setting. It is crucial to iron wool inside out or, preferably, use a pressing cloth between the iron and the fabric. Direct heat can easily cause scorching or create a permanent shiny appearance by flattening the fabric’s natural texture. Steam can be beneficial for removing wrinkles, but apply it through the pressing cloth.
Silk & satin
These delicate fabrics demand a low temperature setting. It’s best practice to iron silk and satin completely dry or with minimal steam, as excess moisture can sometimes leave water spots. Always iron these fabrics inside out, or without fail, use a clean, dry pressing cloth to protect their lustrous surface from direct heat, which can easily scorch or damage the fine fibers.
Polyester, nylon & synthetics
Handle polyester, nylon, and other synthetic fabrics with care, using low temperature to medium temperature settings. These materials can melt or develop permanent fabric shine if the iron is too hot or left in one spot for too long. Iron quickly and keep the iron moving. If unsure, always start with the lowest possible heat setting and test on an inconspicuous area first.
Fabric blends
When dealing with garments made from a blend of fibers, the cardinal rule is to always check the care label. The label instructions are tailored to the specific blend. If the label is missing or unclear, err on the side of caution: use the temperature setting appropriate for the most heat-sensitive (delicate fabrics) fiber present in the blend. For example, for a cotton-polyester blend, use the lower temperature setting suitable for polyester.
Lace and embellishments
Exercise extreme caution when ironing items with lace or embellishments like beads, sequins, or raised prints. Use the lowest possible temperature setting. Using a pressing cloth is absolutely essential to protect these delicate areas. Never iron directly over beads, sequins, plastic prints, or other raised decorations – carefully iron around them using the tip of the iron. Attempting to iron over such details can melt, dislodge, or damage them and potentially the surrounding fabric.
Fabric ironing quick reference guide
| Fabric Type | Heat Symbol (Dots) | Key Tips |
|---|---|---|
| Cotton | ●●● (High) | Best ironed damp; use plenty of steam. |
| Linen | ●●● (High) | Best ironed damp; use high heat and steam. |
| Wool | ●● (Medium) | Use pressing cloth or iron inside out; steam can help. |
| Silk / Satin | ● (Low) | Use pressing cloth or iron inside out; dry iron or minimal steam (beware water spots). |
| Polyester / Nylon | ● (Low) / ●● (Med) | Use low to medium heat; iron quickly; risk of melting/shine. |
| Synthetics (General) | ● (Low) / ●● (Med) | Check label; use low/medium heat; risk of melting/shine. |
| Blends | Varies (Check Label) | Follow label; if unsure, use setting for most sensitive fiber. |
| Lace / Embellished | ● (Low) | Use pressing cloth always; iron around embellishments; lowest heat. |
3. Troubleshooting common ironing problems
Even with care, you might encounter occasional ironing issues. Here’s how to tackle some common problems:
- Stubborn wrinkles: If wrinkles aren’t budging, first ensure the fabric is sufficiently damp; misting with water can significantly aid wrinkle removal. Utilize your iron’s steam boost function for concentrated power on tough creases. Check that you’re using the correct temperature setting – you might need slightly higher heat if safe for the fabric (always consult the care label). As a last resort for certain fabrics like cotton dress shirts, spray starch can help, but use it sparingly and test on an inconspicuous area first, as buildup can occur on the iron or fabric.
- Preventing/fixing shine: Fabric shine often occurs when ironing dark fabrics, wool, or synthetics directly with too much heat or pressure. The best approach is prevention: always iron these items inside out, use a pressing cloth, and ensure you’re using the appropriate (often lower) temperature setting. If shine has already occurred, sometimes gently dabbing the area with a cloth lightly dampened with white vinegar might help lift the shine on certain fabrics, but always test this in a hidden spot first as it’s not universally effective or suitable.
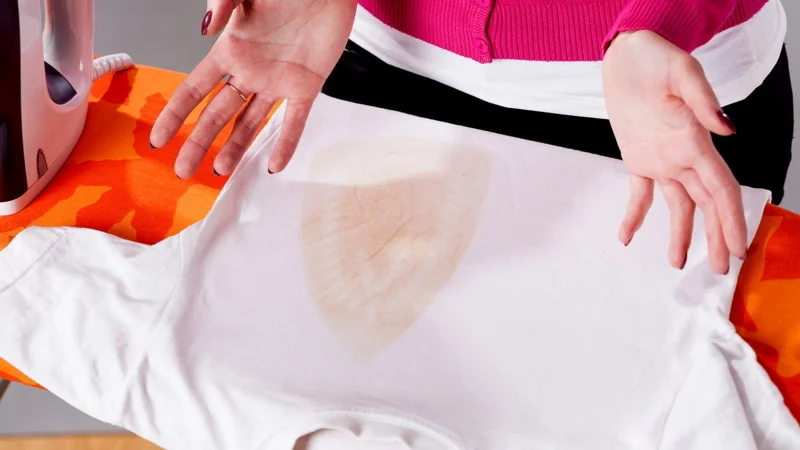
- Scorch marks: Seeing a brown mark means the fabric has been exposed to excessive heat (overheating). Lift the iron immediately! For very light scorches on white cotton or linen, immediate action might offer a slight chance of reduction. Some suggest carefully dabbing with hydrogen peroxide or white vinegar and then rinsing thoroughly (always test on a hidden seam first and proceed with extreme caution). However, be aware that moderate to severe scorch marks represent burned fibers and are typically permanent damage. Prevention by using the correct temperature and a pressing cloth when needed is key.
- Water spots: These spots can be caused by several factors: impurities in tap water being deposited onto the fabric, a dirty iron soleplate transferring residue, or using the steam function when the iron isn’t fully heated, causing water to drip rather than vaporize. To prevent water spots, use distilled or demineralized water in your steam iron, regularly clean iron soleplate according to manufacturer instructions, and ensure the iron reaches the proper temperature before engaging the steam setting.
4. Essential ironing precautions
Following essential safety guidelines is crucial when handling a hot iron to prevent accidents and ensure appliance safety. Adhere to these ironing safety rules:
- Use a stable surface: Always use a proper ironing board designed for the task. Ensure it is set up securely on a level floor and doesn’t wobble. Avoid ironing on beds, floors, or unstable tables.
- Mind the edges: Keep the hot iron away from the edges of the ironing board where it could easily be knocked off.
- Manage the cord: Ensure the iron’s cord is positioned safely to prevent tripping hazards. Keep it clear of walkways and ensure it doesn’t dangle where children or pets could pull on it.
- Never leave unattended: Absolutely never leave a hot iron unattended, even for a moment. If you need to step away, turn off and unplug the iron. Never leave it resting face down on the ironing board or clothing.
- Use the heel rest: When pausing between garments or repositioning clothing, always stand the iron upright on its stable heel rest. This minimizes direct heat contact with the board cover.
- Cool down completely: Allow the iron to cool down fully in a safe, upright position before storing it away. Storing a hot iron can be a fire hazard and damage surfaces.
- Keep away from children and pets: Ensure children and pets are kept well away from the ironing area when the iron is hot or cooling down.
- Regular maintenance: Periodically check the iron’s cord and plug for any signs of wear or damage. Follow the manufacturer’s instructions for cleaning the soleplate and internal components to maintain safe operation.
5. When not to iron & quick alternatives
While ironing is effective for many garments, some materials and items are simply not suited for direct heat and pressure. Fabrics like velvet and corduroy can have their pile crushed and permanently damaged by an iron. Items featuring plastic or rubberized prints, along with heavily sequined or beaded garments, are also generally unsuitable for ironing as the heat can melt or dislodge these elements. Always consult the care label first; if it explicitly prohibits ironing (often shown with a crossed-out iron symbol), follow that instruction diligently.
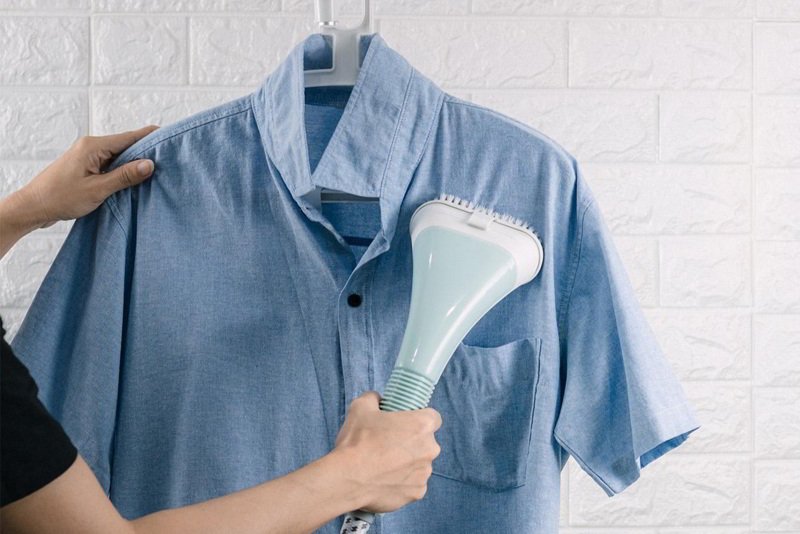
For these heat-sensitive items or when you need a quick wrinkle-release solution, garment steaming offers a valuable alternative. A garment steamer works by relaxing fabric fibers with hot moisture, effectively removing wrinkles without direct contact or pressure.
This makes steaming an excellent choice for delicate fabrics, refreshing clothes between washes, or quickly smoothing out creases on garments while they hang. Consider it a complementary tool in your garment care arsenal, particularly useful for items that cannot withstand traditional ironing.
5.1 How often should I clean my iron and why?
Regularly cleaning your iron, especially the soleplate, is important for maintaining its performance and preventing damage to your clothes. Over time, mineral buildup (limescale) from tap water can clog steam vents, reducing steam output and potentially causing the iron to spit or leak (water spots). Additionally, residue from spray starch, fabric finishes, or even melted synthetic fibers can accumulate on the soleplate, leading to drag, sticking, and the transfer of stains onto clean garments.
How often you need to clean the iron soleplate depends on your usage frequency and water hardness. As a general guideline for laundry care basics, consider cleaning monthly if you iron frequently using tap water (especially hard water), or less often if you use distilled water or iron infrequently.
Clean the iron whenever you notice reduced steam performance, dragging on fabrics, or visible residue or staining on the soleplate. Always consult your laundry equipment manufacturer’s manual for specific cleaning instructions suitable for your model, as methods can vary.
5.2 Can I iron clothes directly on a table or floor?
Ironing directly on unprotected surfaces like tables or floors is strongly discouraged due to the significant risk of heat damage. The high temperatures from an iron can easily scorch, melt, or permanently discolor wood finishes, laminates, carpets, or other flooring materials. A proper ironing board is specifically designed with padding and a heat-resistant cover to absorb heat and provide a suitable surface for pressing clothes.
If an ironing board is unavailable, a purpose-made ironing mat or blanket offers a safer alternative than ironing directly on furniture or floors. These provide some level of heat protection. However, even when using a mat, exercise caution, ensure the surface underneath is robust, and avoid prolonged heat exposure in one spot. Following proper safety guidelines is paramount when ironing without a standard board.
5.3 What’s the difference between ironing and pressing?
While often used interchangeably in casual conversation, ironing and pressing are distinct ironing techniques used for different purposes in garment care. Ironing typically involves a back-and-forth, gliding motion of the iron across larger, flat areas of fabric. The primary goal of ironing is wrinkle removal and smoothing the bulk of the garment.
Pressing, on the other hand, involves an up-and-down motion. You lift the iron and place it down firmly onto a specific area (like a seam, dart, pleat, collar point, or cuff) for a few seconds, then lift it straight up before moving to the next spot.
Pressing is used to set seams flat, create sharp creases, shape details precisely, and is often preferred for delicate fabrics as the lifting motion prevents stretching or distorting the material, which can happen with the gliding motion of ironing.
5.4 Is distilled water really necessary for my steam iron?
Using distilled, demineralized, or deionized water in your steam iron is highly recommended for optimal performance and longevity, although whether it’s strictly “necessary” can depend on your water hardness and iron model (always check the manual).
Regular tap water contains minerals (like calcium and magnesium) that, when heated, form limescale deposits inside the iron. This buildup can clog steam vents, reduce steam output, cause the iron to spit or leak, leave mineral stains (water spots) on clothes, and ultimately shorten the lifespan of your laundry equipment.
While some modern irons have anti-calc features, using purified water effectively prevents this buildup from occurring in the first place. This ensures consistent steam performance, protects your clothes from potential mineral stains, and helps keep the internal components and clean iron soleplate free from damaging deposits, contributing to a longer-lasting and better-performing appliance.
Read more:
Mastering the art of ironing is a valuable skill that significantly contributes to effective garment care and achieving a polished, professional presentation. By understanding how to read care labels, selecting the correct temperature settings for different fabrics, employing proper ironing techniques like pressing versus gliding, and always adhering to safety guidelines, you can transform wrinkled garments into crisp, neat attire.
While it may take practice to perfect techniques for specific items like shirts or pleated skirts, consistency leads to proficiency. Remember that well-cared-for clothes not only look better but often last longer.
For further insights into garment care, fabric handling, or exploring related needs like custom clothing labels, hang tags, or packaging solutions that complement perfectly presented apparel, consider exploring resources available from Packlove.


