


How to Remove Clothes Labels Without Damage – Quick Tips


Whether it’s an itchy tag, a faded label, or a desire to repurpose a garment, there are times when you need to remove a clothing label. But doing it incorrectly can damage the fabric. This guide provides safe and effective methods for removing various types of clothing labels without harming your clothes. From simple seam ripping to using heat or adhesive removers, you’ll learn how to tackle any label removal challenge with confidence.
1. Why Remove Clothing Labels?
1.1 Itchy or Irritating Tags
For some individuals, especially those with sensitive skin or sensory processing differences, clothing labels can be a significant source of discomfort. The texture of the tag, its edges, or even the thread used to attach it can cause intense itching, irritation, and even pain. This constant rubbing against the skin can be incredibly distracting and make it difficult to wear certain garments comfortably.
1.2 Aesthetic Reasons
Some people prefer a cleaner, more minimalist aesthetic for their clothing, and visible tags can detract from this look. This is particularly true for garments where the tag might be visible through the fabric or when wearing sheer or open-back styles. Removing the tag can create a smoother, more streamlined appearance.
1.3 Branding Concerns
There are various reasons why someone might want to remove brand names or logos from their clothing. Some individuals prefer not to display brand names, while others may want to remove branding to create a more generic or customized look. Some may also upcycle clothing and want to remove the previous brand name.
1.4 Preparing Clothes for Resale or Donation
Removing labels is often a necessary step when preparing clothes for resale or donation. Many consignment stores and charities prefer or require that clothing be free of personal markings and, in some cases, brand labels. Removing these labels helps to create a more neutral and appealing item for potential buyers or recipients.
2. Assessing Your Clothing Label Before Removal
2.1 Identifying the Label Type
Clothing labels are attached in several ways, each requiring a different removal technique:
- Sewn-in labels: These are attached with thread, usually along a seam. You can clearly see the stitching holding the label to the fabric.
- Glued labels: These labels are attached with adhesive. They appear flat against the fabric, with no visible stitching. The edges may be slightly raised.
- Heat-pressed labels: These labels are bonded to the fabric using heat and pressure. They often have a slightly textured or plastic-like feel and are often integrated into the fabric itself.
2.2 Examining the Seam and Stitching
If the label is sewn in, take a close look at the seam and stitching:
- Identify the thread: Note the color and thickness of the thread.
- Examine the stitches: Are they small and tight, or larger and looser?
- Locate the seam: Is the label sewn into a main seam of the garment, or is it attached separately?
This examination will help you plan your approach and avoid accidentally cutting the garment fabric.
2.3 Determining the Fabric Type
The fabric type dictates how careful you need to be:
- Delicate fabrics: Silk, lace, chiffon, and very fine knits are easily snagged, torn, or distorted. Proceed with extreme caution.
- Durable fabrics: Denim, canvas, heavy cotton, and twill are more resilient and can withstand more robust removal methods.
2.4 Reading Label for Important Information
Before you remove the label, make sure to read it! It contains important information. It’s a good idea to take a photo of the label or jot down the key details before removing it, just in case you need this information later.
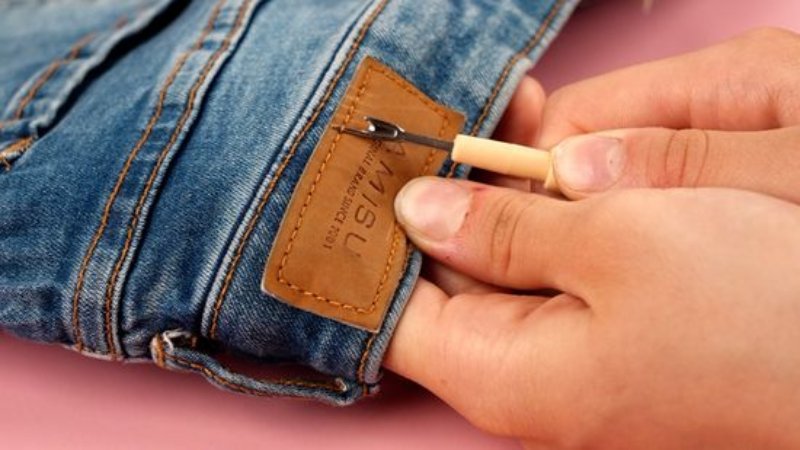
3. Method 1: Removing Sewn-In Labels with a Seam Ripper
3.1 Step 1: Gather Your Tools
You’ll need the following:
- A sharp seam ripper: A dull seam ripper is more likely to snag the fabric.
- Tweezers: For removing loose threads.
- Good lighting: So you can see the stitches clearly.
3.2 Step 2: Find the Right Starting Point
Examine the label and find a spot where the stitching is easily accessible. A corner of the label or a straight edge is usually a good place to start. Avoid areas where the stitching is very tight or close to a complex seam.
3.3 Step 3: Carefully Cut the Stitches
Insert the pointed tip of the seam ripper under the thread (not under the fabric itself!). Gently push the blade forward to cut the stitch. Continue cutting stitches one at a time, working your way along the label. Be patient and avoid pulling or yanking on the label, as this could damage the garment.
3.4 Step 4: Remove the Label and Loose Threads
As you cut the stitches, the label will begin to detach. Once you’ve cut enough stitches, gently pull the label away from the fabric. Use tweezers to remove any remaining loose threads.
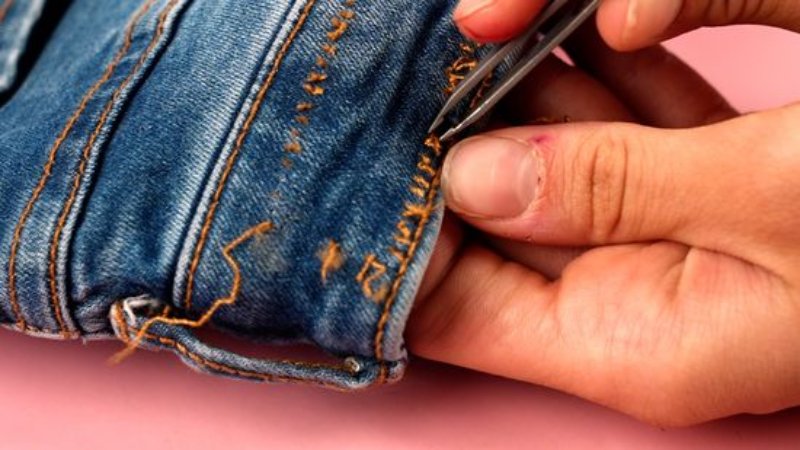
3.5 Step 5: Inspect for Damage and Repair
After removing the label, carefully inspect the area for any signs of damage, such as small holes or pulled threads. If you find any minor damage, you can often repair it with a few discreet stitches using a needle and thread that matches the garment fabric. If the damage is more extensive, you may want to consult a tailor or alterations specialist.
4. Method 2: Removing Glued or Heat-Pressed Labels
4.1 Step 1: Gather Your Tools
Before using any method on the visible part of the garment, always test it on a hidden area (like the inside of a hem or an inside seam) to ensure it doesn’t discolor or damage the fabric.
4.2 Step 2: Prepare the Garment and Lighting
Start with the least aggressive methods and work your way up if necessary:
- Gentle Peeling: If the label is relatively new or the adhesive isn’t very strong, you may be able to simply peel it off. Start at a corner and slowly peel the label away from the fabric, using your fingers or tweezers.
- Warm Water and Soap: Soak the area with the label in warm, soapy water for 15-30 minutes. This may soften the adhesive, making it easier to peel off.
4.3 Step 3: Carefully Cut as Close to the Seam as Possible
Heat can help to soften many types of adhesives, making the label easier to remove. However, heat can also damage some fabrics, so proceed with extreme caution:
- Hair Dryer: Use a hair dryer on a low heat setting. Hold the dryer a few inches away from the label and move it back and forth to warm the adhesive. Try to peel the label off as it warms.
- Iron: Place a pressing cloth (a thin, clean cotton cloth) over the label. Use a dry iron on a low to medium setting (check your garment’s care instructions for heat tolerance!). Press the iron onto the pressing cloth for a few seconds, then try to peel off the label. Repeat if necessary. Never apply a hot iron directly to the label or the fabric.
4.4 Step 4: Remove Remaining Label Fragments and Threads
If heat alone doesn’t work, you can try an adhesive remover. Always test on a hidden area first.
- Rubbing Alcohol (Isopropyl Alcohol): Apply a small amount of rubbing alcohol to a clean cloth and gently dab the adhesive residue. Let it sit for a few minutes, then try to peel or rub off the label.
- Commercial Adhesive Remover: Products are specifically designed to remove adhesive residue. Follow the manufacturer’s instructions carefully.
- Vinegar: Apply a small amound of warm water, add vinegar, and rub the label.
4.5 Step 5: Check for and Address Any Snags
After removing the label and any adhesive residue, wash the garment according to its care instructions to remove any remaining chemicals or residue.
5. Method 3: Dealing with Glued or Heat-Pressed Labels
5.1 Why These Labels Are Different
Glued and heat-pressed labels are more difficult to remove because they rely on strong adhesives to bond the label directly to the fabric fibers. Unlike sewn-in labels, where you can simply cut the threads, there’s no easy way to separate the label from the garment without potentially affecting the adhesive bond or the fabric itself. Heat transfer labels, in particular, are often essentially fused to the fabric, making them the most permanent type of label.
5.2 Option 1: Using Hemming Tape
Instead of attempting to remove the label, a simpler and safer solution is often to cover it up. Hemming tape, a type of iron-on adhesive tape, can be used to create a neat and effective cover:
- Cut a piece of hemming tape: Cut a piece of hemming tape slightly larger than the label you want to cover.
- Position the tape: Place the hemming tape over the label, ensuring it completely covers the label and extends slightly beyond its edges.
- Iron on the tape: Follow the hemming tape manufacturer’s instructions for applying heat. Usually, this involves placing a pressing cloth over the tape and using a dry iron on a medium to high setting (check your garment’s care label for heat tolerance). Press firmly for the recommended time.
- Allow to cool: Let the tape cool completely before handling the garment.
This method effectively conceals the label without the risk of damaging the fabric during removal.
5.3 Option 2: Professional Removal
If you’re concerned about damaging your garment, or if the label is particularly large or stubborn, the best option is to seek professional help. A tailor or dry cleaner has experience with various fabrics and label types and may have specialized tools or techniques for removing glued or heat-pressed labels without causing damage. They can also advise on the best course of action based on the specific garment and label.
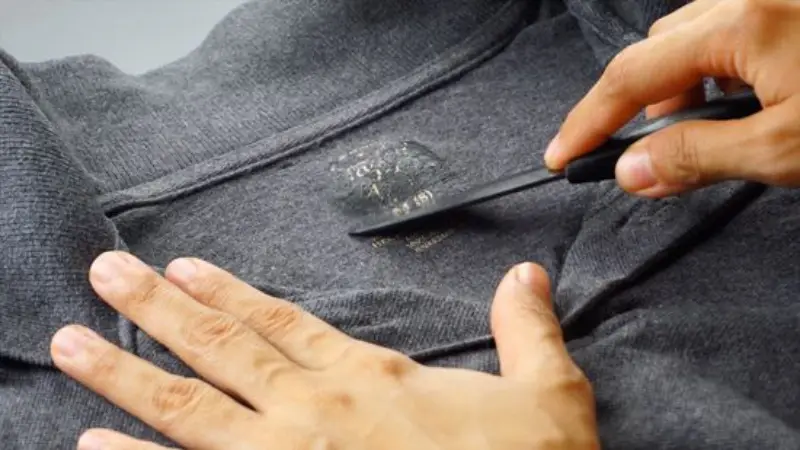
5.4 Option 3: Very Careful Cutting
If you’ve exhausted other options and must remove the label, and you’re willing to accept the risk of damage, you can try very carefully cutting it away. This is a last resort and should only be attempted on sturdy fabrics, not on delicate materials.
- Use sharp, small scissors: Choose scissors with very sharp, pointed tips.
- Work slowly and meticulously: Carefully snip away the label material as close to the fabric as possible, without cutting into the fabric itself. This may involve cutting around the edges of the label and then carefully peeling or scraping away any remaining material.
- Accept that some residue may remain: Even with careful cutting, you may not be able to remove all traces of the label or adhesive.
5.5 Using a product to dissolve the glue
Certain products can help dissolve fabric glue, making label removal easier. However, these must be used with extreme caution, as they can also damage or discolor fabrics.
- Choose the Right Product: Look for a product specifically designed to remove fabric glue or adhesive residue from clothing. Common options include rubbing alcohol (isopropyl alcohol), specialized adhesive removers.
- Test in an Inconspicuous Area: Before applying the product to the label, test it on a hidden area of the garment (like the inside of a hem or seam) to ensure it doesn’t cause discoloration, staining, or damage.
- Apply Sparingly: If the test is successful, apply a small amount of the product to the label, following the manufacturer’s instructions.
- Work in a Well-Ventilated Area: Some adhesive removers have strong fumes, so work in a well-ventilated area or outdoors.
- Allow Time to Work: Let the product sit for the recommended time (usually a few minutes) to allow it to penetrate the adhesive.
- Gentle Removal: After the allotted time try to remove the label.
- Wash the Garment: After removing the label, wash the garment according to its care instructions to remove any remaining adhesive remover residue.
6. Tips for Minimizing Damage During Label Removal
6.1 Work Slowly and Carefully
The most important tip is to take your time. Rushing the process increases the chances of making mistakes, such as accidentally cutting the fabric or pulling threads. Work slowly and deliberately, paying close attention to what you’re doing. Patience and precision are crucial for a successful outcome.

6.2 Use Good Lighting and Magnification
Good visibility is essential for label removal, especially when working with small stitches or delicate fabrics. Work in a well-lit area, and consider using a magnifying glass or a magnifying lamp to get a closer look at the label and the surrounding fabric. This will help you avoid cutting the garment itself.
6.3 Test a Small Area First
Whenever you’re using a chemical solution (like an adhesive remover) or heat to remove a label, always test it on a hidden area of the garment first. This could be the inside of a hem, an inside seam, or another inconspicuous spot. This test allows you to see how the fabric reacts to the substance or method before applying it to the visible part of the garment.
6.4 Choose the Right Tool for the Job
Using the correct tool is essential for minimizing damage. For sewn-in labels, a sharp seam ripper is the best choice. For glued labels, start with gentle methods and only progress to adhesive removers or heat if necessary. For heat-pressed labels, consider covering them up or seeking professional help. Using the wrong tool can lead to snags, tears, or discoloration.
6.5 Know When to Seek Professional Help
If you’re dealing with a delicate or valuable garment, a stubborn label, or if you’re simply unsure about how to proceed, don’t hesitate to seek professional help. A tailor, dry cleaner, or garment care specialist has the experience and tools to remove labels safely and effectively, minimizing the risk of damage. It’s better to be safe than to ruin a cherished item of clothing.
7. What to Do if You Accidentally Damage Your Clothing
7.1 Small Holes: Simple Sewing Repair
If you create a small hole or snag, you can often repair it with a few basic stitches:
- Thread a needle: Use a fine needle and thread that matches the garment fabric as closely as possible.
- Knot the thread: Knot the end of the thread.
- Sew from the inside: Turn the garment inside out.
- Use small stitches: Use small, discreet stitches to close the hole, working from one side of the hole to the other. A simple overcasting stitch or a whipstitch works well.
- Knot and trim: Knot the thread securely on the inside of the garment and trim any excess thread.
7.2 Larger Tears: Patching or Professional Repair
For larger tears or more significant damage, you have two main options:
- Patching: You can patch the tear with a piece of similar fabric, either by sewing it on or using an iron-on patch. Choose a patch that matches the garment’s color and texture as closely as possible.
- Professional Repair: If the damage is extensive, or if the garment is valuable, it’s best to seek professional help from a tailor or seamstress. They have the skills and tools to repair the damage invisibly or to advise on the best course of action.
8. Alternatives to Removing Clothing Labels
8.1 Covering the Label with Fabric or Hemming Tape
As discussed earlier, covering the label is a safe and effective alternative to removal. You can use a fabric patch (sewn or ironed on) or a piece of hemming tape to conceal the label completely. This is a good option for itchy labels or for labels you want to hide for aesthetic reasons.
8.2 Using Fabric Softener to Reduce Itchiness
If the primary reason for wanting to remove a label is itchiness, using fabric softener during washing can sometimes help. Fabric softener can soften the label material and reduce its stiffness, making it less irritating against the skin. This may not work for all labels or all types of skin sensitivities, but it’s worth trying before resorting to removal.
8.3 Choosing Tagless Clothing Options
To avoid the issue of label irritation altogether, consider purchasing tagless clothing. Many brands now offer garments with care and content information printed directly onto the fabric (usually inside the back neck) or applied via heat transfer. These tagless options eliminate the potential for label-related discomfort.
9. Related Questions
9.1 How can I remove a label from a delicate silk garment?
Removing labels from delicate fabrics like silk requires extreme caution. The best approach is to use a very sharp seam ripper to carefully cut the threads of a sewn-in label, working slowly and meticulously to avoid snagging or tearing the silk. If the label is glued or heat-pressed, or if you’re uncomfortable attempting removal yourself, it’s strongly recommended to seek professional help from a tailor or dry cleaner who specializes in delicate fabrics.
9.2 What’s the best way to remove a label that’s glued onto a cotton t-shirt?
For a glued label on a cotton t-shirt, start by trying the gentlest methods. You might be able to peel it off slowly, especially if the adhesive isn’t too strong. If that doesn’t work, consider covering the label with hemming tape.
As a last resort, very careful cutting with sharp scissors might be possible, but be aware of the risk of damaging the shirt. You could also try a fabric glue solvent, but always test it on a hidden area first and use it with extreme caution.
9.3 Can I reattach a clothing label if I change my mind?
Yes, it’s often possible to reattach a clothing label, particularly if it was sewn in originally. You can sew it back on by hand or with a sewing machine, using a thread that matches the garment or the original stitching. If the label was glued, you could try using fabric glue to reattach it, but the bond may not be as strong as the original adhesive. The success of reattachment depends on the condition of the label and the fabric.
9.4 Are there any eco-friendly ways to remove clothing labels?
Yes, several eco-friendly options prioritize minimizing chemical use and waste. The most eco-friendly method is using a seam ripper to remove sewn-in labels, as this only requires a simple tool. For glued or heat-pressed labels, consider covering the label with fabric or hemming tape instead of attempting complete removal. Avoid using harsh chemical solvents whenever possible.
9.5 If I cut the label, can I somehow know washing instructions?
Yes, you can. First, you need to know what kind of material makes up the product. After that, you can search online for “how to wash + [material name]”. Or you can find similar products to get information about washing instructions.
Read more:
Removing clothing labels doesn’t have to be a daunting task. By understanding the different types of labels and fabrics, choosing the appropriate removal method, and proceeding with care and patience, you can successfully remove unwanted labels without damaging your garments.
Remember to assess the situation, start with the gentlest methods, and always test any chemicals or heat on a hidden area first. With a little practice and these helpful tips, you can confidently tackle any label removal challenge and keep your clothes looking their best. And remember, if you’re ever unsure, seeking professional help is always a wise choice.


