


How to Sew a Hat: Beginner’s Step-by-Step Guide


Creating your own hat offers unique rewards, from the satisfaction of wearing something handmade to the potential for crafting custom pieces for a small clothing business. While the idea of hat making might seem complex, involving unfamiliar shapes and materials, this beginner’s guide breaks down the process.
This article provides a clear, step-by-step approach focused on sewing a basic bucket hat, a perfect starting point. Readers will gain practical sewing techniques, learn how to sew a hat from measurement to finishing touches, and ultimately produce a wearable custom hat. Understanding this process also builds valuable knowledge about quality construction, a useful insight for any small clothing business.
1. Understanding the essentials before you stitch
1.1 The basic anatomy of a hat: Crown, brim, and band explained
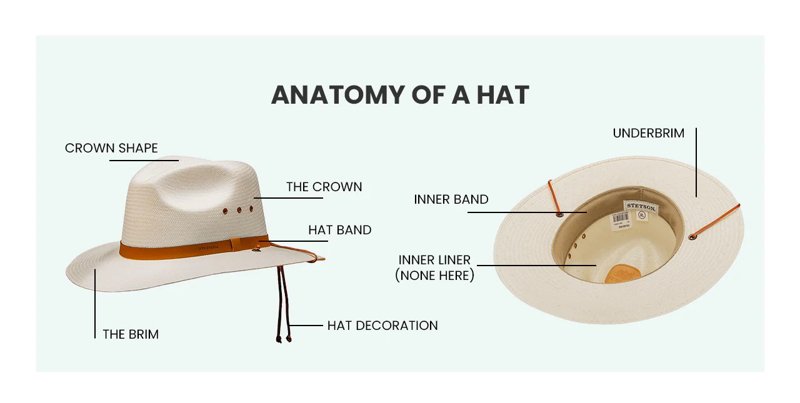
Before starting, familiarizing yourself with the basic hat components is beneficial. Understanding the terminology helps in interpreting patterns and visualizing how the pieces fit together. Most simple hats consist of three main hat parts:
- Crown: This is the uppermost crown piece that covers the top of the head. Typically, for styles like bucket hats, the crown is a circular or slightly oval shape.
- Brim: The brim piece is the horizontal projection extending outwards from the base of the hat. Its primary function is often sun protection, but brim width also significantly influences the hat’s style.
- Side band (or band): This vertical side band connects the crown to the brim. Its height dictates the overall height of the hat structure. Sometimes, this piece is rectangular, forming a loop, or slightly trapezoidal to create a flared shape.
Knowing this basic hat anatomy makes following sewing instructions much clearer, as patterns typically refer to these specific pieces.
1.2 Why accurate head measurement is crucial
The final fit and comfort of a handmade hat depend entirely on accurate measurements. An incorrect measurement will result in a hat that’s uncomfortably tight or frustratingly loose. Taking the time to measure correctly is a fundamental step. Hat sizing determines size selection for your pattern. Here’s how to measure head size accurately:
- Obtain a flexible measurement tape (like the type used for tailoring, not a rigid metal one).
- Wrap the tape measure around the head, positioning where the hat’s inner band will naturally rest. This is usually about an inch above the eyebrows, across the mid-forehead, and just above the ears.
- Ensure the tape is level all the way around (use a mirror or ask for help if needed) and pull snug, but avoid pulling tightly.
- Note the measurement where the tape overlaps, either in inches or centimeters.
- Crucially, add a small amount of ‘ease’ to this head circumference measurement before selecting your pattern size or cutting fabric if drafting yourself. Typically, adding about 1/2 inch (1.25 cm) is recommended. This ease accounts for the thickness of the hat fabric, any lining, internal seam allowances, and general wearing comfort.
Neglecting this step, especially adding ease, is a common beginner mistake leading to an ill-fitting final product.
2. Gathering your materials: What you’ll need for hat making
2.1 Choosing the best fabric for your hat project
Selecting the right hat material is essential for both the sewing experience and the final product’s look and longevity. For beginner hat projects like bucket or sun hats, stable woven fabrics are highly recommended as they are less likely to stretch or distort during sewing, especially around curves. Consider these reliable fabric types:
- Cotton twill: A popular fabric choice known for its diagonal weave, offering good durability and structure without being overly stiff.
- Canvas: Generally heavier than twill, canvas is very sturdy and holds its shape exceptionally well, making it excellent for hats requiring structure.
- Denim: Offers a classic aesthetic and is very durable. Similar in weight and handling to canvas or heavy twill, depending on the specific denim.
- Quilting cotton: While often lighter, quilting cotton can be suitable for the hat’s lining or for softer, less structured hats. Its ease of sewing and vast print variety are advantages. However, it typically requires interfacing for body.
Think about the intended use: heavier fabrics like canvas or denim offer more protection and durability, suitable for year-round wear or workwear styles, while lighter cottons are better for warm weather. For small businesses, considering factors like washability and how the fabric will wear over time is important for customer satisfaction.
2.2 The importance of interfacing: Giving your hat structure
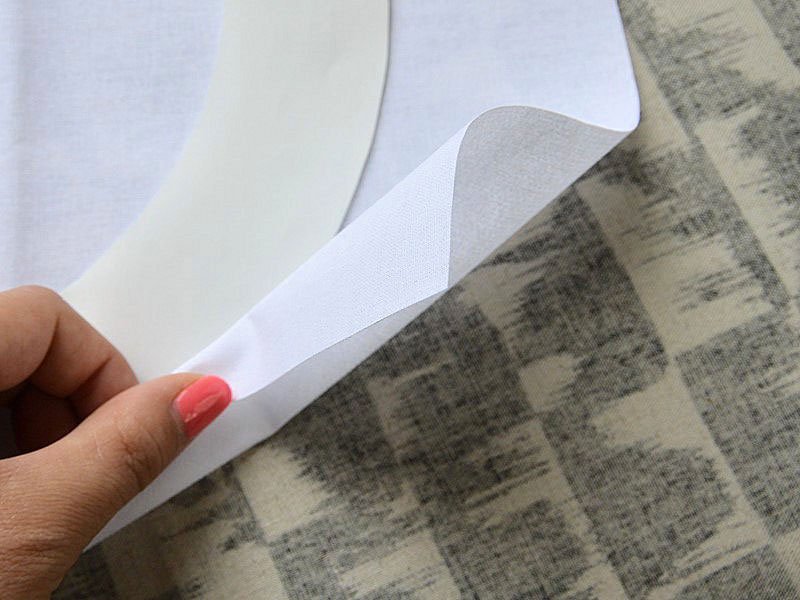
Interfacing is a crucial secondary material applied to fabric pieces to provide structural support, body, or stiffness. For hats, particularly the brim, interfacing is non-negotiable; without it, most brims made from standard apparel fabrics would be too floppy. Understanding the options helps achieve the desired stiffness level:
- Fusible (iron-on) vs. sew-in: Fusible interfacing has a heat-activated adhesive on one side, making application quick with an iron – often preferred by beginners. Sew-in interfacing is stitched within the seam allowance and offers more drape control but requires basting (temporary stitching) or careful pinning.
- Weights: Interfacing comes in various weights (light, medium, heavyweight, and extra-heavyweight). For most hat brims aiming for good shape retention, heavyweight interfacing is recommended. Medium weight might be used on the crown or side band if a little extra body is desired without significant stiffness. Hat brim interfacing is key to the hat’s silhouette.
- Specialty options: Materials like buckram (a stiff, often gummed fabric) or ultra-firm stabilizers (e.g., Pellon Peltex) create very rigid brims but can be more challenging to sew through and require specific techniques. For a first project, standard heavy fusible or sew-in types are generally the most manageable options.
Proper application according to manufacturer instructions is vital for both fusible and sew-in types to ensure a smooth, supportive finish.
2.3 Essential sewing tools checklist
Gathering the right sewing supplies before you start ensures a smoother process. Here’s a checklist of sewing tools needed for making a hat:
- Sewing machine: A standard machine capable of straight stitches is sufficient. Use an appropriate needle size and type for your chosen fabric (e.g., a universal 80/12 or 90/14 for cottons, or a denim/jeans needle for heavier canvas or denim).
- Thread: All-purpose polyester thread matching your fabric color is standard. Contrasting thread can be used for decorative topstitching if desired.
- Fabric scissors: A sharp pair dedicated only to cutting fabric ensures clean, precise edges.
- Pins or sewing clips: To hold fabric layers together securely while sewing. Clips are particularly useful for thicker layers or curved edges where pins might distort the fabric.
- Soft measuring tape: Essential for taking head measurements and checking pattern dimensions.
- Iron and ironing board: Absolutely crucial for pressing seams and fusing interfacing. Do not skip pressing steps.
- Seam ripper: For correcting mistakes – a common part of the learning process.
- Marking tool: Fabric chalk, a disappearing ink pen, or a water-soluble marker helps transfer pattern markings or draw guidelines.
- Pattern: Your chosen hat pattern (printed and assembled if necessary).
Having these tools readily available will make the construction process much more efficient and enjoyable.
3. Preparing your pattern and fabric
3.1 Finding or using a simple hat pattern
Locating a suitable hat pattern is the first step in the construction process. For those new to sewing hats, starting with a simple style like a bucket hat pattern or sun hat is advisable. Many resources offer patterns specifically designed for beginners:
- Online searches: Searching terms like “free download bucket hat sewing pattern” or “beginner pattern sun hat” often yields good results. Look for patterns from established sewing blogs, fabric company websites, or independent pattern designers known for clear instructions.
- Beginner-friendly features: A good beginner pattern will feature relatively simple geometric shapes (like a circle for the crown, a rectangle or gentle curve for the side band, and a donut shape for the brim). Clear, step-by-step instructions with diagrams or photos are also essential.
- Pattern drafting: While it’s possible to draft your own pattern (pattern drafting basics involve drawing the shapes based on your head measurements and desired dimensions), this requires more experience and spatial understanding. For a first project, using a pre-made pattern is highly recommended to ensure the pieces fit together correctly.
- Sizing: Before cutting, double-check that the pattern size you’ve selected corresponds to your measured head circumference plus the added ease (as discussed in the measurement section). Patterns usually provide a size chart.
Choosing a well-drafted pattern designed for beginners significantly increases the chances of a successful first project.
3.2 Laying out and cutting your fabric & interfacing pieces accurately
Precise cutting is fundamental to achieving a well-fitting and professional-looking hat. Rushing this stage often leads to problems later. Follow these steps carefully:
- Prepare fabric: Pre-wash and dry your main fabric and lining fabric (if using one) according to care instructions. This prevents shrinkage after the hat is sewn. Press the fabric thoroughly with an iron to remove all wrinkles.
- Follow pattern layout: Refer to your pattern’s instructions for the correct layout of the pattern pieces on the fabric. Pay close attention to the grainline (the direction of the fabric’s lengthwise threads, usually indicated by an arrow on the pattern piece) and any pieces that need to be placed on a fold. The grainline ensures the hat hangs and behaves correctly.
- Pin securely: Pin the pattern pieces securely to the fabric, placing pins close enough to prevent shifting, especially around curves.
- Cut fabric: Using sharp fabric scissors, cut smoothly along the pattern lines. Avoid lifting the fabric excessively as you cut. Accuracy here is key – inconsistent cutting will affect how the pieces align during sewing.
- Repeat for lining: If your hat includes a lining, repeat the layout and cutting process with the lining fabric.
- Cut interfacing: Lay out and cut the interfacing pieces as indicated by the pattern. Often, interfacing pieces are cut slightly smaller than the corresponding fabric pieces to keep bulk out of the seam allowances, or they are cut the same size and then trimmed back after fusing or basting. Double-check the pattern instructions regarding interfacing size and placement. Ensure you cut the correct number of each piece (e.g., typically two fabric brim pieces, one crown, one band, and potentially corresponding lining and interfacing pieces).
Taking your time during cutting fabric sets a solid foundation for the sewing steps that follow.
4. Step-by-step: Sewing your hat
4.1 Constructing the hat brim
The brim gives the hat its characteristic shape and often requires structure. Assembling it correctly is a key part of the process.
- Interfacing application: Apply interfacing to the fabric brim pieces according to your pattern and the interfacing manufacturer’s instructions. Often, interfacing is applied to the wrong side (the non-public side) of the fabric piece that will become the underside of the brim. For fusible interfacing, press firmly with an iron. For sew-in, baste (sew with long, temporary stitches) it within the seam allowance (the area between the stitching line and the fabric edge). Expert tip: For a significantly stiffer brim, consider interfacing both the upper and under brim pieces, or using multiple layers of heavyweight interfacing on the under brim piece.
- Layer fabric: Place the two fabric brim pieces right sides together (the patterned or ‘correct’ sides facing each other), aligning the outer and inner curved edges carefully.
- Pin outer edge: Pin the layers together along the outer curved edge only.
- Stitch outer edge: Sew along the pinned outer edge, following the seam allowance specified in your pattern (commonly 1/2 inch or 1 cm).
- Trim seam allowance: Trim the seam allowance along the sewn outer curve down to about half its original width (e.g., trim a 1/2 inch seam to 1/4 inch). This reduces bulk, allowing the curve to turn smoothly.
- Turn right side out: Turn the brim right side out through the open inner edge.
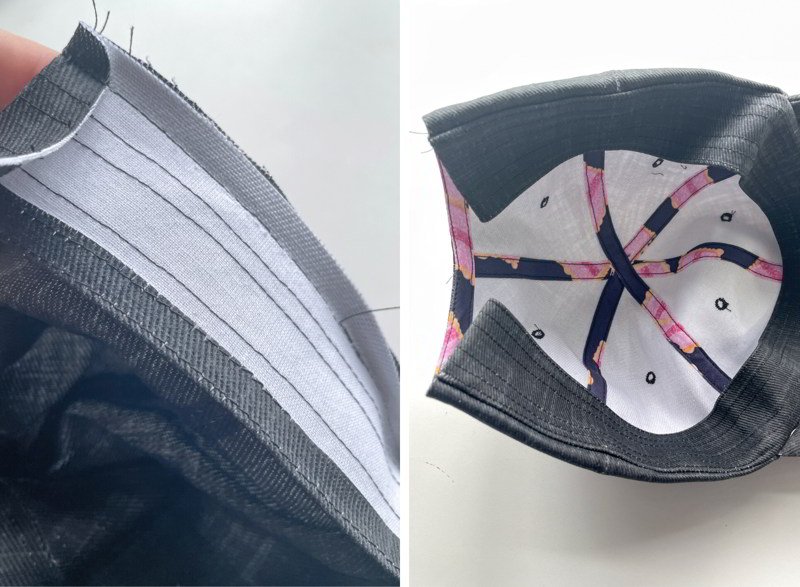
- Press firmly: Pressing seams is crucial here. Use an iron to press the outer edge flat and create a crisp, defined curve. A point turner or a blunt stick (like a chopstick) can help gently push out the seam fully before pressing.
- (Optional but recommended) Topstitching: Topstitching (sewing visible stitches on the right side of the fabric) adds significant structure and a professional look to the brim. Starting about 1/4 inch from the pressed outer edge, sew rows of stitching around the brim, working your way inwards. Spacing can be 1/4 to 1/2 inch apart, or as desired. Using a guide foot on your sewing machine or marking lines beforehand helps keep the stitching even.
4.2 Assembling the crown and side band
These two pieces form the main body of the hat that sits on the head. Joining them involves sewing a straight piece to a curved piece.
- Form band loop: If your side band piece is a rectangle, fold it in half widthwise with right sides together. Sew the short ends together using the specified seam allowance to create a continuous loop. Press this seam open flat. (If your band is already shaped in a loop per the pattern, skip this step).
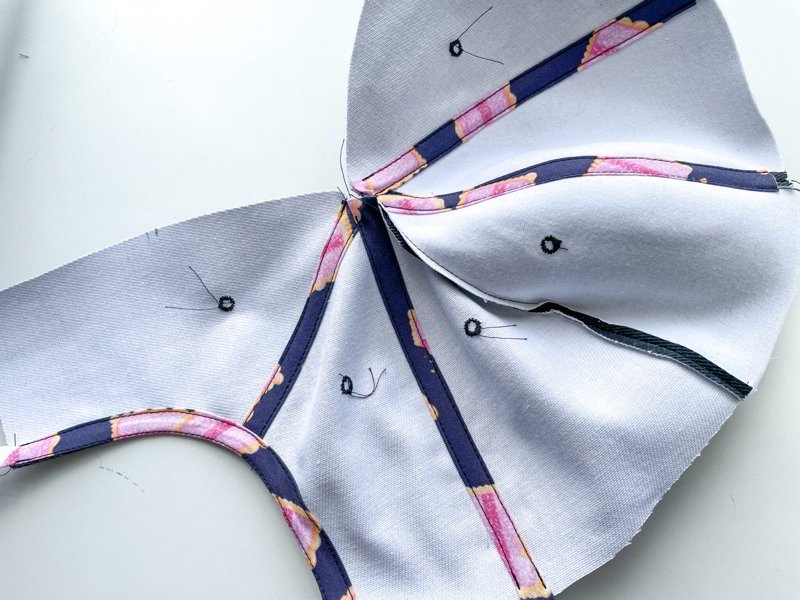
- Pin band to crown: With the hat crown piece and the side band loop both right side out initially, flip the band loop so the right side faces inwards. Place the crown piece inside the loop, aligning the raw edges. Pin the side band loop to the circular edge of the crown piece, making sure right sides are together. Match any notches or markings indicated on your pattern. You will need to ease fabric – gently stretching or compressing the band edge slightly to fit the crown’s circumference without creating puckers. Use plenty of pins or clips perpendicular to the edge to hold the curve securely. This is a key step in joining material accurately.
- Sew curve: Stitch the band to the crown slowly and carefully, following the curve. Keep the specified seam allowance consistent. Sewing curves requires guiding the fabric gently rather than pulling it.
- Clip curve: Make small snips into the seam allowance around the entire curve, cutting from the raw edge towards the stitching line, but not through it. Space these clips about 1/2 to 1 inch apart. Clipping curves allows the seam allowance to spread when the hat is turned, preventing puckering and letting the seam lie flat.
- Press seam: Turn the assembled piece right side out. Using the tip of the iron, press the seam allowance down towards the side band.
- Repeat for lining: If you are including a lining, repeat steps 1-5 using the lining crown and side band pieces.
4.3 Attaching the brim to the hat body
This step connects part of the hat body (the assembled crown/band section) to the finished brim, completing the main structure.
- Position pieces: Keep the assembled crown/band section right side out. Take the finished brim (which should also be right side out).
- Align edges: Place the brim over the crown/band section. The right side of the brim’s upper layer should face the right side of the side band. Align the raw edge at the bottom of the side band with the raw inner edge of the brim.
- Pin securely: Pin the inner edge of the brim to the bottom edge of the side band all the way around. Match the side seam of the band with any corresponding mark or seam on the brim (if applicable), and align any pattern notches. Ensure all layers (the side band, the upper brim fabric, and the under brim fabric) are smooth and aligned without twisting.
- Sew seam: Stitch this seam carefully, sewing through all layers using the specified seam allowance. You are now assembling hat components fully. Handling curves is important here, similar to attaching the crown.
- Notch the curve: To help this inner curve lie flat inside the hat and reduce bulk, notch the seam allowance. This involves cutting small V-shapes out of the seam allowance, perpendicular to the seam line, spaced about 1/2 to 1 inch apart. Be careful not to cut through your stitching. Notching curves is used on inward curves, whereas clipping is used on outward curves.
4.4 Sewing and inserting the lining
Adding a lining fabric provides interior comfort, hides raw seams for a professional finish, and allows for techniques like reversible hat sewing.
- Prepare lining: Ensure your lining crown and side band are assembled (as described in “Assembling the Crown and Side Band”), but leave this lining piece wrong side out.
- Position hat and lining: Take your main hat (which is right side out with the brim attached) and place it inside the lining piece. The right sides of the main hat fabric and the lining fabric should now be facing each other.
- Align bottom edges: Carefully align the bottom raw edge of the main hat (where the brim joins the side band) with the bottom raw edge of the lining’s side band. Match the side seams of the main hat band and the lining band.
- Pin edges: Pin these bottom edges together all the way around.
- Sew, leaving an opening: Sew around this pinned edge using the specified seam allowance. Crucially, leave an opening of about 3-4 inches (8-10 cm) unstitched. This turning opening is necessary to turn the hat right side out. Remember to backstitch securely at the beginning and end of this opening to reinforce the stitches.
- Turn hat: Carefully pull the main hat through the opening you left, turning the entire hat right side out. The lining will naturally want to sit inside the main hat.
- Press edge: Gently push the lining down inside the hat. Neatly tuck the raw edges of the seam allowance at the opening inwards. Press this bottom edge firmly all around with an iron, ensuring the seam line is right at the edge and the opening’s folded edges are crisp and aligned.
- Topstitch to close: To close the opening and create a neat edge finish, topstitch close to the bottom edge of the hat (about 1/8 inch or 3mm from the edge) all the way around. This stitching catches the folded edges of the opening, sealing it shut, and provides a decorative finish. Alternatively, the opening can be hand-stitched closed using a slip stitch or ladder stitch for an invisible finish, though topstitching is often faster and adds durability.
4.5 Finishing touches for a polished look
A few final steps elevate your handmade hat from homemade to professional.
- Final pressing: Give the entire hat a thorough final press with your iron. Use steam if appropriate for your fabric, and shape the crown and brim nicely as you press. This helps meld the stitches and gives the hat its final form.
- Topstitching: Ensure any planned topstitching is complete – commonly around the brim and potentially around the base of the side band where it joins the brim, especially if you closed the lining opening this way.
- (Optional) Grosgrain ribbon finish: If you chose not to fully line the hat, the raw seam allowance where the brim joins the band inside the hat can look untidy and may fray. A common professional technique is to cover this seam with a grosgrain ribbon.
These final details contribute significantly to the polished look and feel of your finished hat.
5. Pro tips from experience for a better-looking hat
5.1 The power of pressing seams as you go
Integrating pressing seams into your sewing workflow is not merely about ironing at the end; this is one of the fundamental sewing techniques separating homemade from handmade quality. Pressing as you complete each seam performs several vital functions: it melds the thread stitches into the fabric fibers, flattens the seam allowances reducing bulk, and sets sharp, crisp edges and curves. This makes subsequent construction steps, like aligning pieces or topstitching, significantly easier and more accurate. An unpressed seam often appears puffy, slightly distorted, and can prevent pieces from lying flat against each other, leading to inaccuracies. In contrast, a well-pressed seam contributes directly to a smooth, refined appearance and a professional result. Consider pressing an integral part of the construction, not an optional step, for a truly clean finish.
5.2 Handling curves: Clipping and notching seam allowances explained
Sewing smooth curves is essential in hat making, and managing the seam allowance correctly is key to avoiding puckers or distortion. Clipping curves and notching curves are two techniques used for different types of curves:
- Clipping: Used on outward (convex) curves, like the edge where the side band joins the crown. Clipping involves making small, straight snips into the seam allowance, cutting from the raw edge towards the stitching line, but stopping just short of it. These snips allow the seam allowance to spread open when the curve is turned right side out, letting it lie flat without pulling or distorting the curve.
- Notching: Used on inward (concave) curves, such as the inner edge of the brim where it attaches to the side band. Notching involves cutting small V-shaped wedges out of the seam allowance. This removes excess fabric (reduce bulk) that would otherwise bunch up when the curve is turned, allowing the seam allowance to compress smoothly and prevent puckering.
Understanding when and why to use each technique is vital for successfully sewing curves. Always use sharp scissors and be careful not to cut through your seam stitches.
5.3 Finishing the inside seam neatly
If you are making an unlined hat and not using the grosgrain ribbon technique described earlier, the raw internal seam allowance where the brim joins the band can still be finished for a neat finish and to prevent fraying. Here are a few common seam finishing options:
- Serger/overlocker: If you have access to a serger (also called an overlocker), this machine trims the raw edge and simultaneously wraps it in thread, creating a very clean, durable, and professional-looking edge quickly.
- Zig-zag stitch: Most standard sewing machines have a zig-zag stitch. Sewing a row of zig-zag stitching along the raw edge of the seam allowance can effectively bind the fibers together and minimize fraying. Adjust the stitch width and length for best results on your fabric.
- Bias tape binding: For a very neat and durable finish, the raw seam allowance can be encased in bias tape binding. This involves sewing double-fold bias tape over the raw edge, completely enclosing it. While producing an excellent result, this method is more time-consuming and requires careful application, especially around curves.
Choosing one of these methods ensures even the inside of an unlined hat looks tidy and withstands wear and washing better.
6. Related questions about sewing hats
6.1 What’s the easiest hat style for a beginner to sew?
For those new to hat making, the most approachable styles are generally the bucket hat and simple fleece beanies. The easy hat pattern for a bucket hat typically involves straightforward geometric shapes – circles and rectangles or gently curved bands – which are relatively simple to cut and sew. Fleece beanies are also a great beginner sewing project because fleece fabric is stretchy, making it forgiving to work with, and these patterns often consist of only two main pieces with no complex interfacing required (a fleece hat pattern is usually quite basic). Styles like structured fitted caps with multiple panels or felt fedoras involve more complex shaping, specialized materials, and techniques, making them less suitable for a first attempt.
6.2 Can I sew a hat without a pattern?
While it’s technically possible, whether you should depends greatly on the hat style. Simple, unstructured items like basic fleece beanies can sometimes be made by tracing an existing hat or using very basic head measurements to create simple shapes. However, for structured hats like bucket hats, sun hats, or caps, attempting sewing without pattern is significantly more challenging for a beginner. Achieving the correct hat proportions, curved shapes, and ensuring all pieces fit together accurately (especially the crown to the side band and the band to the brim) requires careful drafting (self-drafted pattern creation). A pre-made pattern handles this hat shaping work, saving considerable time and potential frustration, leading to a much better final product for structured styles.
6.3 What kind of interfacing is best for hat brims?
The choice of hat brim interfacing significantly impacts the brim’s structure and stiffness. For most bucket hats and sun hats, a heavyweight interfacing – either fusible interfacing (iron-on) or sew-in interfacing – provides good body and shape without being excessively difficult to sew through. Fusible types are often quicker for beginners. For a very stiff, almost rigid brim, ultra-firm stabilizers like Pellon Peltex (a brand name for a type of very stiff, non-woven stabilizer) can be used. Buckram, a traditionally used stiffener often treated with starch or resin, provides substantial stiffness but usually requires different handling techniques like steaming and shaping over a form, making it less common for typical home sewing projects. Beginners are generally advised to start with a standard heavyweight fusible or sew-in interfacing for reliable results.
6.4 How do I make a hat reversible?
Making a reversible hat sewing project essentially involves constructing two complete hats – one becomes the “outer” and the other the “lining,” but they are interchangeable. You assemble the crown and side band for both your chosen two fabrics. The key difference from a standard lining technique lies in the final assembly step. Instead of sewing the lining to the hat body at the base of the side band, you place the two completed hat bodies (one flipped inside the other) so their right sides are facing each other. Then, you align and sew around the outer edge of the brim, leaving a few inches open for turning. After sewing, turn the hat right side out through the opening, carefully press the brim edge flat (tucking in the opening’s seam allowances), and topstitching brim edge all around closes the opening and gives a crisp finish to both sides. Often, both fabric layers of the brim will utilize the same interfacing structure for consistency.
Read more:
Embarking on the journey of how to sew a hat has equipped you with valuable insights, from understanding basic hat anatomy and the importance of accurate measurements to selecting appropriate materials and navigating the core construction steps.
Following this beginner’s guide, you’ve learned the practical sewing techniques needed to transform fabric into a wearable, custom hat. The satisfaction derived from creating your own DIY fashion piece is significant, offering a tangible result of your developing hat making skills.
This first handmade hat is just the beginning. Feel encouraged to experiment further – explore different fabric combinations, try variations on the basic bucket hat style, or add personal embellishments like embroidery or unique topstitching.
For those running or starting a small clothing business, mastering these construction techniques allows for the creation of unique, high-quality accessory items that can differentiate your brand. Understanding how a garment is properly constructed informs better design and production choices.


