Learn to Quilt: Step-by-Step Guide for Absolute Beginners
Quilting, the art of sewing layers of fabric together, might seem like a complex craft, but it’s actually wonderfully accessible for beginners! If you’re eager to start quilting but feel overwhelmed, unsure of where to begin, or worried about making mistakes, you’re not alone.
Many aspiring quilters feel this way. Without clear guidance, learning to quilt can feel daunting, preventing you from experiencing the joy of creating beautiful, quilted projects. This article is here to make your quilting journey smooth and enjoyable.
You’ll gain a clear understanding of quilting basics, learn about the essential tools you truly need, discover simple techniques to get started, and receive step-by-step instructions to confidently begin your very first quilt.
1. What is quilting?
At its heart, quilting is about joining three layers of fabric together to create a warm and decorative textile. These layers form what’s often called a “quilt sandwich”: a decorative quilt top, a soft inner layer of batting, and a functional backing fabric.
The quilt top is where the artistry shines, often created through fabric piecing techniques like patchwork, using carefully cut and sewn quilt blocks to form intricate patterns. The batting, nestled in the middle, provides the quilt’s characteristic puffiness and warmth.
Quilting is more than just sewing; it’s a craft with a rich history, a way of creative quilting that allows you to tell stories and express yourself through fabric. Each fabric choice and stitch becomes a part of your own unique textile creation.
2. Quilting essentials for beginners
To begin your quilting journey, you’ll need a few key quilting supplies and quilting tools. Don’t worry, you don’t need a room full of equipment to get started! Focus on these essentials first:
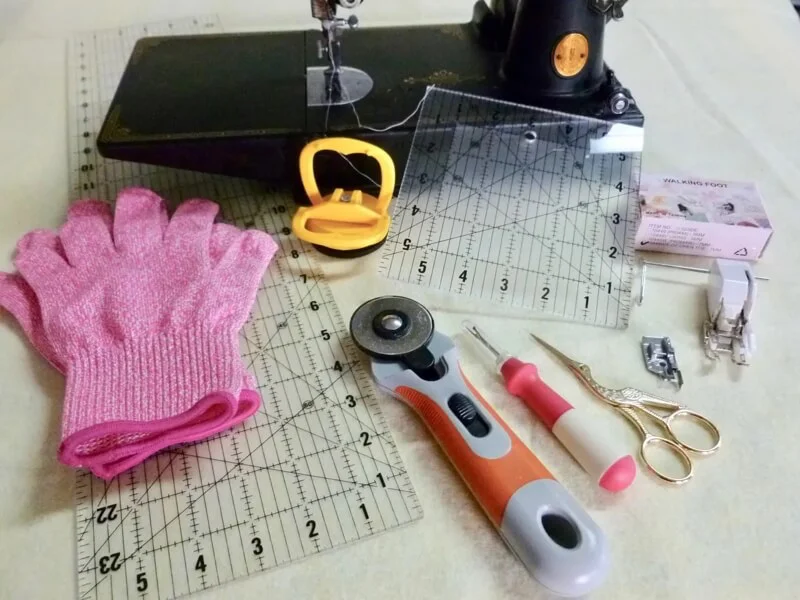
2.1 Must-have quilting tools
- Sewing machine: A basic sewing machine for beginners is perfectly sufficient. Look for models with features like adjustable stitch length and width. A quarter-inch foot can be especially helpful for achieving accurate seam allowance in quilting.
- Rotary cutter & cutting mat: A rotary cutter and self-healing cutting mat are essential for precise fabric cutting. Always prioritize rotary cutter safety by using a sharp blade, cutting away from yourself, and engaging the safety lock when not in use.
- Quilting ruler: Invest in a clear acrylic quilting ruler. Various quilting ruler sizes are available, but a rectangular ruler (like 6″ x 24″) is a versatile starting point for measuring and cutting fabric accurately.
- Fabric scissors & thread snips: Good quality fabric scissors are crucial for clean, even cuts of fabric. Keep a pair of small thread snips handy for trimming threads as you sew. Investing in quality here will make a difference.
- Pins & safety pins: You’ll need pins to hold fabric pieces together for piecing and safety pins for layering your quilt sandwich. Use quilting pins with flat heads, and consider curved safety pins for basting larger quilts.
- Seam ripper: Every quilter, beginner or not, needs a seam ripper! It’s your best friend for quickly and easily fixing any stitching mistakes.
- Iron & ironing board: Pressing your fabric and seams is a vital step in quilting. A good steam iron and ironing board are essential for achieving a professional finish.
2.2 Nice-to-have quilting tools (for later)
As you progress in quilting, you might find these tools helpful additions to your toolkit:
- Walking foot: A walking foot for quilting attaches to your sewing machine and helps feed all layers of your quilt sandwich evenly under the needle, preventing shifting and puckering during machine quilting.
- Quilting foot: A quilting foot for free motion embroidery allows you to move the fabric freely under the needle, enabling creative free-motion quilting designs.
- Fabric markers: Fabric markers erasable with water or air are useful for marking quilting lines or designs directly onto your fabric. Choose markers that are specifically designed for fabric to avoid permanent marks.
- Fabric glue/spray baste: Fabric glue for basting or spray baste can be used instead of pins to temporarily hold the quilt layers together before quilting, especially for larger projects.
- Sewing clips: Sewing clips’ uses include holding fabric pieces together, especially thicker layers or binding, and can be a convenient alternative to pins in some situations.
- Tape measure: While a quilting ruler is essential for cutting, a tape measure is still handy for body measurements if you’re making quilted clothing or for measuring larger pieces of fabric.
2.3 Beginner-friendly fabrics
Choosing the right fabric can make your first quilting projects much easier and more enjoyable.
- Pre-cut quilting fabric: Pre-cut quilting fabric bundles like jelly rolls (strips), charm packs (squares), and fat quarters (larger pieces) are fantastic for beginners. They offer coordinated fabrics and save you time on cutting.
- Cotton fabric: Cotton fabric for quilting is the most popular choice and highly recommended for beginners. It’s easy to handle, comes in countless colors and prints, and is widely available in quilt shops and online.
Don’t feel pressured to buy everything at once. Start with the must-have tools and beginner-friendly fabrics, and gradually expand your collection as you gain experience and discover your quilting preferences. Investing in a good rotary cutter and mat early on is a worthwhile decision for accurate and safe fabric cutting.
3. Making a quilt sandwich
The quilt sandwich is the heart of any quilt – it’s the assembly of three layers that are sewn together to create the finished quilt. These layers are: your carefully pieced quilt top, the insulating batting in the middle, and the backing, which is the bottom layer of your quilt.
Before you begin layering, make sure your quilt top is nicely pressed. This will help ensure all layers lie flat and smooth. When preparing your batting and backing, it’s a good idea to cut them slightly larger than the quilt top – this gives you a little extra room to work with and trim later.
Here’s the basic process for layering your quilt sandwich:
- Lay your backing fabric down on a large, flat surface (like a clean floor or large table) with the right side facing down.
- Spread your batting evenly over the backing fabric.
- Carefully center your quilt top on top of the batting, with the right side facing up.
Once your layers are arranged, the next crucial step is basting. Basting temporarily holds these layers together so they don’t shift while you are quilting.
3.1 Basting methods for quilts
Basting is key to prevent shifting and wrinkles while quilting. Choose a method and do it carefully for best results. Here are common options:
- Thread basting: Secure and traditional, using long, loose stitches. Effective but time-consuming to do and remove.
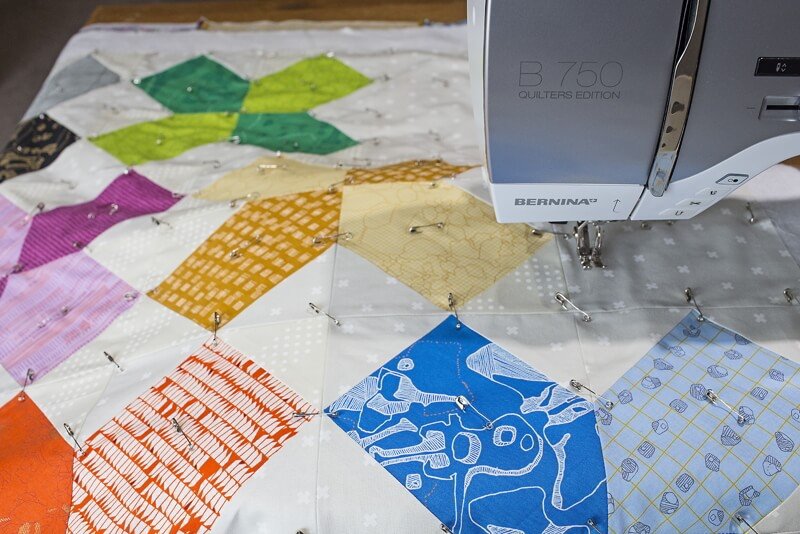
- Pin basting: Faster, using safety pins. Quicker, but slight fabric shift possible. Be careful to remove pins as you sew.
- Spray basting: Quickest, using temporary adhesive spray. Fast and easy, ensure good ventilation when spraying.
Each method has trade-offs. Pick one that suits your project and comfort level. Basting well is essential for a smooth quilt!
4. Quilting stitches for beginners
Quilting stitches are what hold your quilt sandwich together, but they also add beautiful texture and design to your finished quilt. For beginners, starting with simpler stitches is the best approach.
4.1 Beginner-friendly quilting stitches
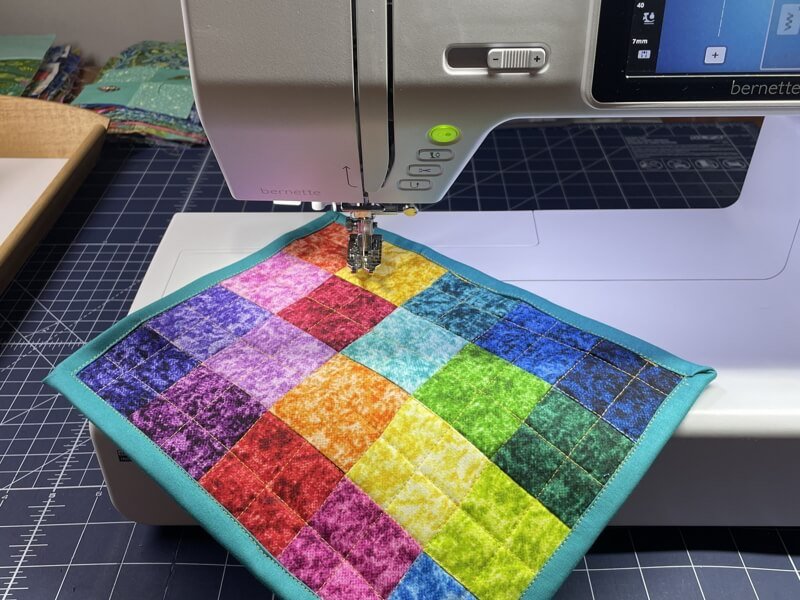
- Straight-line quilting: This is the easiest quilting stitch to learn and perfect for beginners. Straight line quilting involves stitching straight lines across your quilt, often using a quilting ruler as a guide. It’s incredibly versatile and works well for many quilt styles, from modern to traditional. You can create simple vertical, horizontal, or diagonal lines, or more complex patterns by varying the spacing and direction of your lines.
- In-the-ditch quilting: In the ditch quilting for beginners is another excellent choice. This technique involves stitching directly into the seams (“in the ditch”) where your fabric pieces are joined in the quilt top. In-the-ditch quilting provides a subtle quilted look that emphasizes the piecing of your quilt blocks and adds definition without being overly prominent.
4.2 Exploring other quilting stitch types (later)
Once you’re comfortable with straight-line and in-the-ditch quilting, you can explore other quilting stitch types to add more visual interest to your quilts:
- Outline/contour quilting: Outline quilting or contour quilting involves stitching around shapes and motifs within your quilt top, “echoing” their outlines. This can highlight appliqué, pieced designs, or printed fabrics.
- Grid/crosshatch quilting: Grid quilting pattern or crosshatch quilting creates a classic geometric look. Crosshatch quilting is simply a grid of diagonal lines that intersect to form diamond shapes. This creates an even texture across the entire quilt.
- Echo quilting: Echo quilting technique involves repeating lines that radiate outwards from a shape or seam line, creating a rippling “echo” effect.
Before you start quilting, you may want to use marking quilting designs onto your fabric. Simple methods include using pencils, chalk, templates, or even masking tape to create guidelines for your stitches.
Start with straight lines to build your skills and confidence. Mastering these easy quilting stitches will open up a world of creative possibilities for your quilting projects.
5. Hand quilting for first-timers
Hand quilting is a beautiful, traditional way to finish your quilts. It’s a portable and often relaxing approach, perfect for those who enjoy slower, more mindful crafting. For first-time quilters, hand quilting is a wonderful way to develop a true feel for the fabric layers and find a peaceful rhythm in the stitching process.
5.1 Essential hand quilting supplies
To get started with hand quilting, you’ll need just a few specialized hand quilting supplies:
- Quilting needles (‘betweens’): Quilting needle types, specifically “betweens,” are shorter and stronger than regular sewing needles. Their shorter length makes them easier to maneuver through the quilt layers when hand quilting.
- Thimble: A thimble for quilting is essential! It protects your finger as you push the needle through the fabric layers. Choose a thimble that fits comfortably on your middle finger and helps you push the needle without discomfort.
- Cotton thread: Cotton thread for hand quilting is generally recommended when quilting with cotton fabrics. Look for thread specifically labeled for quilting, as it is typically stronger and designed to hold up well within the quilt.
5.2 Step-by-step guide to hand quilting with a running stitch
The running stitch hand quilting is the most common and easiest stitch for beginners to learn. Here’s a simple hand quilting tutorial beginner guide:
- Starting and knotting thread: Thread your quilting needle and tie a small knot at the end of your thread. To start hand quilting, bring the needle up through all layers of your quilt sandwich from the back to the front, about an inch away from where you want to begin stitching. Gently tug the knot through the backing fabric so it is hidden between the layers. Bring the needle back up at your starting point.
- Loading stitches: This is the key to efficient hand quilting. Instead of making one stitch at a time, aim to “load” several stitches onto your needle before pulling it through. Rock your needle down and up through the layers, taking small, even stitches.
- Maintaining even stitch length: Try to keep your stitches consistent in length – about 1/8 to 1/4 inch is a good starting goal. Don’t worry about perfection at first; focus on evenness and rhythm.
- Ending and burying thread: To end a thread when hand quilting, take a few small backstitches to secure your line. Then, thread the needle back down into the quilt layers and bring it out an inch or two away. Gently tug the thread to pop the knot inside the batting layer, then trim the thread close to the fabric surface. This “buries” the knot and keeps it hidden.
Hand quilting is a slower, more deliberate process, but it allows you to truly connect with your quilt. It’s a wonderful starting point for beginners who want to enjoy the process and develop a tactile understanding of quilting.
6. Machine quilting basics for beginners
Machine quilting offers a faster and more efficient way to finish your quilts compared to hand quilting. While it might seem a bit intimidating at first, especially for beginners, with a little practice, you’ll find it’s a very achievable skill. Don’t let any initial hesitation hold you back – machine quilting opens up many creative possibilities!
6.1 Must-have machine quilting supplies
For successful machine quilting, you’ll need a few key supplies in addition to your basic quilting tools:
- Sewing machine: You don’t need a fancy, expensive machine to start machine quilting. A best sewing machine for quilting for beginners is simply one that can sew a consistent straight stitch. Reliability is more important than bells and whistles at this stage.
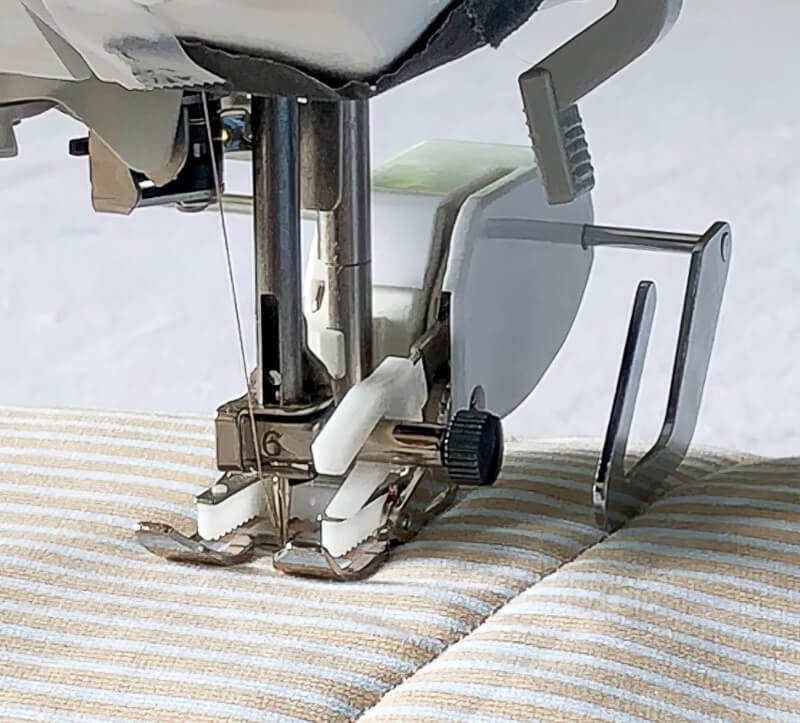
- Walking foot: A walking foot for machine quilting is truly essential for quilting straight lines on your home sewing machine. Walking foot benefits include feeding all layers of the quilt sandwich evenly, preventing the top layer from shifting or puckering as you stitch.
- Machine quilting needles (‘sharps’): Use machine quilting needles sharps, which are specifically designed to penetrate multiple layers of fabric and batting without breaking or bending. A fresh needle is always recommended for quilting projects.
- Cotton thread: Cotton thread for machine quilting, specifically 100% cotton quilting thread, is generally the best choice for quilting cotton quilts. It’s strong and designed to withstand the stress of quilting.
6.2 How to machine quilt straight lines: a beginner’s guide
A straight line machine quilting tutorial is the perfect starting point for learning to machine quilt. Here’s a machine quilting for beginners step by step guide:
- Set stitch length: Set your sewing machine to a slightly longer stitch length than you would use for piecing – around 2.5 to 3mm is a good starting point.
- Starting and securing stitches: Position your quilt sandwich under the walking foot. To starting and stopping machine quilting securely, begin by taking a few stitches forward, then engage your machine’s reverse function and stitch back over those few stitches to “stitch in place.” Then, continue stitching forward along your planned straight line.
- Using a walking foot for straight quilting: The walking foot will gently and evenly feed the layers through your machine. Keep a steady, even pressure on the foot pedal to maintain a consistent stitching speed. Let the walking foot guide the fabric – avoid pushing or pulling the quilt sandwich.
- Maintaining consistent direction and spacing: Use your quilting ruler and the edge of your walking foot as a guide to keep your lines straight and evenly spaced. Focus on a consistent distance between your lines of quilting.
- Stopping and securing stitches: When you reach the end of your quilting line, stop stitching. Again, use your machine’s reverse function to stitch back over the last few stitches to secure the thread. Lift the presser foot and remove your quilt. Clip your threads.
Machine quilting might feel fast, but control is key. The walking foot is your best friend for straight lines. Practice on scrap fabric first to get comfortable with your machine’s speed and stitch length before starting on your actual quilt.
If the idea of quilting a large project feels daunting, Quilt-As-You-Go (QAYG) is a fantastic, beginner-friendly technique to explore. The QAYG method simplifies the quilting process by breaking it down into smaller, more manageable sections. It’s especially ideal for smaller easy quilt projects and a great way for beginners to practice quilting without feeling overwhelmed.
The core idea of quilt as you go is to create a mini quilt sandwich for each individual quilt block. Instead of layering the entire quilt top, batting, and backing at once, you work on each block separately.
Here are the simplified steps for QAYG:
- Cut a piece of batting slightly larger than your quilt block.
- Center your fabric quilt block on top of the batting.
- Quilt each block individually, securing the block to the batting.
After you’ve quilted each block using the QAYG method, you then sew the individual quilted blocks together to form your finished quilt.
Quilt-As-You-Go is like quilting in bite-sized pieces! It’s fantastic for beginners because it’s less overwhelming and allows you to focus on one block at a time, making it a truly approachable and rewarding technique.
7. Binding your quilt: the finishing touch
Quilt binding is the essential final step in quilt making. It’s how you seal quilt edges, providing protection and a beautifully finished quilt look. Think of binding a quilt as the frame around your artwork – it completes the piece!
Before you start binding, prepare your quilt by pressing it well, trimming any excess batting and backing, and squaring up the quilt edges.
For beginners, straight quilt binding is the easiest method. It creates a clean and simple border around your quilt. (More detailed binding techniques can be explored as you gain experience.)
Binding is the finishing touch that brings everything together and protects your quilt for years to come. Don’t rush this important step!
8. Essential quilting tips for beginners
Starting quilting is exciting! Keep these tips in mind to set yourself up for success and enjoy the process:
8.1 Plan your quilting project
Tip: Before sewing, take a photo of your fabric layout. This helps you remember your design arrangement as you piece your quilt top. Choose simple quilt patterns to start with. Beginner-friendly patterns will build your skills and confidence without feeling overwhelming.
8.2 Basting is absolutely key
Tip: Never skip basting! Basting is absolutely key for smooth, wrinkle-free quilting. It’s worth the time to prepare your quilt sandwich properly. Choose a basting method that suits your project and comfort level. Experiment with thread, pins, or spray baste to find what works best for you.
8.3 Start quilting from the center outwards
Tip: When quilting, start quilting from the center outwards. This technique helps prevent puckering and shifting of fabric as you quilt.
8.4 Use a walking foot for straight line machine quilting
Tip: For straight line machine quilting, use a walking foot. A walking foot quilting ensures even fabric feed and prevents layers from shifting, resulting in smoother lines.
8.5 Master nesting your seams for perfect patchwork
Tip: Master nesting your seams for accurate patchwork. Nesting seams, explained simply, means pressing seams in opposite directions in adjoining rows so they “lock” together when sewn. This creates flat patchwork corners and helps with precise piecing. There are many nesting seams tutorial videos online if you need a visual guide.
8.6 Start small and simple to build confidence
Tip: For your first few projects, start small and simple to build confidence. Easy quilting projects for beginners like baby quilts, table runners, or lap quilts are great starting points.
8.7 Choose what works best for you
Tip: Choose what works best for you. Quilting is a personal journey. Experiment with different techniques and find the methods and tools you enjoy most.
8.8 Be patient and enjoy the creative process
Tip: Be patient and enjoy the creative process. Quilting takes time and practice. Relax, embrace the learning curve, and savor the satisfaction of creating something beautiful with your own hands.
Remember, every quilter starts somewhere! Be patient with yourself, embrace learning, and enjoy your quilting journey.
9. FAQs about quilting for beginners
9.1 What are the absolute essential tools I need to start quilting?
To begin your quilting journey, focus on gathering the absolute essential tools. You’ll need a rotary cutter, cutting mat, and quilting ruler for accurate fabric cutting. A basic sewing machine capable of a straight stitch is key. Of course, you’ll also need fabric, thread, a needle, pins to hold fabric, and an iron for pressing. These core tools will get you started on your first quilting projects without feeling overwhelmed.
9.2 What’s the easiest type of quilt to make as a beginner?
The easiest type of quilt to make as a beginner is a simple patchwork quilt using squares or rectangles. These projects utilize basic shapes and straight seams, allowing you to practice fundamental piecing and straight-line quilting. Choosing simple quilt patterns like these lets you build skills and confidence without tackling complex designs right away.
9.3 How much fabric do I need for a beginner quilt project?
The fabric amount needed for a beginner quilt project depends on the size of the quilt and the pattern. It’s best to start with a small project like a baby quilt or lap quilt. Always check the pattern instructions for specific fabric requirements. For a smaller project, pre-cut fabrics like a few fat quarters or a charm pack can be a convenient and manageable starting point.
9.4 Can I quilt without a fancy sewing machine?
Yes, you absolutely can quilt without a fancy sewing machine! A basic sewing machine that can sew a reliable straight stitch is perfectly sufficient for many quilting projects, especially for beginners. While advanced features like a walking foot can be helpful, they are not mandatory when you are just starting out and learning the basics of quilting.
9.5 What if I make mistakes while quilting?
Mistakes are a completely normal part of learning quilting! Every quilter, regardless of experience level, makes them. Don’t be discouraged! A seam ripper is an essential tool and your best friend for fixing errors. Focus on the learning process, enjoy the creative journey, and remember that progress, not perfection, is the goal.
10. Packlove – supporting your creative journey
As you embark on your quilting adventure and explore the world of fabric and thread, remember that attention to detail and quality craftsmanship extends to every aspect of your creative work. At Packlove, we understand this dedication to quality.
With over 8 years of experience in the garment industry, we are committed to providing high-quality garment accessories. While our expertise lies in labels and tags, zipper bags, and poly mailers for clothing, we deeply appreciate the passion and care that goes into handmade creations like quilts.
We believe that every detail matters, whether you are creating quilts for personal enjoyment or considering sharing your beautiful work with others. As your quilting and crafting journey expands, and if you ever consider selling or gifting your creations, remember Packlove for your garment label and tag needs.
We are here to support creative businesses and individuals who value quality and a professional finish. Explore our offerings and learn more about how we can support your creative journey at Packlove.
Read more:
Quilting, as you’ve now seen, is a wonderfully accessible and rewarding craft, especially for beginners. The key is to start with the basics, gather a few essential tools, learn fundamental techniques, and most importantly, enjoy the creative process.
Don’t feel overwhelmed by complex patterns or fancy equipment right away. Begin with simple projects, focus on mastering basic skills like straight-line quilting and patchwork, and gradually build your confidence and knowledge.
Embrace the journey of learning, be patient with yourself, and soon you’ll be experiencing the immense joy of creating your own beautiful, handmade quilts. So go ahead, gather your fabric and tools, and begin your quilting adventure today!


