


Sewing Machine Problems? Quick Fixes and Expert Tips


You’re in the flow, making progress on your latest sewing project, when suddenly – disaster! The thread bunches, the needle breaks, or the fabric stops feeding. Frustrating sewing machine problems like these are common for both beginner and intermediate sewers, disrupting projects, wasting valuable time and materials, and leading to a sense of discouragement. These sudden issues can derail your creative process, ruin your fabric, and potentially damage your machine if left unaddressed.
This comprehensive troubleshooting guide is your lifeline when those inevitable sewing machine hiccups occur. We’ll provide clear, easy-to-follow solutions for diagnosing and resolving a wide range of common problems. You’ll learn how to quickly identify the cause, implement the fix, and get back to enjoying your sewing. Plus, we’ll share preventative maintenance tips to keep your machine running smoothly and minimize future frustrations, saving you time, money, and stress.
1. Diagnosing and fixing specific sewing machine problems
This section tackles common sewing machine issues, grouped by the symptoms you might observe. Let’s troubleshoot!
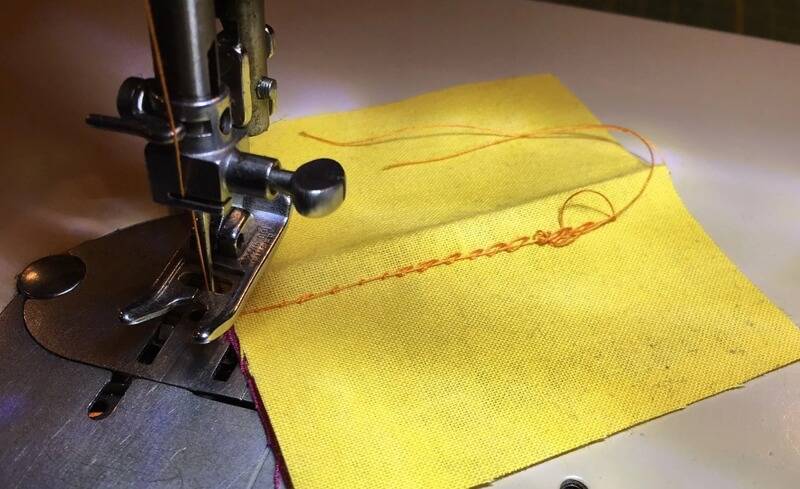
1.1 Thread issues: Bunching, breaking, and tangling
Thread problems – bunching under the fabric (bird’s nests), breaking, tangling, or fraying – often share similar root causes.
Possible Causes:
- Incorrect top threading: This is a primary culprit. Ensure the presser foot is up while threading and that you meticulously follow the threading diagram in your manual. Missing even one guide can disrupt tension.
- Incorrect bobbin threading or insertion: Ensure the bobbin is wound evenly and inserted correctly, unwinding in the direction specified in your manual.
- Incorrect tension settings: Both top and bobbin tension must be balanced. Too much or too little tension on either thread can cause problems.
- Wrong needle/thread combination: The needle size must be appropriate for the thread thickness. A needle that’s too small can cause the thread to fray or break.
- Poor quality thread: Use only good-quality machine sewing thread. Cheap or old thread can be weak and prone to breakage.
- Lint buildup: Lint accumulation in the thread path or bobbin area can interfere with thread movement.
Solutions:
- Completely re-thread the top thread, meticulously following your manual.
- Re-wind and re-insert the bobbin, ensuring it’s correctly placed.
- Adjust tension: If the thread is bunching on the underside of the fabric, the top tension is likely too loose. If it’s bunching on the top, the top tension is likely too tight. Make small adjustments and test.
- Check needle and thread compatibility: As a general guideline, use finer needles (sizes 9-11) with fine threads and lightweight fabrics, and thicker needles (sizes 14-18) with thicker threads and heavier fabrics.
- Use high-quality thread designed for machine sewing.
- Clean your machine, removing lint from the bobbin area and thread path.
1.2 Needle nightmares: Breaking, bending, and unthreading
Needle problems are another common source of frustration.
Possible Causes:
- Wrong needle type: Using a universal needle on knit fabrics, or vice versa.
- Wrong needle size: Using a needle that’s too fine or too thick for the fabric and thread.
- Dull or damaged needle: Needles become dull with use and should be replaced regularly.
- Hitting pins: Sewing over pins can bend or break needles.
- Pulling fabric: Forcing the fabric through the machine can bend the needle.
- Incorrect needle installation: The needle might not be fully inserted or might be facing the wrong direction.
- Machine timing: In rare cases, the machine’s timing might be off (this requires professional repair).
Solutions:
- Replace the needle: Use the correct type (universal for wovens, ballpoint/stretch for knits) and size for your fabric and thread.
- Always use a new, sharp needle for each project.
- Avoid sewing over pins, or place them carefully perpendicular to the seam line.
- Let the feed dogs move the fabric; don’t pull or push.
- Ensure the needle is installed correctly (refer to your manual).
- If timing is suspected, consult a professional.
1.3 Feed problems: Fabric not moving or feeding unevenly
If your fabric isn’t moving through the machine properly, or if it’s feeding unevenly, here’s what to check:
Possible Causes:
- Drop-feed engaged: The drop-feed mechanism (used for free-motion quilting) might be activated, lowering the feed dogs.
- Presser foot up: The presser foot must be down to hold the fabric against the feed dogs.
- Incorrect presser foot pressure: Too little pressure won’t grip the fabric; too much can impede movement.
- Lint buildup: Lint can clog the feed dogs, preventing them from gripping the fabric.
- Worn feed dogs: Over time, feed dogs can wear down and lose their grip.
- Stitch length too short: A very short stitch length may not allow the fabric to advance properly.
Solutions:
- Disengage the drop-feed mechanism if it’s activated.
- Lower the presser foot.
- Adjust the presser foot pressure according to your fabric (refer to your manual).
- Clean the feed dogs thoroughly to remove lint.
- Replace worn feed dogs (this usually requires professional repair).
- Increase the stitch length.
1.4 Stitch skipping and irregularities
Skipped stitches or uneven stitching can be caused by several factors:
Possible Causes:
- Incorrect needle: Using the wrong type or size of needle.
- Improper threading: Incorrect threading of either the top thread or the bobbin.
- Machine timing: The timing between the needle and the bobbin hook might be off.
- Incorrect stitch settings: Using the wrong stitch length or width for decorative stitches.
- Using a zipper foot too far from the needle.
Solutions:
- Check the needle: Ensure it’s the correct type (ballpoint for knits!) and size, and that it’s not bent or dull.
- Completely re-thread the machine (both top and bobbin), following your manual carefully.
- If timing is suspected, seek professional repair.
- Verify the correct stitch length and width settings for decorative stitches (consult your manual).
- Adjust zipper foot positioning.
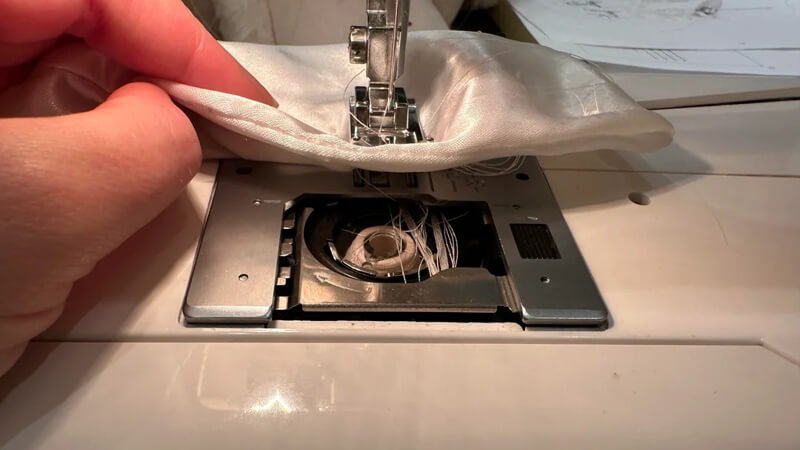
1.5 Bobbin blues: Tension troubles and tangled threads
Bobbin-related problems are a frequent source of sewing headaches.
Possible Causes:
- Incorrect bobbin winding: The bobbin might be wound unevenly or too loosely.
- Incorrect bobbin insertion: The bobbin might be inserted in the wrong direction.
- Lint or thread in bobbin case: Even a small piece of lint can disrupt tension.
- Worn or damaged bobbin: Bobbins can become damaged over time.
- Incorrect bobbin size: Using a bobbin that is not specifically designed for your machine model.
Solutions:
- Re-wind the bobbin, ensuring even tension and a smooth, consistent wind.
- Re-insert the bobbin, carefully following the instructions in your manual.
- Clean the bobbin case thoroughly, removing any lint or thread fragments.
- Replace worn or damaged bobbins.
- Use the correct bobbin size: Only use bobbins that are the correct size and type for your machine.
1.6 Fabric frustrations: Puckering, wavy seams, and bunching
These issues often relate to fabric handling and tension.
Possible Causes:
- Incorrect tension settings: Often, the top tension is too tight.
- Wrong needle or thread: Using a needle or thread that’s too thick or too thin for the fabric.
- Pulling/pushing fabric: Forcing the fabric through the machine instead of letting the feed dogs guide it.
- Uneven fabric feed: This can be caused by incorrect presser foot pressure or problems with the feed dogs.
- Wrong presser foot: Using a general-purpose foot on delicate or stretchy fabrics.
- Incorrect backstitching: Stitching off the edge of the fabric when backstitching.
Solutions:
- Adjust tension settings: Start by loosening the top tension slightly.
- Choose the correct needle and thread for your fabric.
- Avoid pulling or pushing the fabric; let the feed dogs do their job.
- Ensure even fabric feed: Adjust presser foot pressure or consider using a walking foot (especially for stretch fabrics or multiple layers).
- Use the appropriate presser foot for your fabric.
- Practice proper backstitching: Stitch a few stitches in reverse on the fabric, not off the edge.
1.7 Machine malfunctions: Seizing up, strange noises, and immobile needles
If your machine suddenly stops working, makes unusual noises, or the needle won’t move, don’t panic!
Possible Causes:
- Lack of lubrication: The machine may need oiling.
- Significant lint buildup: Lint can clog the mechanisms and prevent movement.
- Bobbin winder engaged: The machine might be in bobbin-winding mode.
- Internal mechanical issue: A more serious problem requiring professional repair.
Solutions:
- Clean and oil the machine according to your manual’s instructions. Never force a seized machine.
- Thoroughly clean the machine, removing all lint and debris.
- Disengage the bobbin winder mechanism.
- If the problem persists, seek professional repair.
2. Preventative maintenance: Keeping your sewing machine happy
Regular maintenance is key to preventing many common sewing machine problems and extending the life of your machine.
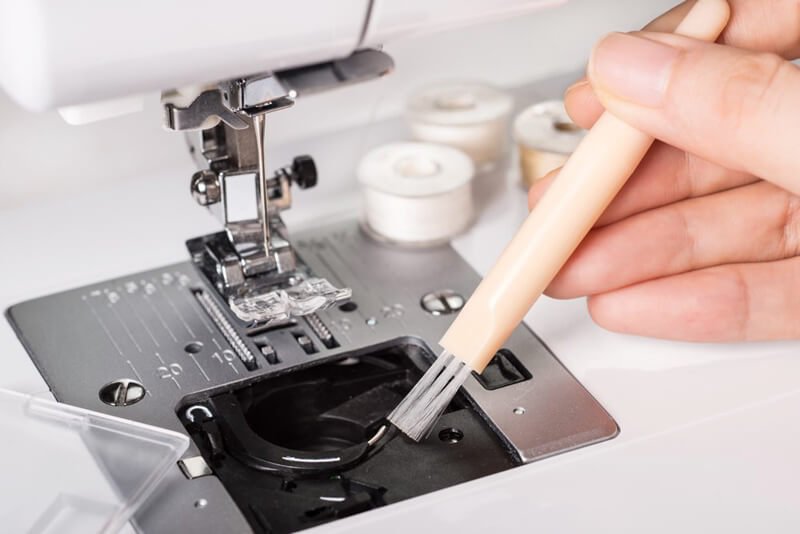
2.1 Regular cleaning and oiling
Cleaning: Lint, dust, and thread fragments can accumulate inside your sewing machine, interfering with its operation. Clean your machine regularly, focusing on these areas:
- Bobbin case: Remove the bobbin and bobbin case and use a small brush or lint brush to remove any accumulated lint.
- Feed dogs: Clean around the feed dogs, removing any lint that might be preventing them from gripping the fabric.
- Under the needle plate (throat plate): Remove the needle plate and clean underneath it.
How often should you clean? It depends on how much you sew, but a good rule of thumb is to clean after each major project or at least once a month.
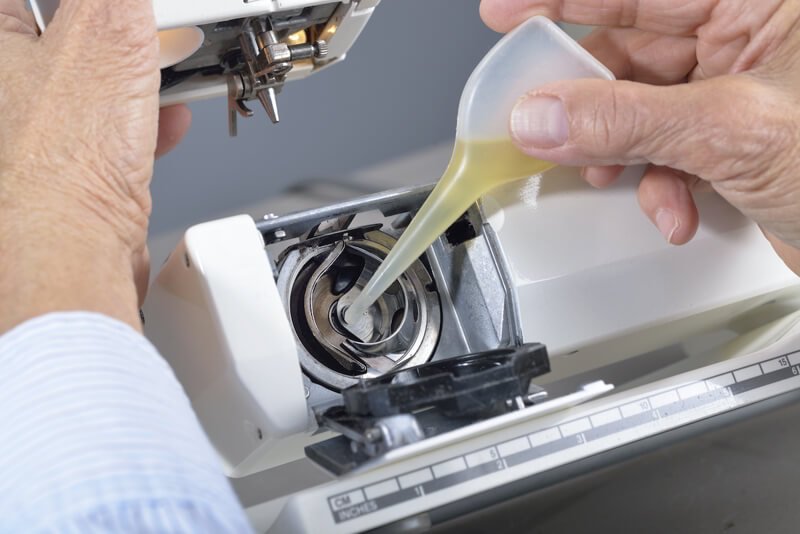
Oiling: Some sewing machines require regular oiling, while others are self-lubricating. Consult your manual for specific instructions on whether, where, and how often to oil your machine. Use only sewing machine oil.
2.2 Needle know-how
Using the correct needle is crucial for preventing skipped stitches, thread breakage, and fabric damage.
- Needle type: Choose the right type of needle for your fabric, Ballpoint, Stretch, Denim, Leather.
- Needle size: Choose the right size needle based on the fabric weight and thread thickness. Finer needles (lower numbers) are for lighter fabrics and threads; thicker needles (higher numbers) are for heavier fabrics and threads.
2.3 Thread tactics
Just like needles, thread quality and compatibility matter.
- Use good quality thread designed specifically for machine sewing. Avoid old, brittle, or cheap thread, as it can break easily and cause tension problems.
- Match the thread weight to your fabric and needle. Use finer threads for lightweight fabrics and thicker threads for heavier fabrics. A needle and thread chart can guide you.
- Generally, use the same type of thread in the bobbin as you use in the top thread.
2.4 Professional servicing
Even with regular home maintenance, it’s recommended to have your sewing machine professionally serviced periodically. A technician can perform a thorough cleaning, lubrication, and adjustment, and can identify and address any potential problems before they become major issues. How often you need professional service depends on how much you use your machine, but annually is a good guideline for regular sewers.
3. FAQs about sewing machine troubleshooting
3.1 Why is my thread breaking only sometimes?
Intermittent thread breakage often points to a subtle, rather than a major, problem. Here are some likely culprits:
- Lint buildup: Even a small amount of lint in the thread path or bobbin area can disrupt tension and cause breakage.
- Slightly damaged needle: A needle with a tiny burr or a slightly bent tip might work sometimes, but cause intermittent breakage.
- Inconsistent tension: Slight variations in tension can lead to breakage, especially with delicate threads.
- Missing a thread guide during the threading process, even partially, can disrupt the tension and cause intermittent breakage.
Solutions:
- Completely re-thread the machine (both top and bobbin).
- Clean the bobbin area and thread path thoroughly.
- Replace the needle.
- Check tension settings.
3.2 Can I use any type of oil on my sewing machine?
No, absolutely not! You should only use sewing machine oil. Other types of oil (like household oil, WD-40, or cooking oil) can damage the machine’s internal components, gum up the mechanisms, or stain your fabric. Sewing machine oil is specifically formulated to be lightweight and non-gumming. Always check your machine’s manual for specific oiling recommendations, as some modern machines are self-lubricating and don’t require oiling.
3.3 How often should I really change my needle?
The general guideline is to change your needle:
- After every project: This is ideal for optimal performance.
- After approximately 8 hours of sewing: This is a good rule of thumb for regular sewers.
- When switching to a different fabric type: Even if the needle is relatively new.
- If you experience any problems: Skipped stitches, thread breakage, or fabric damage.
3.4 What does it mean if my machine is “out of time”?
“Out of time” refers to a misalignment of the needle and bobbin hook mechanisms. These two parts must work together in perfect synchronization to form a stitch. If the timing is off, the needle and bobbin thread won’t interlock correctly, resulting in skipped stitches, thread breakage, or the machine not sewing at all. Machine timing is a complex adjustment that usually requires professional repair by a qualified sewing machine technician.
3.5 My machine is vintage. Are these tips still relevant?
Yes, the core principles of sewing machine troubleshooting apply to most machines, regardless of age. The basic mechanisms (needle, bobbin, feed dogs, tension) are fundamentally similar. However, if you have a manual for your vintage machine, it’s always best to consult it for specific instructions. Vintage machines may have unique features or require specific types of oil or needles. If you don’t have the manual, try searching online for a digital copy using the machine’s brand and model number.
While this guide focuses on troubleshooting your sewing machine, it’s important to remember the finishing touches that elevate your sewn creations. Packlove specializes in providing high-quality, custom labels, tags, zipper bags, and poly mailers for clothing and other sewn goods.
With over 8 years of experience in the garment industry, particularly in processing labels and tags, we understand the importance of professional branding and packaging. We can advise you on the best labeling solutions to complement your sewing projects, whether you’re creating garments for personal use, for sale, or for a growing brand.
Let Packlove help you add the perfect finishing touch to your creations. Visit Packlove to explore our services and contact us for a quote or consultation.
Read more:
Sewing machine problems are inevitable, but they don’t have to derail your projects. Understanding common issues, knowing how to troubleshoot, and practicing preventative maintenance are key to keeping your machine running smoothly. Your machine’s manual is your best resource, so consult it often. Don’t be afraid to experiment, and seek professional help when needed. Mastering basic troubleshooting empowers you to sew with confidence and enjoy the creative process. By taking care of your machine and addressing problems promptly, you can ensure many years of happy sewing!


