


Dojo Patch: Iron-On Guide for Your Karate Uniform (Gi)


So, you’ve got a new dojo patch and you’re ready to show it off on your karate uniform (gi). But before you grab the iron, take a moment! Applying an iron-on patch correctly is crucial for ensuring it stays attached and looks great, even after countless training sessions and washes. Incorrect application can lead to a patch that peels, frays, or even damages your quality karate gi.
This guide will walk you through every step of the process, from gathering your materials to troubleshooting common problems. We’ll cover the right technique, the ideal temperature settings, and everything in between. By the end of this guide, you will be able to confidently attach an iron-on patch to your karate uniform (gi). Let’s see!
1. Gathering Your Materials
Before you begin, it’s essential to have all the necessary materials on hand. This will make the process smooth and efficient, ensuring the best possible heat transfer for your iron-on patch. Here’s what you’ll need:
1.1 Your Karate Uniform (Gi)
Your karate uniform, also known as a gi, is the foundation for this project. Gi fabric can vary, with most being made from cotton or a cotton-poly blend. Heavier fabrics, like a 12oz gi, may require slightly longer ironing times to ensure the heat penetrates properly. Lighter-weight uniforms generally require less time. It is best to keep that in mind.
1.2 Your Iron-On Patch
The star of the show! Ensure your iron-on patch, often a dojo patch, is of good quality. Look for detailed embroidery and a strong adhesive backing. The material of the patch itself can vary, but the adhesive is what will bond it to your uniform.
1.3 Your Iron
A standard household iron is all you need. The most important feature is adjustable heat. You’ll need to select the appropriate temperature based on your gi’s fabric and the patch’s instructions (if provided). Make sure the steam function is turned OFF.
1.4 Your Ironing Board
A sturdy, flat surface is crucial for even heat distribution. Your ironing board provides this stable base, allowing you to apply consistent pressure during the ironing process.
1.5 Protective Cloth
This is a critical, often overlooked, item. A protective cloth – such as a thin cotton towel, parchment paper – acts as a barrier between the iron and the patch. This helps prevent scorching of both the patch and your uniform.
1.6 Spray Bottle with Water (Optional)
A light mist of water can sometimes aid in heat transfer, particularly with thicker fabrics. However, this is optional and depends on the specific materials involved. If unsure, it’s generally best to start without water and add it only if needed.
2. Preparing Your Karate Uniform and Patch
Proper preparation is key to a successful iron-on patch application. These steps ensure optimal adhesion and a professional-looking result.
2.1 Washing and Drying the Uniform
A clean uniform is essential. Washing and drying your gi removes any dirt, oils, or sizing (a starch-like substance applied during manufacturing) that could interfere with the patch’s adhesion to the fabric. Always follow the care instructions on your gi’s label.
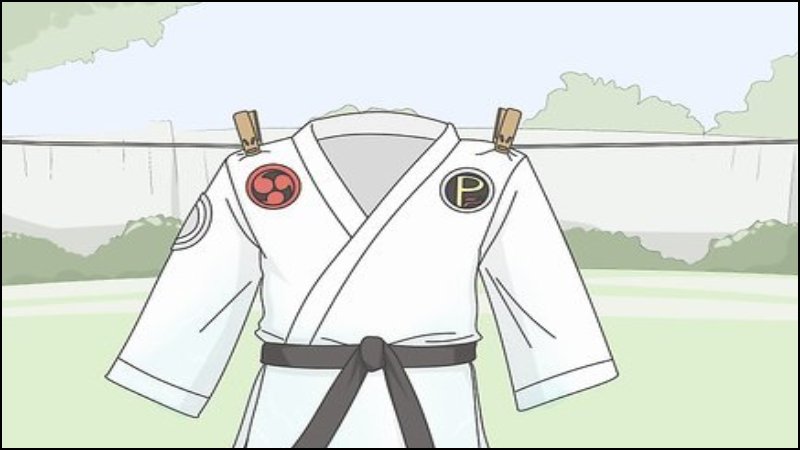
2.2 Identifying the Correct Patch Placement
Patch placement is important for both aesthetics and etiquette. The most common location for a dojo patch is on the left chest of the uniform jacket. A general guideline is to position the patch 2-3 inches down from the breast seam and 2 inches across from the ribbed seam. However, your specific dojo may have its own guidelines, so it’s always best to check with your instructor. Measurement ensures accuracy.
2.3 Preheating Your Iron
Before you even touch the patch to the uniform, preheating your iron is crucial. Set your iron to the appropriate heat setting for your gi fabric. For most cotton uniforms, a high setting is suitable, but always double-check the care label. Crucially, ensure the steam function is turned off. Steam can interfere with the adhesive and prevent proper bonding. The correct temperature is key to melting the adhesive on the patch without damaging the gi fabric.
3. The Ironing Process: Step-by-Step
This step-by-step guide will ensure your patch is securely attached using the correct ironing application technique. Pay close attention to heat, pressure, and duration for optimal results.
3.1 Step 1: Positioning the Patch
Carefully place your patch on the desired location on your uniform, adhesive-side down. Double-check the alignment to ensure it’s straight and precisely where you want it.
3.2 Step 2: Placing the Protective Cloth
Lay your protective cloth over the patch. Ensure it completely covers the patch and extends beyond its edges. The cloth should be smooth and wrinkle-free to ensure even heat distribution.
3.3 Step 3: Applying Heat and Pressure
With your preheated iron, press down firmly on the protective cloth directly over the patch. Apply consistent, firm pressure. Do not move the iron in a back-and-forth motion, as this can cause the patch to shift. Hold the iron in place for approximately 20-30 seconds. The exact duration may vary slightly depending on the thickness of your gis and the patch’s instructions.
3.4 Step 4: Checking the Edges
Carefully lift a corner of the protective cloth and gently check the edges of the patch for adhesion. If any areas appear to be lifting, replace the protective cloth and apply heat and pressure for a few more seconds. Repeat this process until all edges are firmly bonded.
3.5 Step 5: Cooling and Setting
Once you’re satisfied with the adhesion, remove the iron and the protective cloth. Allow the patch to cool completely for 2-3 minutes. Do not touch or move the patch during this time, as the adhesive is still setting.
3.6 Step 6: The Final Check
After the cooling period, give the patch a gentle tug to ensure it’s securely attached. Check for any loose areas, particularly around the edges. If you find any, you can repeat the ironing process (using the protective cloth) on those specific spots.
4. Troubleshooting Common Problems
Even with careful preparation, you might encounter some issues. This section provides solutions to common problems encountered when applying iron-on patches.
4.1 Patch Not Sticking
If your patch is not sticking, several factors could be at play:
- Insufficient Heat: Ensure your iron is set to the correct temperature for your uniform and patch materials. You may need to increase the heat slightly.
- Insufficient Pressure: Apply firm, consistent pressure throughout the ironing process.
- Uneven Surface: Make sure you’re using a firm, flat ironing board.
- Incompatible Fabric: Some fabrics simply don’t bond well with iron-on adhesives. Check the patch manufacturer’s instructions for fabric compatibility.
4.2 Edges Peeling
Edges peeling is a common frustration, often caused by:
- Insufficient Ironing Time: Ensure you’re applying heat for the recommended duration, paying particular attention to the edges.
- Uneven Heat Distribution: Make sure the iron is making full contact with the protective cloth and applying even pressure across the entire patch, especially the edges.
4.3 Fabric Scorching
Fabric scorching indicates that the heat setting was too high or the iron was applied for too long:
- Iron Too Hot: Reduce the heat setting on your iron.
- Protective Cloth Too Thin: Use a thicker protective cloth, or double up on a thinner one.
- Prolonged Ironing: Keep an eye on the duration you keep the heat on the fabric
4.4 Patch Shifting During Ironing
If you find that your patch is not staying in place, you may have been ironing with a back-and-forth motion. The iron should only be placed straight down.
5. Caring for Your Uniform with the Ironed-On Patch
Care instructions, washing, and drying are crucial for maintaining the durability of both your uniform and the newly applied patch. These steps will help preserve the adhesive bond and keep your patch looking its best.
- Turn Inside Out: Before washing, always turn your *uniform inside out. This protects the patch from direct abrasion during the wash cycle.
- Cold Water: Wash your gi in cold water. Hot water can weaken the adhesive and potentially damage the patch.
- Low Heat: If you use a dryer, tumble dry on a low heat setting. High heat can also compromise the adhesive.
- Air Dry: The best option is to air dry your gi. This is the gentlest method and minimizes any risk of heat damage to the patch or the uniform.
- Avoid Fabric Softeners: Avoid fabric softeners, as these can leave a residue that may interfere with the adhesive’s bond over time, reducing the durability of the patch, uniform.
6. Related Questions
6.1 Can I sew the patch on if the ironing doesn’t work?
Yes, absolutely. If you’re having trouble with the iron-on method, or if you simply prefer a more permanent solution, sewing the patch onto your uniform is a great alternative. This provides extra security and is often recommended for patches that will experience a lot of wear and tear.
6.2 Can I remove the iron-on patch if I need to?
Removing an iron-on patch can be tricky, and it may not always be possible to remove it completely without leaving some residue. There are methods involving heat and specialized adhesive removers, but these carry the risk of damaging the uniform fabric. It’s best to consider the patch placement permanent before applying it.
6.3 How many times can I wash gi (uniform) with iron-on patch?
The lifespan of an iron on patch may vary, but if you put it in correctly and then treat it properly afterwards, you should get a long time out of it.
Read more:
Applying an iron-on patch to your karate uniform (gi) is a straightforward process, but attention to detail is key. By following this step-by-step guide, you’ve learned the proper technique, the importance of heat and pressure, and how to troubleshoot common problems. Remember, a well-applied patch not only personalizes your uniform but also reflects your dedication to your martial arts practice.


