


Hemming Techniques: A Guide to Perfect Finishes for Any Fabric


In the world of garment creation, the hem is the unsung hero. It’s the final flourish, the detail that can make or break the entire piece. For small clothing businesses, DIY designers, and seamstresses striving for that polished, professional look, mastering hemming is non-negotiable. Are you struggling to achieve neat, durable hems?
Do you find yourself intimidated by different fabrics like denim, delicate silks, or stretchy knits? Is time-efficient hemming a constant challenge? This expert guide is your comprehensive resource to unlock the secrets of professional hemming. We’ll equip you with practical tips, step-by-step instructions, and insider advice to confidently master garment finishing. Let’s see!
1. Importance of Hemming
1.1 Hemming and Brand Perception
In today’s competitive clothing market, brand image is everything and customer perception is the key to success. A seemingly small detail like the hemline plays a surprisingly large role in shaping that perception. Neat and professionally executed hems instantly communicate garment quality and professional appearance.
Customers instinctively associate clean, well-finished hems with higher standards of craftsmanship and attention to detail. Conversely, uneven, poorly finished hems can create a negative impression, suggesting rushed production or a lack of care, ultimately damaging brand reputation and eroding customer trust.

1.2 Hemming for Garment Durability
Beyond aesthetics, hemming plays a crucial role in garment durability. The raw edges of fabric are inherently vulnerable to fraying and unraveling, especially with wear and washing. Hemming effectively prevents fraying by securely enclosing these raw edges, creating reinforced edges that can withstand the stresses of daily use.
This reinforcement directly contributes to extending the garment lifespan. Strong, durable hems ensure that seams remain intact, preventing garments from falling apart prematurely. Ultimately, focusing on seam strength through proper hemming results in durable hems that enhance the longevity of your creations.
1.3 Hemming and Perceived Value
The quality of hemming directly impacts the perceived value of a garment. A professionally hemmed garment simply looks and feels more valuable, justifying a higher price point. Garment aesthetics are significantly enhanced by clean, even hems, contributing to an overall impression of polish and refinement.
This quality finishing signals to customers that they are investing in a well-made, thoughtfully crafted item. In contrast, poorly finished hems can cheapen the look of a garment, diminishing its value proposition and making it harder to command premium prices.
2. Preparing for Perfect Hemming: Essential Steps
2.1 Essential Tools for Hemming
Having the right hemming tools at your fingertips is non-negotiable for achieving professional results. These sewing tools, when used correctly, will make the hemming process significantly easier and more precise:
- Measuring Tape: For accurate measurements of hem length and seam allowances.
- Pins: To securely hold fabric folds in place before sewing.
- Sharp Fabric Scissors: Essential for clean, precise fabric cutting.
- Seam Ripper: An indispensable tool for correcting mistakes and removing unwanted stitches.
- Hemming Gauge: A small ruler with a sliding marker, specifically designed for measuring and marking consistent hem depths.
- Iron: Crucial for creating crisp folds and pressing hems flat before and after sewing.
- Pressing Cloth: To protect delicate fabrics from direct heat when ironing.
- Fabric Markers/Chalk: For marking hem lines and seam allowances on fabric.
- Sewing Needles: Choose the appropriate needle type and size for your fabric.
- Sewing Thread: Select thread that matches your fabric in color and weight for a professional finish.
2.2 Understanding Seam Allowance for Hems
Seam allowance is the distance between the raw edge of the fabric and the stitching line. In hemming, it’s often referred to as hem allowance and dictates how much fabric is folded under to create the hem. Understanding seam allowance is crucial because it directly impacts the hem width and the overall proportions of your garment. The correct measuring seam allowance will vary depending on the type of hem you are creating and the fabric you are using. Wider hems generally require a larger seam allowance.
2.3 Fabric Preparation is Key
Proper fabric preparation is an often overlooked but absolutely vital step in achieving perfect hems. Always pre-wash fabric, especially natural fibers like cotton, linen and rayon, before cutting and hemming. Pre-washing fabric addresses potential fabric shrinkage. Fabrics can shrink during their first wash and if you hem your garment before washing, the hem length will change after washing, potentially resulting in a garment that is too short or has distorted proportions.
Pre-treating fabric for stains before hemming is also a good practice, ensuring any blemishes are addressed before the final finishing. Furthermore, ironing fabric and pressing fabric thoroughly before hemming is essential. Crisp, flat fabric is much easier to work with, allowing for accurate measuring, folding, and pinning, ultimately leading to neater and more professional hems.
2.4 Tidying Raw Edges: A Professional Prerequisite
Leaving raw edges unfinished within a hem is a hallmark of amateur sewing and can lead to unsightly fraying over time. Edge finishing is a clean finish prerequisite for professional-looking hems. Finishing raw edges prevents fraying and creates a more durable and aesthetically pleasing hem. Several methods can be used for tidy edges:
- Serging Edges: Using a serger (overlock machine) is a fast and efficient way to create a clean, finished edge.
- Zigzag Stitch: A zigzag stitch along the raw edge on a regular sewing machine provides a simple yet effective way to prevent fraying.
- Seam Sealant: For fabrics that fray excessively, a seam sealant can be applied to the raw edge to prevent unraveling.
Choosing the appropriate edge finishing method depends on the fabric type and the desired level of finish. Regardless of the method, taking the time to finish raw edges before hemming is a sign of quality craftsmanship and attention to detail.
3. Mastering Different Hemming Techniques
3.1 Machine Hemming Techniques
Machine hemming is the workhorse of garment construction, offering speed, efficiency and a wide range of options for various fabrics and garment types. Mastering these sewing machine hems is fundamental for any aspiring or established clothing business.
3.1.1 Straight Hem: The Foundation
The straight hem is the most basic and versatile of all hems, making it the beginner hemming starting point and a staple for countless garments. This basic hem, also known as a single-fold hem, is simple to execute and suitable for straight edges on stable fabrics like cotton, linen, and many medium-weight woven materials.
To create a machine straight hem, begin by determining your desired seam allowance and pressing the raw edge of the fabric up by that amount. Then, fold the edge up again by the same amount to encase the raw edge within a double fold, creating a clean finish.
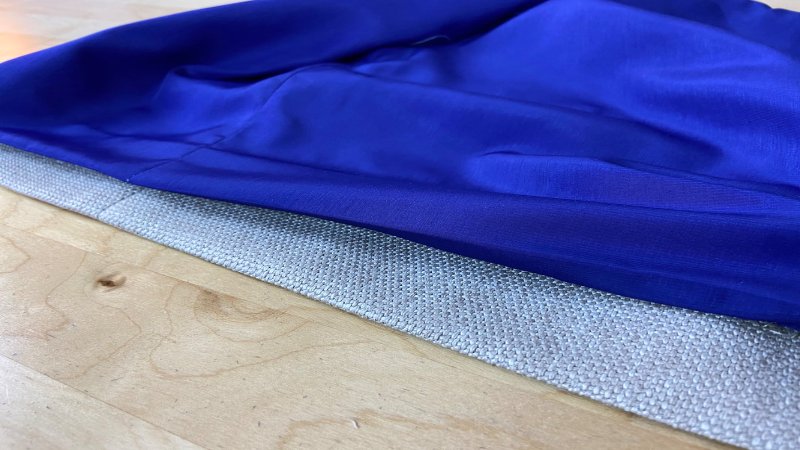
3.1.2 Rolled Hem: For Delicate Edges
The rolled hem is the perfect choice for finishing the edges of delicate fabrics hem such as silk, chiffon, voile and other lightweight materials. This narrow hem creates a soft, subtle and almost invisible finish, preventing fraying without adding bulk to fine fabrics. A rolled hem foot for your sewing machine is invaluable for achieving a professional rolled hem. This specialized foot automatically rolls the fabric edge under twice as you sew, creating a tiny, neat edge finish.
3.1.3 Blind Hem: The Invisible Finish
For situations where you want a hem to be virtually invisible from the right side of the garment, the blind hem is the answer. This invisible hem, also known as a hidden hem, is a classic choice for skirts, pants, and formal wear hem, where a clean, uninterrupted line is desired.
A blind hem foot and blind hem stitch on your sewing machine are essential for achieving this technique efficiently. The blind hem foot guides the folded edge of the fabric while the blind hem stitch creates tiny, almost invisible stitching that catches only a few threads of the outer fabric. The result is a hem that appears seamless and professionally finished.
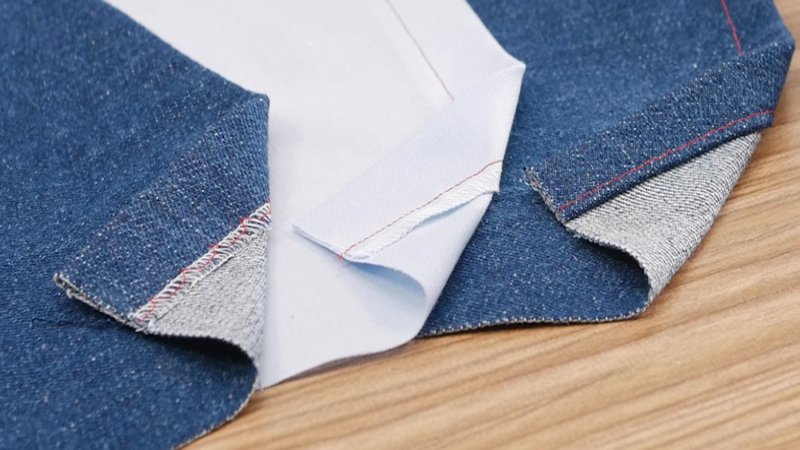
3.1.4 Double Folded Hem: Durable and Neat
When durability and a clean, robust finish are paramount, the double folded hem is the go-to technique. This durable hem is created by folding the fabric edge under twice, similar to a straight hem but with a wider double fold, resulting in a more substantial and reinforced hem. The double folded hem is exceptionally strong and resistant to fraying, making it ideal for sturdy fabric hem like jeans hem, workwear, children’s clothing, and other garments that will endure frequent wear and washing.
The neat hem finish of a double folded hem also makes it a good choice for projects where the inside of the garment might be visible, as it provides a clean and professional look from both sides. Heavy fabrics and garments requiring long-lasting hems benefit greatly from the strength and durability of the double folded hem.
3.1.5 Serged Hem: Quick and Clean for Knit Fabrics
For knit fabrics and casual wear, the serged hem, also known as an overlock hem, offers a fast, efficient, and clean finish. A serger machine uses an overlock stitch to simultaneously trim the raw edge, encase it in thread and sew a seam.
This creates a neat, stretchy, and durable hem that is particularly well-suited for the properties of knit fabrics and stretch fabrics. Serged hems are commonly found on t-shirts, sweatshirts, leggings and other casual wear hem items. The speed and efficiency of serger hem make it a popular choice for production sewing and for achieving a quick hem on knit garments.
3.1.6 Hand Hemming Techniques: The Couture Touch
Hand hemming represents the pinnacle of garment finishing, offering a level of control, delicacy and artistry that machine hemming simply cannot replicate. This couture hem technique is often reserved for high-end garments, and custom hem work, where the utmost attention to detail and a softer more fluid drape are desired. Hand sewn hem techniques are a hallmark of heirloom sewing and lingerie sewing, where the subtle beauty and handcrafted quality are highly valued.
3.1.7 When to Choose Hand Hemming
Hand hemming is the preferred choice in specific situations where its unique qualities truly shine. For delicate fabrics like fine lace, silk charmeuse or sheer chiffon, hand hemming provides a gentle touch that prevents fabric distortion and preserves the fabric’s delicate nature. In couture finishes, hand hemming is often employed to achieve an unparalleled level of refinement and invisibility, creating hems that are virtually undetectable.
When a soft drape is desired, hand hemming allows the fabric to fall naturally and gracefully without the slight stiffness that machine stitching can sometimes impart. Custom garments and heirloom garments often warrant the extra time and care of hand hemming, reflecting the bespoke nature of the piece. Finally, in situations where machine stitching might be too visible or bulky, hand hemming offers a more discreet and subtle alternative.
3.1.8 Essential Hand Hemming Stitches (Slip Stitch, Blind Stitch, Catch Stitch)
Mastering a few key hand hemming stitches is essential for anyone venturing into hand hemming. Here are three fundamental techniques:
- Slip Stitch: The slip stitch is the gold standard for invisible hand hem. It creates a virtually seamless hem, perfect for delicate fabrics and couture garments. The needle “slips” through the fold of the hem and then catches just a few threads of the garment fabric, creating almost imperceptible stitches.
- Blind Stitch: The blind stitch is another excellent option for a near-invisible hand hem. Similar to the slip stitch, it is designed to be hidden. The needle picks up a tiny amount of fabric from the garment and then a small stitch within the hem fold, creating a secure yet discreet finish.
- Catch Stitch: The catch stitch is a slightly more visible but still very useful hand hemming stitch. It is wider and less delicate than the slip or blind stitch, making it a good choice for slightly thicker fabrics or when a completely invisible hem is not essential. The needle “catches” a small amount of fabric in a diagonal direction, creating a flexible and secure hem.
3.2 Specialized Hemming Techniques
Beyond the standard machine and hand hemming methods, there exists a realm of specialized hemming techniques tailored for specific garment types or fabrics. These unique hem techniques address particular challenges or aesthetic goals associated with certain projects.
3.2.1 Hemming Jeans: A Step-by-Step Guide for Beginners
Hemming jeans can seem daunting, especially due to the thick denim and bulky seams. However, with the right approach and tools, even beginner jeans hem sewers can achieve professional results. This jeans hem tutorial provides a step-by-step guide to how to hem jeans using a sewing machine, making jeans alteration accessible to all.
To successfully hem jeans, gather these essential jeans hemming tools and materials:
- Denim Needles: Use heavy-duty denim needles specifically designed for thick fabrics.
- Heavy Thread: Select heavy thread that matches the original jeans sewing supplies topstitching thread color for an authentic look.
- Seam Ripper: For removing the original hem and any mistakes.
- Measuring Tools: Measuring tape and ruler for accurate hem length.
- Iron: For pressing crisp folds.
- Pins: To secure hem folds.
- Optional: Hump Jumper: A hump jumper (or Jean-a-ma-jig) is a helpful tool for sewing over thick seams smoothly
3.2.2 Beginner’s Guide to Hemming Towels, Napkins, and More
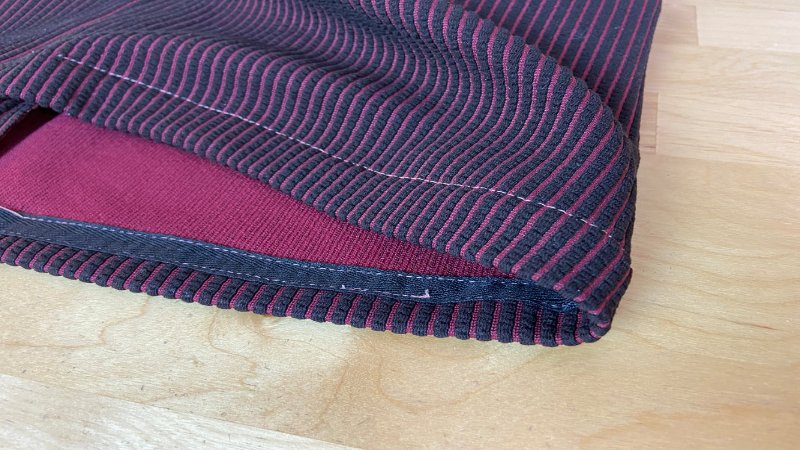
Hemming towels, napkins, placemats and other home textile hems requires a focus on durability, neat corners, and appropriate hem allowance for items that will be frequently washed. Using handwoven towel hem as a specific example, we can explore key techniques applicable to various home textile projects. Planning hem allowance for towel hem allowance is crucial, considering factors like fabric shrinkage and the desired hem width.
Handwoven towels, in particular, may shrink significantly upon washing. Always pre-wash fabric before hemming. Account for serge allowance if you plan to serge the raw edges before hemming. For a standard double fold hem, a hem allowance of 1-2 inches is generally recommended for towels, allowing for a generous double fold and a substantial finished hem.
Tools and Materials for Hemming Jeans
To embark on your jeans hemming tools journey, gather these essential supplies:
- Denim Needles: Invest in denim needles (size 14/90 or 16/100) – these are specifically engineered to pierce through the dense weave of denim without breaking or skipping stitches.
- Heavy-Duty Thread: Opt for heavy thread in a color that matches the original topstitching on your jeans. This ensures a professional and authentic-looking finish. Polyester or cotton-wrapped polyester threads are excellent choices for durability.
- Seam Ripper: A trusty seam ripper is indispensable for carefully removing the original hem and correcting any mistakes along the way.
- Measuring Tools: Accurate measurements are key. You’ll need a measuring tape or ruler, and ideally a hemming gauge for consistent hem depths.
- Iron and Pressing Board: An iron and pressing board are crucial for creating crisp folds and ensuring a flat, professional-looking hem.
- Pins or Clips: Use pins or fabric clips to securely hold the hem folds in place before and during sewing.
- Optional: Hump Jumper (Jean-a-ma-jig): A hump jumper, also known as a Jean-a-ma-jig, is a small, wedge-shaped tool that helps your sewing machine foot glide smoothly over thick seams, preventing skipped stitches and needle breakage.
Step-by-Step Jeans Hemming Tutorial
Follow these jeans hemming steps for a successful sewing jeans hem:
- Determine Hem Length and Mark: Have the wearer try on the jeans with the shoes they intend to wear most often. Fold the jeans up to the desired length, ensuring the hem sits where they want it to. Use pins to secure the folded hem in place, making sure both legs are even in length. Carefully mark the desired finished hemline on both legs using pins or fabric chalk.
- Remove Original Hem: Using your seam ripper, gently and patiently remove the original hem stitching from both legs. Once removed, press the creases from the old hem flat with an iron to create a smooth working surface.
- Measure and Cut Hem Allowance: Measure down from your marked hemline the desired hem allowance. For jeans, a common hem allowance is 1 to 1.5 inches. Mark this cutting line around both legs, ensuring it’s parallel to your marked hemline. Using sharp fabric scissors, carefully cut along this marked cutting line to remove the excess fabric.
- Fold and Press First Fold: Fold the raw, cut edge of the jeans leg upwards towards the wrong side of the fabric, aligning it with your marked hemline. Press this fold firmly with a hot iron to create a crisp crease.
- Fold and Press Second Fold (Double Hem): Fold the hem up again, encasing the raw edge within the fold. The folded edge should now align with your original marked hemline. Press this second fold thoroughly to create a clean, double-folded hem. Secure the folded hem with pins or fabric clips, placing them perpendicular to the hem edge.
- Optional: Staystitch for Security: For added security and to help keep the layers together during topstitching, you can optionally staystitch close to the raw edge of the inner fold. This is particularly helpful for thicker denim.
- Topstitch the Hem: Thread your sewing machine with heavy-duty thread that matches the original topstitching on your jeans and install a denim needle. Select a straight stitch and slightly lengthen your stitch length to around 3-3.5mm to mimic the look of jeans topstitching. Begin topstitching close to the inner folded edge of the hem, carefully sewing around the entire circumference of the leg. Sew slowly and steadily, especially when approaching the thick side seams. Maintain a consistent distance from the folded edge for a professional look.
- Press the Finished Hem: Once you’ve completed the topstitching, give the newly sewn jeans hem tutorial a final press with a hot iron. This sets the stitches, flattens the hem, and creates a crisp, professional finish, completing your step-by-step guide.
Expert Tips for Hemming Thick Denim Seams
“When hemming jeans, the side seams are the trickiest part. Slow down, use a hump jumper if you have one, or gently hand-walk your machine needle over the thick layers to avoid breaking needles or jamming your machine.”
- Reduce Sewing Speed: As you approach a thick denim seams, significantly reduce your sewing machine speed. Sewing slowly gives your machine more power to penetrate the layers and reduces the risk of skipped stitches or needle breakage.
- “Hand-Walk” Over Obstacles: For extremely thick sections, gently lift the presser foot lever slightly. Manually turn the handwheel of your sewing machine to “walk” the needle over the thick layers, one stitch at a time. This provides maximum control and prevents forcing the machine.
- Employ a Hump Jumper: A hump jumper (or a folded piece of sturdy fabric of similar thickness) is your secret weapon. As you approach the thick seam, position the hump jumper behind the presser foot, lifting the back of the foot to be level with the front. This creates a level sewing surface, allowing the presser foot to glide smoothly over the thick seam without tilting and causing skipped stitches or needle breakage.
- Strategic Skip and Restart (Advanced): In very challenging situations, you can carefully sew up to the thick seam, stop with the needle down, lift the presser foot, and gently maneuver the fabric to skip over the thickest part of the seam. Lower the presser foot again just beyond the seam, overlap your stitching slightly to secure, and continue sewing. This technique requires precision and is best for experienced sewers.
Hemming for Home Textiles: Handwoven Towels Example
Hemming towels, napkins, placemats, and other home textile hems demands a focus on durability, neat corners, and appropriate hem allowance for items destined for frequent washing. Using the handwoven towel hem as our guide, let’s explore techniques applicable to a range of home textile projects.
Planning Hemming for Towels
Careful hem planning is essential for towel hem allowance. Consider these factors:
- Account for Fabric Shrinkage: Fabric shrinkage is particularly relevant for natural fibers like cotton and linen often used in towels. Always pre-wash fabric before cutting and hemming to allow for shrinkage beforehand. Factor in potential shrinkage when determining your initial fabric dimensions and hem allowance.
- Serge Allowance (Optional): If you plan to serge the raw edges of your towels before hemming for a cleaner finish and to further prevent fraying, factor in a small serge allowance (typically ¼ inch) when cutting your fabric. This means you’ll cut your towel pieces slightly larger to accommodate the serged edge.
- Double Fold Hem Allowance: For towels, a generous double fold hem is recommended for durability and a substantial, luxurious feel. A towel hem allowance of 1 to 2 inches is common, allowing for a double fold of ½ to 1 inch each fold. Wider hems are more durable and visually appealing on towels.
The “Dog Ear” Technique for Perfect Corners
The “dog ear technique” is a simplified method for achieving mitered-like, neat corners on towel corners and other home textile hems, without the complexity of true mitered corners. Here’s how to execute the dog ear technique:
- Prepare Double Fold Hem: Fold and press your planned double fold hem allowance along all four sides of the towel. For example, if your hem allowance is 1 inch, fold and press ½ inch, then fold and press another ½ inch.
- Unfold Corners: Unfold the pressed hem folds at each corner, opening up the fabric at the corner point.
- Create “Dog Ear” Fold: At each corner, fold the corner point diagonally inwards towards the wrong side of the fabric. Align the raw edges of the unfolded hem folds to meet, forming a triangle or “dog ear” shape. Press this diagonal fold firmly.
- Refold Double Hem: Refold the double hem along your original pressed fold lines. The “dog ear” fold you just created will automatically create a neat, angled corner as you refold the hem. Pin or clip the hem in place, ensuring the corners are neatly aligned.
The dog ear technique provides an easy and effective way to create professional-looking mitered corners on towel hemming corners and other home sewing projects.
Sewing the Hem: Step-by-Step
Follow these towel hem sewing steps for sewing towel edges and achieving durable and attractive home textile hems:
- Prepare Double Fold Hem: Ensure your hem is neatly double fold hem sewing and securely pinned or clipped, paying special attention to the corners created using the “dog ear” technique.
- Select Stitch Length: For towel hem instructions, use a slightly longer stitch length than you would for clothing hems. A stitch length of around 3-3.5mm provides added durability and visual weight appropriate for towels.
- Topstitch Hem: Begin topstitching close to the inner folded edge of the double-folded hem. Sew slowly and steadily around the entire perimeter of the towel, maintaining a consistent distance from the folded edge. When you reach a corner, pivot the fabric with the needle down, and continue sewing along the next side.
- Press Finished Hem: Once you have sewn all the way around, give the finished towel hem sewing a final press with a hot iron. This sets the stitches, flattens the hem, and creates a crisp, professional finish, completing your towel hem instructions.
Mitered Hemming: For Corners and Clean Finishes (Napkins, Curtains, Clothing Linings)
Mitered hemming is a refined technique specifically employed to create mitered corners, resulting in clean finish corners that are sharp, angular, and exceptionally professional-looking. This technique is ideal for projects where crisp corners are a key design element, such as napkin hem, placemat hem, curtain hem, and sometimes for achieving a polished finish on clothing linings or specific design details. Mitered hem corners are characterized by their precise 45-degree angle, achieved through a diagonal seam that eliminates bulk at the corner. Here’s how to create professional corners using mitered hemming:
- Prepare Double Fold Hem and Mark Miter Line: Begin by folding and pressing your desired double-fold hem allowance along all sides of your fabric piece. Unfold the hem folds at each corner. At each corner, use a ruler and fabric marker or chalk to draw a line at a 45-degree angle diagonally across the corner. This line should intersect the inner pressed fold lines of your hem, creating a triangle at the corner.
- Fold and Stitch Corner Seam: Fold the corner right sides together along the marked 45-degree angle line.
- Trim Corner Seam Allowance: Trim away the excess fabric from the corner seam allowance, leaving about ¼ inch seam allowance to reduce bulk. Clip the corner point close to the stitching, being careful not to cut through the seam.
- Turn and Shape Corner: Turn the mitered corner right side out, using a point turner, knitting needle, or chopstick to gently push out the corner point and create a sharp, defined angle. Press the mitered corner flat, ensuring the diagonal seam is neatly pressed open or to one side.
- Refold and Hem Edges: Refold the hem along your original pressed fold lines, encasing the raw edges. The mitered corner will now create a neat, sharp, 45-degree angle.
- Hem Edges: Choose your desired hemming stitch (straight stitch, decorative stitch, or hand stitch) and hem the edges of your project, sewing close to the inner folded edge of the hem.
- Press Finished Hem: Give the completed mitered hem a final press with a hot iron to set the stitches and create a crisp, professional finish, showcasing the sharp, clean corner finishing achieved through this technique.

4. General Hemming Tips for Professional Results
4.1 Achieving Straight and Even Hems
Straight hems and even hems are the foundation of professional-looking garment finishing. Wobbly or uneven hems can detract from even the most beautifully constructed garment. Here are key tips for sewing straight lines and achieving perfectly even hems:
- Utilize Throat Plate Markings: Your sewing machine’s throat plate has markings that serve as valuable hemming guides. Align the folded edge of your hem with a specific marking on the throat plate and maintain that alignment as you sew. This provides a visual guide for keeping your stitching straight and parallel to the hem edge.
- Invest in Hemming Guides: For consistent and precise hems, consider investing in dedicated hemming guides. These attachments for your sewing machine presser foot or sewing table help to fold and guide the fabric edge as you sew, ensuring uniform hem width and straight stitching.
- Consider a Walking Foot: A walking foot (even feed foot) is particularly helpful when hemming multiple layers of fabric or slippery materials. It helps to feed the top and bottom layers of fabric evenly through the machine, preventing shifting and ensuring a smooth, straight hem, especially on thicker fabrics.
- Maintain Consistent Seam Allowance: Accuracy in your consistent seam allowance is paramount. Use a hemming gauge or ruler to precisely measure and mark your hem allowance before folding and sewing. Refer to the markings on your throat plate or use a seam guide to maintain that consistent distance from the folded edge as you stitch.
- Take Your Time and Sew Slowly: Rushing through hemming is a recipe for uneven stitches and wobbly lines. Patience and a steady hand are essential. Sew at a moderate, controlled pace, focusing on maintaining a straight line and consistent seam allowance. If needed, stop periodically with the needle down to reposition your hands or adjust the fabric.
4.2 The Crucial Role of Pressing in Hemming
Pressing hems, often underestimated, is not merely an optional step – it is absolutely crucial role of pressing in hemming for achieving professional hemming results. Ironing hems at every stage of the hemming process transforms a good hem into a truly exceptional one.
- Press Before Folding: Before you even begin folding your hem, press the fabric flat to remove any wrinkles or creases. This creates a smooth, even surface to work with and ensures accurate folding.
- Press After Each Fold: After each fold of your hem (whether single or double fold), press the fold firmly with a hot iron. Pressing techniques at this stage sets the fold in place, creating crisp, defined edges that are much easier to sew accurately.
- Press After Stitching: Once you have completed sewing your hem, give it a final, thorough press from both the right and wrong sides of the fabric. This pressing hems step flattens the hem, blends the stitches into the fabric, and creates a polished, professional finish. The heat also helps in heat setting stitches, making them more secure and less likely to unravel.
4.3 Stitch Length and Tension: Getting it Right
Achieving a balanced and professional-looking hem depends on correctly adjusting your stitch length and stitch tension. Sewing machine settings that are appropriate for one fabric may be completely wrong for another. Fabric stitch settings are crucial for preventing puckering, skipped stitches, and ensuring a smooth, secure hem.
4.4 Securely Starting and Ending Your Hemming Stitches
Leaving loose threads at the beginning and end of your hem stitching is an invitation for unraveling and a sign of unprofessional finishing. Securing stitches at both the start and finish of your hemline is essential for durability and a polished look. Here are several effective finishing stitches techniques:
- Backstitching (Machine Sewing): For machine hemming, backstitching is the standard method for stitch security.
- Overlapping Stitches (Machine Sewing): Another secure machine sewing method is to slightly overlapping stitches at the beginning and end of your hemline. Sew a few stitches past your starting point at the end of the hem, effectively overlapping the beginning stitches.
- Burying Threads (Machine Sewing): For an even cleaner finish, especially on delicate fabrics, you can burying threads. After backstitching or overlapping, thread the top thread onto a hand sewing needle. Insert the needle into the fabric close to the end of your stitching line, and bring it out a short distance away. Pull the thread through, then trim it close to the fabric surface. This hides the thread tail within the hem.
- Hand-Tying Threads (Hand Hemming): For hand hemming, hand-tying threads is the preferred method for securing stitches. When you reach the end of your hemline, create a small knot close to the fabric surface with your hand sewing thread. Then, take a few tiny, inconspicuous stitches to further secure the knot. Trim the thread close to the fabric.
5. FAQs about Hemming Techniques
5.1 What are the most common hemming mistakes and how to avoid them?
Even experienced sewers can sometimes fall prey to common hemming mistakes. Being aware of these pitfalls and how to avoid them is key to consistent success:
- Uneven Hems: Mistake: Hems that are noticeably higher in some areas than others. Avoid it: Measure accurately, use a hemming gauge, and take your time when marking and folding your hem. Double-check measurements before sewing.
- Puckering: Mistake: Hems that ripple or gather along the stitching line. Avoid it: Ensure your stitch tension is correctly adjusted for your fabric. Avoid stretching the fabric as you sew. Press the hem flat after stitching.
- Visible Stitches on Right Side (when they shouldn’t be): Mistake: Stitches that are too large, uneven, or distracting on the outside of the garment, especially with blind hems or hand hems meant to be invisible. Avoid it: Use a fine needle and thread that matches your fabric. For blind hems and hand hems, pick up only a few threads of the outer fabric with each stitch. Practice stitch consistency.
- Wobbly or Crooked Hemlines: Mistake: Hemlines that are not straight or follow the intended garment shape. Avoid it: Use throat plate markings or hemming guides to sew straight lines. Sew slowly and steadily, focusing on maintaining a consistent seam allowance.
- Bulky or Stiff Hems: Mistake: Hems that are too thick, stiff, or don’t drape well, especially on delicate fabrics. Avoid it: Choose appropriate hem types for your fabric weight. Use narrow hems or rolled hems for lightweight fabrics. Trim excess seam allowance to reduce bulk.
5.2 How do I hem stretchy knit fabrics?
Hemming stretchy knit fabrics requires a different approach than woven fabrics to accommodate their elasticity and prevent distortion. Use a Zigzag Stitch or Stretch Stitch, instead of a straight stitch, use a narrow zigzag stitch or a dedicated stretch stitch on your sewing machine. These stitches allow the hem to stretch with the fabric, preventing popped seams and maintaining flexibility.
Avoid Stretching the Fabric While Sewing, resist the urge to pull or stretch the knit fabric taut as you sew the hem. Let the feed dogs of your sewing machine guide the fabric naturally. Stretching while sewing can lead to wavy or distorted hems that don’t lay flat. Consider a Serged Hem, a serged hem is an excellent option for knit fabrics. The serger creates a stretchy, clean-finished edge that is ideal for knits and provides a professional look often found in ready-to-wear knit garments.
5.3 What’s the best hemming technique for sheer fabrics?
When working with sheer fabrics like chiffon, georgette, and voile, the key to successful hemming lies in techniques that minimize bulk and preserve their delicate, airy nature. For these fabrics, rolled hems are often considered the gold standard. Their incredibly narrow and delicate finish is almost invisible, effectively preventing fraying without adding any noticeable weight or stiffness that could compromise the fabric’s drape. Alternatively, a narrow hem, which is similar to a rolled hem but slightly wider, presents another excellent option.
This technique involves folding the hem edge under twice to create a very fine, lightweight hem that maintains the fabric’s delicate quality and beautiful drape. Ultimately, both rolled hems and narrow hems are specifically designed to provide subtle and refined finishes that perfectly complement the ethereal and lightweight characteristics of sheer fabrics.
5.4 How do I hem a curved hemline?
Achieving a smooth, flat hem on curved hemlines requires a slightly different approach than straight hems, incorporating a few key extra steps to ensure the hem follows the curve gracefully. The first crucial step is to clip the curves. Before you begin hemming, make small clips or notches into the seam allowance along the curved edge, being careful to clip up to, but not through, the folded hemline.
For concave curves, those that curve inwards, create small V-shaped notches. For convex curves, which curve outwards, clip straight lines outwards from the edge. These strategic clips are essential because they allow the fabric to spread or ease as needed, enabling it to lie flat and conform to the curve as you fold the hem. As you fold and pin your curved hem, remember to gently ease the fabric along the curve. This might involve slightly stretching or shrinking the fabric edge as you fold to encourage it to lie flat, preventing unwanted puckers or gathers.
Finally, consider using a narrower hem allowance. A smaller hem allowance, such as ¼ inch or less, can significantly simplify hemming curved edges, as there is less fabric to manipulate and maneuver around the curve, making the process more manageable and resulting in a neater finish.
5.5 Can I hem without a sewing machine?
Hand Hemming: Hand hemming is a traditional and versatile method for hemming without a machine. Using hand hemming stitches like the slip stitch or blind stitch, you can create beautiful, almost invisible hems entirely by hand. While more time-consuming than machine hemming, hand hemming offers precision and control, especially for delicate fabrics or couture finishes.
Fusible Hemming Tape: Fusible hemming tape (also known as hemming web or stitch witchery) provides a quick and temporary hemming solution. This double-sided adhesive tape is placed between the folded hem and the garment fabric, and then fused together using an iron. Fusible hemming tape is ideal for quick fixes, temporary hems, or for hemming projects where sewing is not desired or practical. However, it is generally less durable than sewn hems and may not be suitable for garments that will be heavily worn or frequently washed.
6. Packlove – Your Partner in Garment Finishing Excellence
In the pursuit of creating truly exceptional garments, mastering techniques like hemming is paramount. At Packlove, with over 8 years of experience in the garment industry, especially in crafting garment labels and clothing tags for countless brands, we deeply understand that every detail contributes to the overall perception of quality and brand identity. Just as a meticulously finished hem speaks volumes about craftsmanship and garment branding, so too do your brand labels and tags.
A perfectly executed hem and a thoughtfully designed label work in harmony to communicate quality, attention to detail, and brand value to your customers. We believe that clothing business success hinges on these details – the professional finish of your garments and the impactful presentation of your brand.
That’s why Packlove is dedicated to being your partner in garment finishing excellence, providing not only the branding elements that elevate your products but also sharing expertise, like this guide to hemming, to empower you in every aspect of garment creation. Let us help you perfect every detail, from the hemline to the hangtag, and build a brand that truly stands out in the competitive fashion landscape.
Read more:
From the foundational straight hem to the refined mitered corner and the delicate hand-stitched finish, mastering hemming techniques is an indispensable journey for anyone serious about garment creation. It’s a skill that transcends mere functionality, becoming an art form that elevates the quality, durability, and perceived value of your clothing.
By investing time in understanding and practicing these techniques, you equip yourself with the power to transform good garments into truly exceptional pieces, imbued with a professional polish and a lasting impression of quality.
With each perfectly finished hem, you are not just completing a garment; you are crafting a statement of quality, reinforcing your brand’s commitment to excellence, and ultimately, sewing the seeds of customer satisfaction and lasting success.


