


How to Patch Carpet Without Iron: Easy DIY Steps


We’ve all been there. A misplaced curling iron, a dropped ember from a fireplace, or even a too-hot pan can leave an unsightly burn or melt mark on your otherwise pristine carpet. It’s a frustrating situation, and the immediate thought is often, “how much is this going to cost to fix?” Replacing an entire carpet is expensive, and even professional repairs can add up. This article is here to help. We’ll show you how to tackle carpet burns and melts yourself, achieving a seamless repair without needing an iron, saving you money and restoring your carpet’s appearance. This guide will walk you through assessing the damage, gathering the right materials, and performing the repair step-by-step, even covering situations with varying degrees of damage. You will find expert tips to get better result!
1. Assessing the damage and gathering your materials
Before you begin any repair, it’s crucial to take a good look at the damaged area and understand the extent of the problem. This will determine the best approach for fixing it.
1.1 Determining the severity of the burn
Understanding the severity of the burn is key to choosing the right repair method. Here’s a breakdown of different burn levels:
- Minor burns (surface level): These burns only affect the tips of the carpet fibers. They often appear as small, darkened, or slightly melted spots. Cigarette burns are a common example.
- Medium burns (fiber damage): These burns go deeper than the surface, damaging a significant portion of the carpet fibers. The fibers may be melted together, creating a hard, crusty texture.
- Large burns (backing/underlayment damage): These are the most severe burns, extending through the carpet backing and potentially damaging the underlayment beneath. You might see a hole or a significant area of melted material.

1.2 Tools and materials you’ll need
Having everything ready before you start will make the repair process much smoother. Here’s a comprehensive list:
- Sharp scissors: For trimming burnt fibers and cutting the carpet patch. Precision is key.
- Utility knife or carpet knife: A utility knife with a fresh blade is essential for cutting out the damaged carpet section and creating a clean patch. A carpet knife (specifically designed for cutting carpet) can offer even more control.
- Spare carpet: This is crucial for patching larger burns. Ideally, you’ll have leftover carpet from the original installation. If not, try to find a piece that matches as closely as possible in color, texture, and pile height. You can often find small carpet remnants at flooring stores.
- Carpet adhesive: A strong, reliable carpet adhesive is needed to secure the patch. There are different types available; choose one that’s appropriate for your carpet type (check the label).
- Vacuum cleaner: To remove loose debris and fibers before and after the repair.
- Comb or carpet brush: For blending the fibers of the patch with the surrounding carpet after the adhesive dries.
- Carpet seam roller (optional but recommended): This tool helps to press the patch firmly into place and create a strong bond between the patch and the existing carpet.
- Sandpaper (fine grit): For lightly sanding the edges of very minor burns to remove charred tips.
- Razor: To shave off any melted or damage fibers.
- Carpet dye (optional): If the color of your patch doesn’t perfectly match the surrounding carpet, you might consider using carpet dye. This is an advanced step and requires careful color matching. Test in an inconspicuous area first.
2. Step-by-step guide to patching carpet without an iron
Now that you’ve assessed the damage and gathered your materials, it’s time to start the repair. This section provides a detailed, step-by-step guide to patching your carpet, focusing on techniques that don’t require an iron. Remember to work carefully and patiently for the best results.
2.1 Step 1: Preparing the damaged area
The first step is to prepare the damaged area for the patch. This involves removing the burnt or melted carpet and creating a clean surface for the new piece.
For very small burns (surface burns):
- Sand and shave: If only the very tips of the fibers are affected, you might be able to avoid cutting. Gently sand the burnt tips with fine-grit sandpaper. If sanding doesn’t remove all the damage, use a razor to carefully shave off the burnt or melted fibers.
- Vacuum: After sanding or shaving, thoroughly vacuum the area to remove any loose debris and fibers.
For larger burns (requiring cutting):
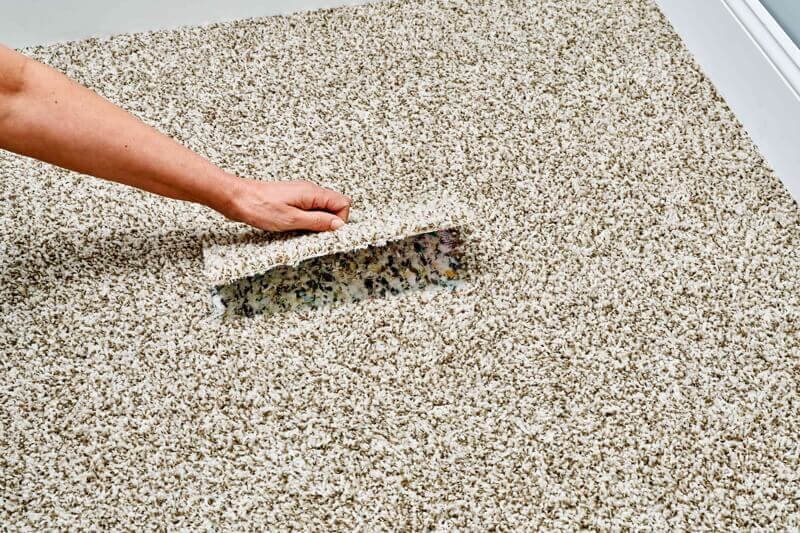
- Cut out the damaged section: Using your utility knife or carpet knife, carefully cut out the damaged section of carpet. Make straight, clean cuts. Aim for a square or rectangular shape, as this will be easier to patch.
- Important: Cut through the carpet backing, but avoid cutting into the underlayment.
- Remove the cut-out piece: Carefully lift out the damaged section of carpet.
- Vacuum: Vacuum the area thoroughly to remove any loose fibers or debris.
2.2 Step 2: Creating the carpet patch
Now you’ll create the patch that will replace the damaged section. Precision is key here to ensure a seamless repair.
- Use the cut-out as a template: Place the piece of carpet you cut out on top of your spare carpet. This will serve as your template.
- Cut the patch: Carefully cut around the template using your utility knife or carpet knife. Make sure the patch is the exact same size and shape as the piece you removed.
- Match pile direction: Pay very close attention to the direction of the carpet pile (the way the fibers lean). The pile of the patch must match the pile direction of the surrounding carpet. This is crucial for a seamless blend. If your carpet has a pattern, make sure to align the patterns as well.
- Trim if necessary: If the patch is slightly larger than the hole, carefully trim it down until it fits perfectly. It’s better to start slightly larger and trim than to cut the patch too small.
2.3 Step 3: Applying the adhesive
With the patch ready, it’s time to apply the carpet adhesive.
Apply adhesive to the edges: Carefully apply a thin bead of carpet adhesive around the edges of the hole in the carpet backing. Avoid applying adhesive to the underlayment. Don’t over-apply; a thin, even layer is best. Too much adhesive can seep through and make the carpet fibers stiff.
2.4 Step 4: Inserting the patch
Carefully insert the patch into the prepared hole.
- Align and insert: Carefully align the patch with the hole, ensuring the pile direction matches perfectly. Gently lower the patch into place.
- Press firmly: Once the patch is in place, press down firmly around all the edges to ensure good contact with the adhesive.
2.5 Step 5: Securing and blending
This step is crucial for achieving a professional-looking repair.
- Use a carpet seam roller (recommended): If you have a carpet seam roller, roll it firmly over the patched area, especially along the edges. This helps to create a strong bond and flatten the seam.
- Manual pressure: If you don’t have a seam roller, use your fingers and the palm of your hand to press down firmly on the patch, working from the center outwards.
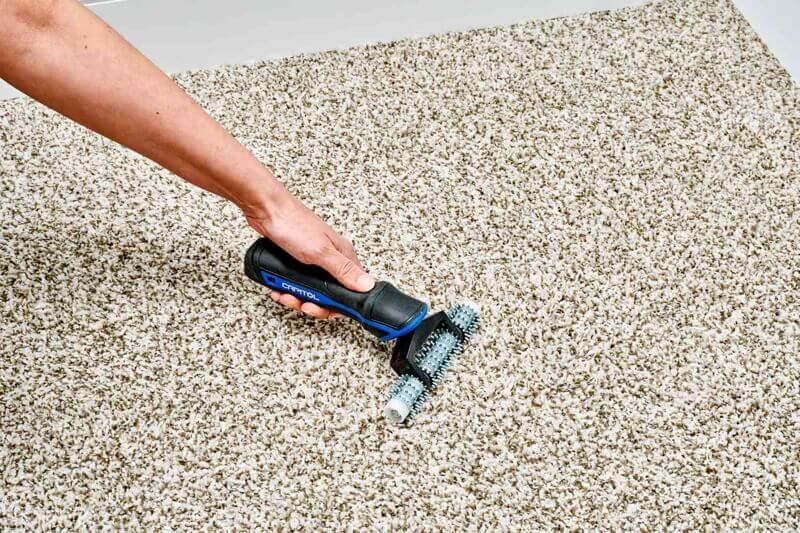
- Blend the fibers: Use a comb or carpet brush to gently blend the fibers of the patch with the surrounding carpet. This helps to disguise the seam and create a seamless appearance. Work in the direction of the pile.
2.6 Step 6: Color matching and finishing touches (if necessary)
If, after the adhesive has dried, you notice a significant color difference between the patch and the surrounding carpet, you may need to consider color matching.
- Assess the color difference: Only do this step if it really needed.
- Carpet dye (use with caution): Carpet dye can be used to adjust the color of the patch. This is an advanced technique, and it’s essential to test the dye in an inconspicuous area first (like inside a closet or under furniture) to ensure it’s a good match. Follow the dye manufacturer’s instructions carefully. Start with a small amount and gradually build up the color.
3. Tips for a seamless repair
Achieving a truly invisible repair requires attention to detail and a few expert techniques. Here are some tips to help you blend the patch seamlessly with the surrounding carpet:
3.1 Matching carpet pile and pattern
This is arguably the most critical aspect of a successful carpet patch.
- Pile direction is key: Before you cut the patch, carefully examine the existing carpet to determine the direction of the pile (the way the fibers naturally lean). The patch must be cut and installed with the pile running in the same direction. You can determine the pile direction by running your hand across the carpet; it will feel smoother in one direction than the other.
- Pattern alignment (if applicable): If your carpet has a pattern, meticulous alignment is essential. Use the cut-out piece as a guide to ensure the pattern on the patch matches the surrounding carpet perfectly. Even a slight misalignment will be noticeable.
3.2 Choosing the right adhesive
The type of adhesive you use can impact the success of your repair.
- Carpet-specific adhesive: Always use an adhesive specifically designed for carpets. General-purpose glues or adhesives may not provide a strong enough bond or may damage the carpet fibers.
- Check the label: Different carpet adhesives are formulated for different types of carpet backing (e.g., jute, synthetic). Read the label carefully to ensure the adhesive is compatible with your carpet.
- Solvent-based vs. water-based: Solvent-based adhesives generally provide a stronger bond, but they can have strong odors and require good ventilation. Water-based adhesives are often easier to work with and have lower VOCs (volatile organic compounds), making them a better choice for indoor use.
- Avoid over-application: Do not use too much glue.
3.3 Blending techniques
Proper blending is the final step to making the patch disappear.
- Comb or brush: Use a wide-toothed comb or a carpet brush to gently lift and separate the fibers around the edges of the patch. Work in the direction of the pile. The goal is to intermingle the fibers of the patch with the fibers of the surrounding carpet, making the seam invisible.
- Feathering: For a particularly seamless blend, you can try “feathering” the edges of the patch. This involves carefully trimming some of the fibers around the perimeter of the patch at a slight angle, making them blend more gradually with the surrounding carpet. This is an advanced technique and requires a steady hand.
- Address the edges: The areas most in need of attention when blending is its surrounding edges.
4. Preventing future carpet burns
Once you’ve repaired your carpet, taking steps to prevent future burns is a smart move. Here are some practical tips to protect your carpet:
- Be mindful of hot items: This is the most obvious but most important tip. Be extra cautious when using items that generate high heat, such as: curling irons, hair straighteners, irons, clothes dryers, hot pots and pans, cigarettes, candles, and incense.
- Use protective surfaces: Always place hot items on heat-resistant surfaces, such as: trivets, ironing boards, heat-resistant mats or pads and ceramic tiles.
- Designated areas: Establish designated areas for using hot styling tools, away from carpeted areas. For example, use a bathroom counter or a vanity with a hard surface.
- Safe smoking practices: If you smoke indoors, use deep ashtrays and never leave cigarettes unattended. Consider smoking only in designated areas, preferably not on carpeted floors.
- Fireplace safety: If you have a fireplace, use a fireplace screen to prevent sparks and embers from landing on the carpet. Keep flammable materials away from the fireplace.
- Regular maintenance: Keep your carpet, maintain regular cleaning.
- Educate others: If you have children or guests, make sure they’re aware of the importance of carpet safety and the precautions to take.
5. When to call a professional
While many carpet burns can be successfully repaired with DIY methods, there are certain situations where it’s best to call a professional carpet repair service. Here’s when you should consider seeking expert help:
- Extensive damage: If the burn is very large, deep, or covers a significant area, a DIY repair may not be feasible or may produce unsatisfactory results.
- High-value or delicate carpets: If you have an expensive, antique, or delicate carpet (such as a Persian rug or a carpet made of natural fibers like wool or silk), attempting a DIY repair could risk further damage. Professionals have the expertise and tools to handle these materials properly.
- Damage to underlayment: If the burn has penetrated through the carpet backing and damaged the underlayment, it’s generally best to call a professional. Replacing underlayment requires specialized tools and skills.
- Lack of spare carpet: If you don’t have any spare carpet and can’t find a close match, a professional may have access to a wider range of carpet remnants or be able to source a suitable replacement.
- Complex patterns: If your carpet has a very intricate or complex pattern, achieving a seamless patch can be extremely difficult for a DIYer.
- You’re uncomfortable with DIY: If you’re not confident in your DIY skills or are worried about making the damage worse, it’s always best to err on the side of caution and call a professional.
- Multiple burns: If there are multiple burns in different areas of the carpet, it might be more efficient and cost-effective to have a professional handle the repairs.
- Lack of tools: If you do not have specialized tools.

6. Related questions
Here are answers to some frequently asked questions about carpet burn repair:
6.1 Can I use baking soda to fix a carpet burn?
Baking soda is excellent for neutralizing odors and cleaning, but it won’t repair a burn. For minor burns where only the tips of the fibers are singed, you might be able to use fine-grit sandpaper or a razor to remove the damaged portion. Baking soda can be used after a repair to help absorb any lingering odors.
6.2 How do you fix melted synthetic carpet?
Melted synthetic carpet requires a similar approach to burn repair. The key is to carefully cut out the melted section and replace it with a patch, ensuring the pile direction and any patterns match. If the melted area is small and only affects the fiber tips, you may be able to trim or shave away the damaged portion.
6.3 Can I dye a carpet patch to match the surrounding carpet?
Yes, carpet dye can be used, but it requires careful color matching and application. It’s best to test the dye in an inconspicuous area first. Start with a small amount of dye and gradually build up the color to avoid over-darkening. Be aware that achieving a perfect color match can be challenging, and professional assistance may be needed.
6.4 What’s the best way to remove a cigarette burn from carpet?
Small cigarette burns often only affect the tips of the carpet fibers. You can usually remove these by carefully trimming the burnt tips with small, sharp scissors or by gently sanding the area with fine-grit sandpaper. For deeper cigarette burns, you’ll likely need to cut out the damaged section and replace it with a patch.
Read more:
Carpet burns and melts can be frustrating, but they don’t necessarily mean you need to replace your entire carpet. With the right tools, materials, and a little patience, you can often repair these blemishes yourself, achieving a seamless and professional-looking result.
This guide has provided you with a step-by-step approach to patching carpet without an iron, covering everything from assessing the damage and gathering supplies to blending techniques and preventative measures. Remember to start by carefully evaluating the extent of the burn, choose the right adhesive, and pay close attention to matching the pile direction and pattern of your carpet.
For small burns, simple trimming or shaving might suffice, while larger burns will require patching. And, if the damage is extensive or you’re unsure about tackling the repair yourself, don’t hesitate to call a professional. By following these steps, you can restore your carpet’s appearance and avoid costly replacements, keeping it looking its best for years to come!


