


Interfacing: Key to Professional Garment Finishes


Understanding interfacing is fundamental for any clothing business aiming for high-quality, professional garments. This guide provides comprehensive insights into selecting and applying interfacing, detailing different types, construction methods, weight considerations, application techniques, troubleshooting common issues, and ultimately, how this often-unseen component impacts your brand’s reputation and bottom line.
Readers will gain practical knowledge on choosing the right sewing material for structure and stability, mastering application for consistent results, and recognizing interfacing’s role as a key apparel component in achieving a professional finish.
1. Why the right interfacing is crucial for your clothing quality
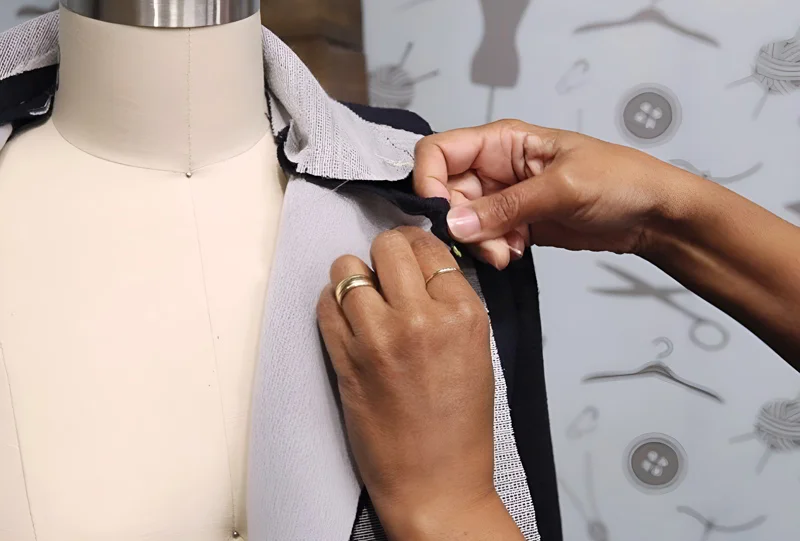
Interfacing serves as a hidden layer applied internally to specific garment areas to provide essential garment support and structure. Think of this textile material as the internal scaffolding that enhances a garment’s form and function. Its primary roles include adding firmness and stability, defining shape, and preventing stretching or sagging in critical zones like collars, cuffs, waistbands, plackets (the strip where buttons and buttonholes are located), and button stands.
Using the correct collar interfacing or cuff stiffener, for example, results in crisp details that hold their shape through wear and washing.
Proper application of interfacing directly influences the overall garment quality, durability, and the professional finish customers expect. Garments that maintain their structure and resist sagging convey higher value and meticulous craftsmanship. Neglecting or choosing the wrong interfacing can lead to limp collars, stretched-out necklines, or misshapen waistbands, undermining the garment’s aesthetic and perceived quality.
Therefore, thoughtful interfacing selection is a hallmark of superior garment construction and directly contributes to a brand’s reputation for quality. Effective sewing structure ensures the garment not only looks good initially but also performs well over time, preventing undesirable sagging.
2. Fusible vs. sew-in interfacing
2.1 Fusible interfacing
Fusible interfacing features an adhesive layer on one side, often appearing as small glue dots or a fine fusible web. This adhesive is activated by heat, typically from an iron, creating a permanent bond with the fabric through a heat bonding process.
Advantages:
- Speed and efficiency: Significantly faster to apply than sew-in types, boosting production efficiency.
- Ease of use: Requires less complex handling, suitable for various skill levels.
- Consistency: Provides a uniform bond when applied correctly.
Limitations & when to avoid:
- Textured/napped fabrics: The adhesive may not bond securely to uneven surfaces like velvet or corduroy, and the required heat/pressure can crush the nap.
- Heat sensitive fabrics: Delicate synthetics, sequins, vinyl, or metallics can melt, shrink, or become damaged by the iron’s heat.
- Loose weaves/sheers: Potential for glue seepage through the fabric to the right side, creating visible marks.
2.2 Sew-in interfacing
Sew-in interfacing, also known as a sew-in stabilizer, lacks an adhesive coating. This type is attached to the garment piece through stitching, usually within the seam allowances, becoming an integrated layer.
Advantages:
- Universal fabric compatibility: Works with virtually any fabric, including those unsuitable for fusible interfacing (textured, heat-sensitive, open-weave).
- No heat damage risk: Eliminates the possibility of melting or damaging delicate materials.
- Natural shaping: Often provides a softer, more natural shaping and drape compared to fusible options, as the layers aren’t rigidly bonded.
Limitations:
- Labor-intensive: Application requires stitching, making the process slower and increasing labor costs in production.
- Skill dependent: Requires careful sewing machine handling to attach smoothly without causing puckers or distortion in the final garment.
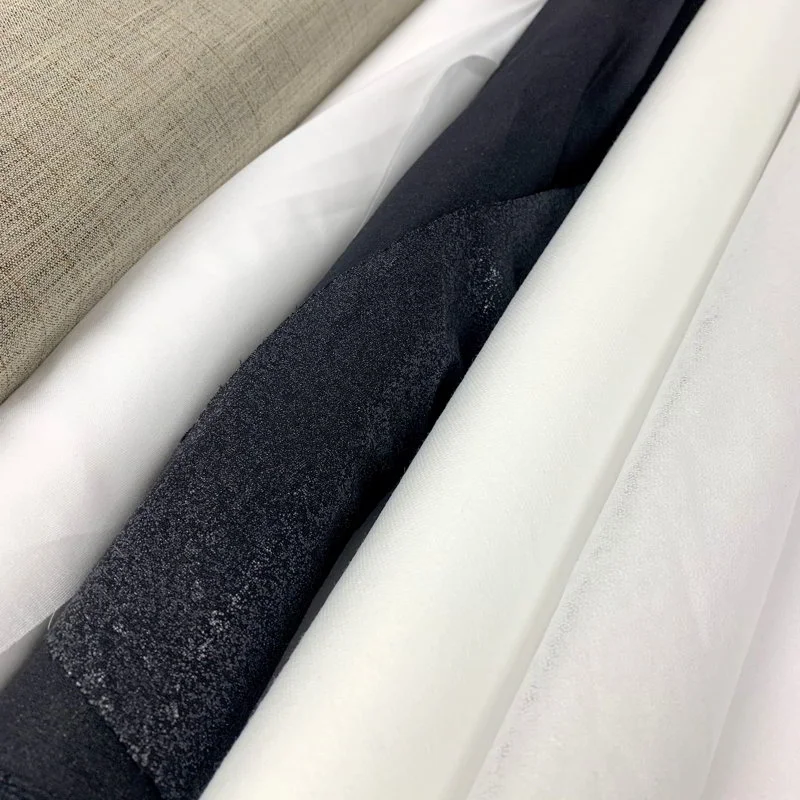
3. Construction types: Woven, non-woven, and knit interfacing
The internal structure of the interfacing itself dictates its behavior and suitability for different fabrics and applications.
3.1 Woven interfacing
Woven interfacing is constructed using a weaving technique, similar to regular woven fabric, resulting in a distinct grainline (threads running lengthwise and crosswise).
Key characteristics & use:
- Grainline alignment: Crucially, the grainline of the woven interfacing must be aligned with the grainline of the fabric pattern piece (grainline matching). Failure to follow fabric grain can cause twisting, distortion, and improper drape in the finished garment.
- Fabric-like behavior: Tends to drape and handle more like the fashion fabric compared to non-woven types.
- Structure: Often chosen in tailoring for crisp yet responsive structure in collars, cuffs, and lapels. Available in various woven interfacing types based on weight and weave.
3.2 Non-woven interfacing
Non-woven interfacing is created by bonding or felting fibers together, often resembling paper or felt in texture.
Key characteristics & use:
- No directional grain: Can be cut in any direction, simplifying pattern layout and reducing material waste. This makes non-woven interfacing very versatile.
- Stability: Provides good firmness and support.
- Ease of use: Generally considered the easiest type to handle.
- Feel/drape: May feel less like fabric and can be stiffer, offering less natural drape compared to woven options.
3.3 Knit interfacing
Knit interfacing features a knitting structure, giving the material inherent stretch, usually in the crosswise direction, though some offer two-way stretch.
Key characteristics & use:
- Stretch fabric compatibility: Specifically designed for use with knit or stretch woven fabrics (Jersey fabric needs this type). Knit interfacing application adds support and structure without eliminating the fabric’s natural stretch.
- Stretch alignment: The direction of stretch in the knit interfacing should be considered and aligned with the fabric’s stretch as required by the garment design (e.g., aligning cross-stretch for cuffs on a knit sleeve). This ensures the interfacing accommodates fabric stretch.
4. Selecting the right interfacing
4.1 The weight factor
Interfacing weight selection is critical for achieving the desired balance between support and drape, ensuring the interfacing supports the fabric without overpowering its natural characteristics. The cardinal rule is: choose an interfacing weight that is equal to or slightly lighter than your fashion fabric.
Using an interfacing that is significantly heavier than the main fabric will result in unnatural stiffness, making the area feel bulky and rigid, disrupting the intended drape.
General guidelines:
| Fabric Weight Category | Example Fabrics | Recommended Interfacing Weight |
|---|---|---|
| Lightweight | Chiffon, Voile, Silk Charmeuse, Rayon | Lightweight |
| Medium weight | Cotton Poplin, Linen, Quilting Cotton, Chambray | Medium weight |
| Heavyweight | Denim, Canvas, Wool Coating, Corduroy, Twill | Medium weight or heavyweight |
For heavyweight fabrics, the choice between medium or heavyweight interfacing depends on the desired level of structure – a crisp tailored collar might need heavyweight, while a slightly softer waistband could use medium weight.
4.2 Fabric compatibility
While weight is primary, other fabric properties influence the ideal interfacing choice:
- Stretch: Use knit interfacing for knit fabrics or woven fabrics with significant stretch to maintain elasticity.
- Texture/nap: Consider sew-in interfacing for fabrics like velvet, corduroy, or heavily textured materials to avoid crushing the surface or achieving a poor bond with fusible types.
- Weave density: For loosely woven or open-weave fabrics (like some linens or lace), be cautious with fusible interfacing due to potential glue seepage. Testing is essential, or opt for sew-in.
- Heat sensitivity: For delicate synthetics, silks, vinyl, or specialty fabrics that cannot withstand high heat, sew-in interfacing is the safer choice.
- Construction match: Often, matching the construction type (woven interfacing for woven fabric, knit interfacing for knit fabric) helps the layers behave cohesively.
4.3 Desired outcome
The intended structure and fabric drape influence the interfacing choice for specific garment areas:
- Crisp structure: For sharply defined collars, cuffs, plackets, or waistbands requiring significant shape retention (e.g., in tailored shirts or structured outerwear), a firmer woven or non-woven interfacing is often preferred.
- Soft structure/support: For areas needing gentle support without rigidity, such as a soft roll lapel, a lightly structured waistband, or stabilizing a neckline on a soft fabric, a lightweight woven, a soft non-woven, or even a knit interfacing might be suitable.
Consider the final aesthetic – does the area need to stand firm, or should maintain a degree of softness and movement?
4.4 Color choice
Matching interfacing color to the fabric is straightforward but important to prevent shadowing or visibility through the main fabric:
- Light-colored fabrics: Use white or cream interfacing.
- Dark-colored fabrics: Use black or charcoal interfacing.
Using dark interfacing under light fabric (or vice versa), especially if the main fabric is somewhat sheer, can create an undesirable shadow or make the interfacing visible from the outside.
5. Application techniques
5.1 Applying fusible interfacing
Correct fusible application is crucial for a smooth, durable bond. Precision prevents issues like bubbling or incomplete adhesion.
- Prepare: Identify the adhesive side (usually bumpy or shiny). Critically, cut a small test swatch of both your fashion fabric and the interfacing.
- Test: Following the steps below, fuse the test piece. Check for secure adhesion, appropriate stiffness, and ensure no damage (shine, melting, color change) occurs to the fabric. Adjust iron temperature or pressing time if necessary based on this test. This step informs the correct heat bonding process settings.
- Cut: Accurately cut the interfacing using the relevant pattern piece. Decide whether to include or exclude seam allowances based on pattern instructions or desired effect. Excluding seam allowances (seam allowance consideration) reduces bulk in the seams.
- Position: Place the interfacing piece with the adhesive side (bonding agent) down onto the wrong side of the fabric piece. Ensure smooth alignment with no wrinkles.
- Protect: Place a clean pressing cloth (a piece of plain cotton fabric like muslin works well) over the interfacing and fabric. Never skip this step; the pressing cloth protects both your fabric and your iron.
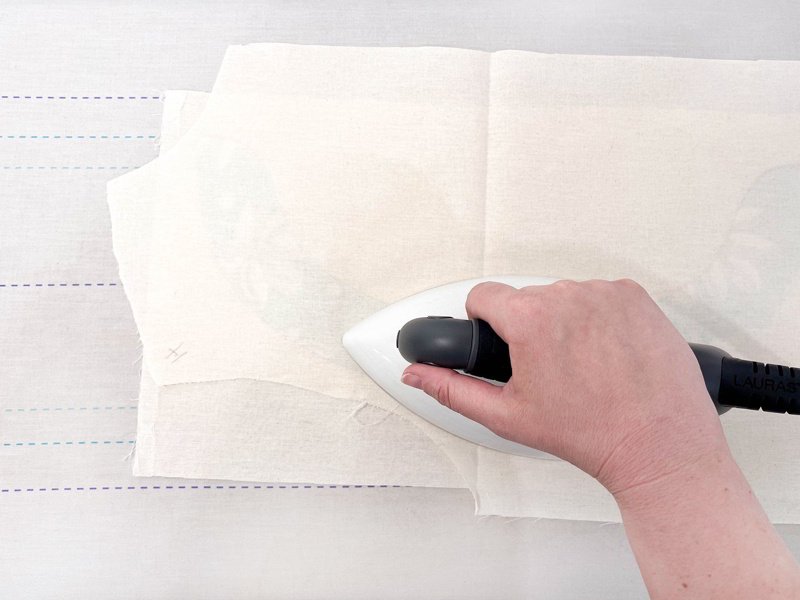
- Fuse: Set your iron to the correct heat setting determined during testing (often the ‘wool’ setting without steam is a starting point, but the fabric dictates the safe temperature). Use steam only if specifically recommended by the interfacing manufacturer. Press the iron firmly down onto one section, holding for 10-15 seconds (adjust based on test results and interfacing weight). Do not glide or iron back and forth. This is a pressing motion, not an ironing motion.
- Repeat: Lift the iron completely, move to the next section overlapping the previous one slightly, and press down again. Continue this lift-and-press iron application until the entire interfacing piece is fused.
- Cool: Allow the fused piece to cool completely flat on the ironing board before moving the piece. This allows the adhesive bond to set properly.
5.2 Applying sew-in interfacing
The sew-in method involves attaching the interfacing using stitching.
- Cut: Cut the interfacing accurately using the pattern piece. As with fusible, decide whether to include or exclude seam allowances (excluding reduces bulk).
- Position: Place the interfacing piece against the wrong side of the corresponding fabric piece, carefully aligning all edges.
- Attach (basting): Secure the interfacing to the fabric layer by hand or machine basting within the seam allowance. Stitch close to the intended permanent seam line, but ensure these temporary basting stitches will not be visible on the finished garment. Keep both layers smooth and flat during this process.
- Sew: Proceed with garment construction, treating the basted fabric-and-interfacing unit as if it were a single layer of fabric.
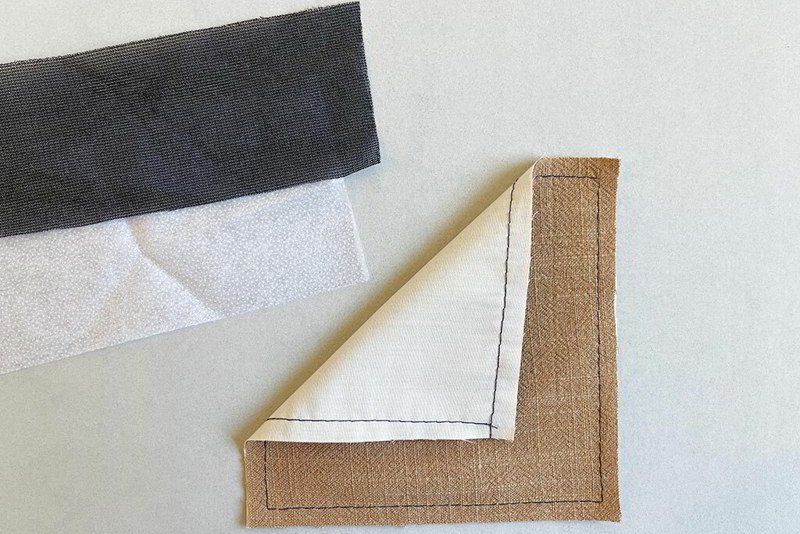
- Trim (optional but recommended): After sewing seams that incorporate the interfacing, consider trimming the interfacing layer close to the stitch line within the seam allowance. This step is particularly helpful on curves and corners to reduce bulk and allow seams to lie flatter. Be careful not to cut the main fabric or the permanent seam stitches.
6. Avoiding common interfacing pitfalls in production
Effective troubleshooting can prevent costly errors and ensure consistent quality.
Issue: Bubbling/incomplete fusion (fusible)
Solutions: Verify iron temperature, pressure, and pressing time are adequate for the specific fabric and interfacing combination (refer to test results); ensure the ironing surface is firm and flat; always use a press cloth; check that the iron soleplate is clean; confirm the fabric is clean and completely dry before application.
Issue: Wrong stiffness/drape (too stiff or too limp)
Solutions: Re-evaluate interfacing weight and type selection – testing on scraps is non-negotiable; create and maintain a reference library documenting successful fabric/interfacing pairings used in past production runs.
Issue: Glue seepage (fusible)
Solutions: Always test first!; opt for sew-in interfacing for very open weaves or highly textured fabrics; try a slightly lower iron temperature if feasible without compromising the bond; protect the ironing board cover with an extra layer of scrap fabric underneath the main piece.
Issue: Fabric damage (crushing nap/shine/melting)
Solutions: Use sew-in interfacing for sensitive materials like velvets, corduroys, sequins, vinyl, or fabrics known to react poorly to heat; always test iron heat on a fabric scrap before applying to the actual garment piece; use a press cloth diligently every time.
Issue: Interfacing showing through fabric
Solutions: Strictly follow the color matching rule (light interfacing for light fabrics, dark for dark); evaluate the main fabric’s opacity when choosing interfacing – very sheer fabrics may require special consideration or alternative stabilization methods.
7. Related questions
7.1 Can I use just one type of interfacing for all my designs?
While the appeal of using a single, versatile interfacing (like a medium-weight non-woven) for simplicity is understandable, this approach often leads to compromises in quality across a diverse range of fabric types and garment styles. Achieving the most professional result consistently requires tailoring the interfacing choice—considering its weight, stretch (or lack thereof), and construction-to the specific needs of the fashion fabric and the desired structural outcome. Customization ensures the interfacing enhances, rather than detracts from, the garment’s intended look and feel.
7.2 How critical is pre-washing interfacing?
For most modern synthetic interfacings (polyester, nylon blends), pre-washing is generally unnecessary as they are designed to have minimal shrinkage. However, there’s an exception: if using a 100% cotton interfacing (less common but available) paired with a natural fiber fabric (like cotton or linen) that is expected to shrink significantly during laundering, and precise fit is critical (e.g., in fine tailoring), pre-washing both the fabric and the interfacing might be advisable. Testing shrinkage on swatches first is a prudent step. When in doubt, consult the manufacturer’s information if available.
7.3 What’s the best way to store interfacing?
Proper storage helps maintain interfacing quality and makes identification easier:
- Roll, don’t fold: Store interfacing rolled rather than folded. Folds can create permanent creases that may be difficult or impossible to remove and can interfere with smooth application, especially for fusible types.
- Keep clean and dry: Store rolls in a clean, dry environment away from direct sunlight and excessive heat, which could potentially affect fusible adhesives over time.
- Label clearly: Label the rolls or their cores with the type (fusible/sew-in, woven/non-woven/knit) and weight (light/medium/heavy). This saves time and prevents errors during production selection.
8. The impact on your bottom line: Interfacing as a quality investment
While interfacing represents a small fraction of a garment’s material cost, its correct selection and application deliver significant returns by directly impacting key business factors:
- Product quality: Ensures a professional appearance and feel, with crisp details and appropriate structure. Professional garment finishing relies heavily on proper interfacing use.
- Durability: Increases the lifespan of garments by reinforcing high-stress areas (collars, cuffs, button areas), providing essential garment support against wear and tear.
- Brand perception: Consistently well-structured garments signal quality construction, enhancing brand reputation and perceived value.
- Customer satisfaction: Meets customer expectations for garments that look good and hold their shape, leading to higher customer satisfaction and potentially reducing returns related to structural issues.
- Potential cost savings: Although quality interfacing adds a minor cost, reducing returns and bolstering brand image often justifies this as a worthwhile quality investment.
Investing thought and care into interfacing is not merely an expense; it’s a strategic choice that elevates product quality and strengthens brand value in a competitive market.
Read more:
Mastering the selection and application of interfacing—whether fusible interfacing or sew-in interfacing, woven, non-woven, or knit—is an essential skill for any clothing business aiming for a professional standard. This unseen fabric stabilizer profoundly influences a garment’s structure, durability, drape, and overall aesthetic appeal.
Integrating thoughtful interfacing choices into the design and production workflow is not just a technical detail but a fundamental aspect of quality control and brand building. By understanding the nuances of different types, weights, and application methods, businesses can ensure their products possess the structure and finish that discerning customers expect.


