


Make Sewing Patterns: Beginner’s Guide to Drafting and Cloning


Dreaming of unique clothing designs or perfect custom fits? Small clothing businesses and DIY enthusiasts often struggle with generic designs, standard sizes, and pattern costs. But pattern making is the foundation of great garments! It unlocks unique designs, perfect fits, and brand differentiation. Poor patterns mean wasted fabric and unhappy customers.
Mastering pattern making empowers your creativity and improves your clothing quality. This beginner’s guide provides step-by-step techniques for drafting patterns from measurements and tracing templates. Learn expert tips for accuracy and fit, understand key pattern making principles, and create custom patterns for any design. Unlock your fashion potential and bring your visions to life!
1. Master sewing pattern making: Your expert guide to custom clothing designs
Sewing pattern making is the cornerstone of creating well-fitting, unique garments. For custom clothing and original garment design, mastering patterns is essential. Creating your own DIY patterns empowers your creativity and builds a distinct brand identity for small businesses. Custom patterns offer numerous benefits: achieving a perfect fit, realizing truly unique designs, and significant cost savings compared to relying solely on pre-made patterns. Unlock your design potential through expert pattern making.
2. Two proven methods to make your own sewing patterns
Creating your own DIY sewing patterns opens up endless design possibilities. Whether you prefer precise customization or replicating favorite garments, mastering pattern making methods is key. Two popular approaches are drafting patterns from measurements for a custom fit and creating template patterns by tracing existing clothes. Both offer unique advantages for crafting personalized clothing.
2.1 Method 1: Drafting sewing patterns from measurements – The precision approach
Drafting patterns uses body measurements to create patterns from scratch. This pattern drafting technique offers precise customization.
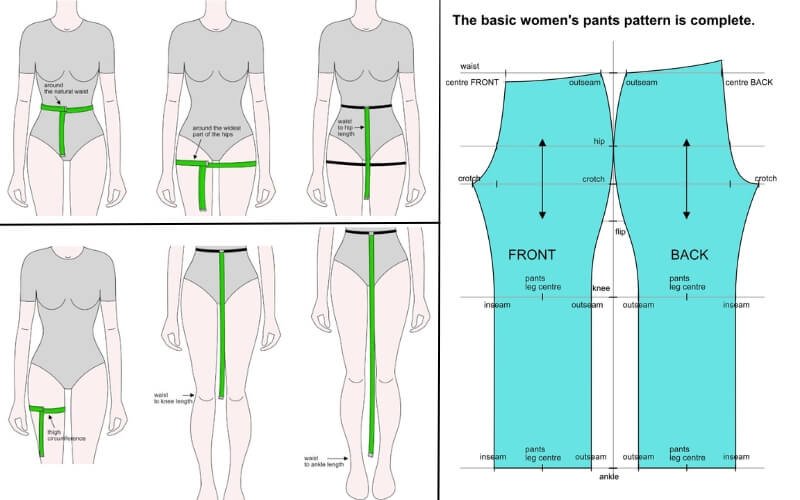
- Step 1: Accurate body measurements – Your foundation for fit: Essential body measurements include bust, waist, hips, back length, height, neck, chest, sleeve length, shoulder length, and upper arm width. Accuracy is paramount in drafting. Always measure twice and use a flexible measuring tape. For best results, wear the type of undergarments that will be worn with the finished garment when taking measurements.
- Step 2: Sketching your design – Visualizing the pattern pieces: A garment sketch helps visualize pattern pieces needed for your clothing design process. Even a simple sketch helps break down complex designs into manageable pattern pieces. Consider the garment’s construction and how seams will join.
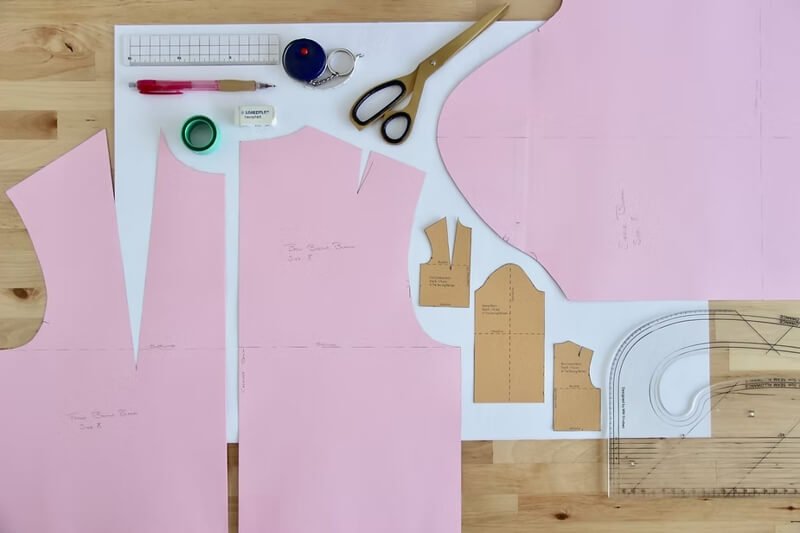
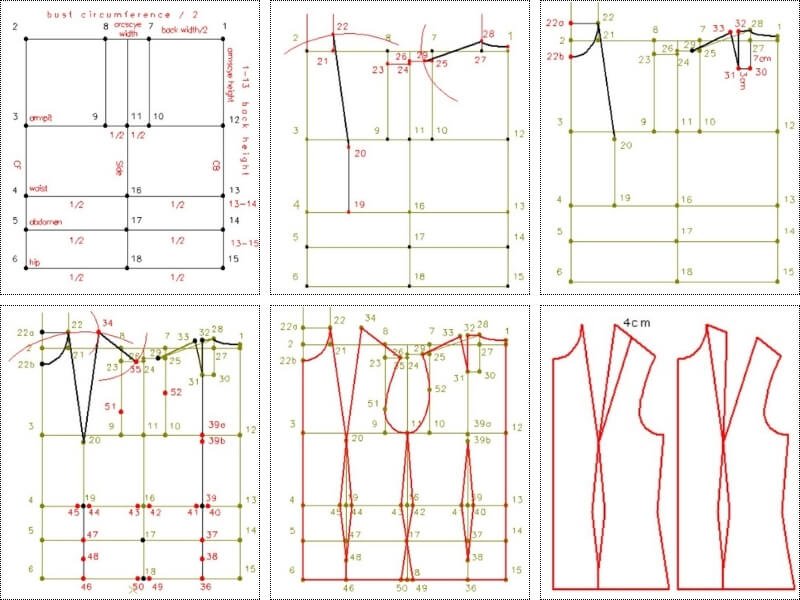
- Step 3: Plotting length and key lines – Setting the pattern framework: Lay pattern paper flat and establish the center front. Plot horizontal pattern lines for the shoulder line, bust line, waist line, and hip line.
- Step 4: Connecting the dots – Shaping the garment outline: Use a curved ruler to define the garment silhouette by shaping pattern outlines, connecting bust/chest, waist, and hip points.
- Step 5: Neckline and shoulder – Defining the upper bodice: Shape the neckline and draw the shoulder slope using a curved ruler for the bodice pattern.
- Step 6: Seam allowance – Preparing for sewing: Add seam allowance around pattern edges. Standard seam allowance is often 1/2 inch (1.3cm), but consider adjusting based on fabric type and desired finish. Consistency in seam allowance is crucial for accurate garment construction. This ensures pattern making accuracy and sewing preparation.
- Step 7: Sleeve pattern (example) – Applying drafting principles: Draft a basic sleeve pattern using sleeve length and upper arm width.
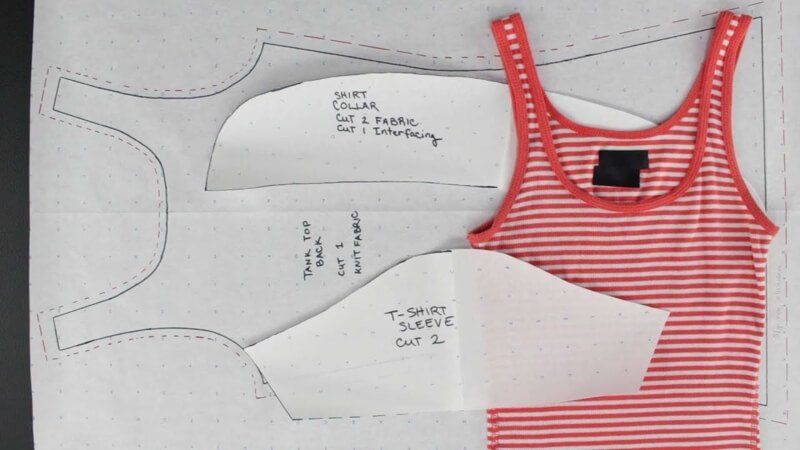
- Step 8: Cutting and labeling – Organizing your pattern pieces: Cutting pattern pieces accurately and labeling patterns clearly (e.g., “Front Bodice”) is crucial for pattern organization in the pattern making process. Label pattern pieces with size, garment description, and date. This helps with organization and future use, especially if you create multiple sizes.
2.2 Method 2: Making sewing patterns from existing clothing – The template technique
Creating template patterns involves copying clothes you already own, using existing garments as a guide for pattern making from clothes. This tracing patterns method is ideal for replicating favorite styles.
- Step 1: Prepare pattern paper and garment – Setting up your template: Fold pattern paper in half and prepare your chosen garment by folding paper and the garment along vertical seams for the template method.
- Step 2: Pinning and tracing – Capturing the garment shape: Pinning garment to the folded paper, then tracing pattern outline of the folded garment captures the pattern outline.
- Step 3: Refining and labeling – Creating a usable pattern: Redraw traced lines with bold lines, add pattern labeling, and include seam allowance for template pattern accuracy.
- Step 4: Pattern pieces for each section – Completing the garment pattern: Create separate pattern pieces for all garment sections, considering closures like zippers for complete template pattern making.
- Step 5: Cutting and labeling template patterns – Ready for sewing: Accurately cutting template patterns and clearly labeling template patterns ensures proper pattern piece organization and pieces are ready for sewing. This method is great for replicating styles you love, but remember that commercially made clothes may have design ease built in. Consider this when tracing and adjust if needed for your desired fit.
3. Key patternmaking considerations for professional results
To achieve truly professional results in pattern design, certain pattern making skills and considerations are essential. Beyond the basic techniques, understanding key principles will elevate your pattern making aptitude. Let’s explore some crucial aspects for refining your pattern making journey.
3.1 Skill and aptitude in pattern drafting – Is it for you?
Pattern drafting skills aren’t solely about following instructions; they require certain aptitudes. Spatial reasoning is important, as you’re visualizing 2D shapes in 3D form. Basic mathematical skills, particularly working with fractions for measurements, are also necessary.
The pattern making learning curve can be challenging initially, but rewarding. Pattern making involves problem-solving and an eye for detail. If you enjoy puzzles and have a knack for precision, you’ll likely find pattern making a fulfilling endeavor.
3.2 Learning from existing patterns – Building your patternmaking foundation
Before creating your own designs from scratch, learning from existing patterns is invaluable. Studying commercial patterns helps you understand pattern construction principles. Analyzing how darts, seams, and curves shape a garment provides practical insight for learning pattern making.
Take apart some old clothes or closely examine commercial patterns. Observe how different elements contribute to the final garment shape. This pattern analysis through reverse engineering is a fantastic learning tool for aspiring pattern makers.
3.3 Starting with basic blocks (slopers) – Your patternmaking building blocks
A fundamental step in pattern making is creating basic blocks, also known as slopers. These are your pattern making foundation. Start by drafting essential blocks: the bodice block, skirt block, sleeve block, and pant block. Think of blocks as your basic templates.
They are simple shapes that fit closely to the body and serve as the starting point for more complex and creative pattern design. Mastering blocks is crucial before moving on to more intricate designs.
3.4 The muslin mock-up – Testing and refining your patterns
The muslin mock-up is a critical step in ensuring a well-fitting garment. Always sew a muslin mock-up to test the fit of your drafted patterns. Fitting muslin allows you to identify and correct any errors in your pattern before cutting into your final fabric.
During the fitting process, carefully check the fit and identify areas needing pattern alterations. Refine your pattern based on the muslin fit. Muslin is your best friend in pattern making! Don’t skip this step. It’s much easier to adjust a muslin than to waste expensive fabric on a poorly fitting garment.
Pay attention to areas like bust fit, shoulder slope, and ease of movement. This step is essential for checking pattern fit and achieving accurate garment fitting.
3.5 Dart apex and body fit – Understanding pattern adjustments
Understanding the dart apex is key to achieving good body shape and fit in pattern making. Dart apex placement is crucial for shaping garments to the bust and other body curves. Use your basic blocks to understand standard dart placement. Compare the dart apex on your block to your own body landmarks.
This understanding helps you make informed pattern adjustments for a better fit. Learning basic pattern fitting issues and fitting darts principles will enable you to create patterns that flatter different body shapes.
4. FAQs about making sewing patterns
4.1 What are the essential tools for pattern making?
Essential pattern making tools include: pattern paper for drafting and tracing; sharp pencils for precise lines; rulers – both straight and curved rulers like French and hip curves for shaping; a flexible measuring tape for body measurements; sharp scissors dedicated to paper; and optionally a tracing wheel for transferring pattern lines.
French curve and hip curve rulers are invaluable for smoothly shaping necklines, armholes, and curves. Having these basic tools will set you up for success in creating your own sewing patterns.
4.2 How do I choose the right size when drafting a pattern?
Choosing the right size starts with accurate body measurements. Use a size chart as a general starting point, but remember these are just guidelines. Ease is crucial – it’s the extra room added to a garment for comfort and movement.
Consider the intended fit of your garment and add appropriate ease to your measurements. Always draft your pattern based on your specific measurements and desired ease, rather than strictly adhering to standard size charts, for a truly custom fit.
4.3 What is the difference between drafting and draping patterns?
Drafting patterns is flat pattern making created on paper using measurements. It’s precise and mathematical. Draping patterns, conversely, involves creating patterns directly on a dress form. Fabric is manipulated and pinned onto the form to create the desired shape.
Drafting is excellent for structured designs and predictable fits. Draping is more intuitive and allows for organic shapes and designs, but can be less precise for beginners. Drafting is often preferred for its accuracy and suitability for mass production, while draping is favored in couture and for unique, sculptural designs.
4.4 Can I make sewing patterns digitally?
Yes, sewing patterns can absolutely be made digitally using specialized CAD software designed for pattern making. Digital pattern making offers numerous benefits. It provides greater accuracy in pattern drafting and allows for easy grading of patterns to different sizes.
Digital patterns are also easily shared and stored electronically. While there is a learning curve to mastering CAD software, it can significantly streamline the pattern making process, especially for businesses or those creating patterns regularly.
4.5 Where can I find resources to learn more about pattern making?
Many resources are available to further your pattern making learning journey. Explore books dedicated to pattern making techniques, which offer in-depth knowledge and step-by-step instructions. Online courses and tutorials provide visual guidance and structured learning.
Consider attending workshops for hands-on experience and personalized feedback. Joining online communities and forums connects you with other pattern makers for support, inspiration, and shared learning. These resources offer diverse learning styles and levels to suit your needs.
As you master sewing pattern making and create truly unique garments, Packlove is here to help you complete your brand vision. With over 8 years of experience in the garment industry, we specialize in providing high-quality, custom-designed labels and tags for clothing businesses of all sizes.
Our services include a wide range of options: custom woven labels, printed labels, care labels, hang tags, zipper bags, and poly mailers. We understand the needs of small clothing brands and offer customizable solutions to elevate your brand presentation and create a lasting impression. Visit Packlove to explore our full range of label and tag options and request a free quote today.
Read more:
Your sewing pattern making journey begins now, unlocking endless creative possibilities for custom clothing designs. From drafting to templates, you have the foundation for garment creation. Mastering these techniques gives you ultimate creative control. While practice is key to hone your sewing skills, the reward is designing and sewing clothes that perfectly fit your vision. Embrace the process and enjoy bringing your unique fashion ideas to life through pattern making!


