


Master Cotton Fabric: Sewing Guide for Beginners


Embarking on a new sewing project is always exciting, and choosing the right fabric is the first step towards success. Cotton fabric, with its versatility and ease of use, is a favorite among both beginners and seasoned sewing enthusiasts. This guide is designed specifically for those just starting their sewing journey, or for anyone looking to brush up on their skills with this popular material.
Whether you’re dreaming of crafting your own clothes, creating unique home décor, or simply exploring the world of sewing, this article will provide you with valuable knowledge to master cotton. We’ll cover everything from understanding what cotton fabric really is, to tackling common issues like fraying and puckering.
Expect a comprehensive look at selecting your materials, mastering essential stitches, and troubleshooting problems, equipping you with the expertise of a seasoned professional.
1. What is cotton fabric?
Cotton fabric is a natural fiber textile derived from the fluffy fibers surrounding the seeds of the Gossypium plant. Historically, cotton has been cultivated for thousands of years, with evidence of its use dating back to ancient civilizations. Its enduring popularity is no accident. Understanding the properties of this time-tested material is the bedrock of effective, long-lasting sewing project results.
Here’s a closer look at the variety within the world of cotton:
- Lawn: A lightweight, fine, and slightly sheer cotton, often used for summer dresses and blouses.
- Poplin: A plain-weave cotton with a smooth, slightly crisp feel, suitable for shirts, dresses, and lightweight jackets.
- Chambray: A plain-weave cotton that often has a denim-like appearance, but is lighter and softer. It’s great for shirts and casual wear.
- Quilting cotton: A medium-weight cotton, commonly used for quilting and crafts, available in a vast array of prints.
- Flannel: A soft, napped cotton that provides warmth and is often used for pajamas and blankets.
- Canvas: A heavy-duty, durable cotton used for bags, upholstery, and outdoor projects.
Beyond the specific types, consider these key characteristics:
- Fiber content: The best are typically made from 100% cotton, but blends (with polyester, for example) also exist.
- Weave: How tightly the fabric is woven will give you a guide of the use of the fabric.
- Weight: Grams per square meter is the common guide for fabric weight.
- Drape: Whether the fabric is best for garments or home decorations.
- Breathability: Cotton is known for its excellent breathability, allowing air to circulate and keeping you cool.
- Absorbency: Cotton is highly absorbent, making it comfortable to wear, but also prone to taking on moisture.
- Organic certification: This will guide the user that fewer chemicals were used in the processing of the fabric.
- Shrinkage: A crucial factor – cotton will shrink, especially when washed in hot water or dried on high heat. This is essential to keep in mind for your projects.

2. Why choose cotton for sewing?
Cotton presents a compelling choice for a vast range of sewing endeavors. Its inherent qualities make it a standout option, particularly when compared to other materials like, say, silk, which can be notoriously slippery and challenging to manage. Consider the following benefits:
- Easy to handle: Unlike some synthetic materials that can shift and slide, cotton generally stays put, making it far easier to cut and sew accurately. This is a huge advantage, particularly for those building their sewing confidence.
- Versatile: From lightweight summer dresses to sturdy tote bags, cotton’s adaptability makes it suitable for a wide array of projects. This means you can gain experience with a single fabric type while exploring different creations.
- Comfortable: The soft, breathable nature of cotton makes it exceptionally comfortable to wear, especially in warmer climates. This makes it a natural choice for clothing and items that come into direct contact with skin.
- Affordable: Compared to some specialty fabrics, cotton is generally very budget-friendly. This makes it accessible for practicing and experimenting without a large financial investment.
- Widely available: You’ll find cotton fabric in almost any fabric store, both online and offline, in a huge variety of colors, prints, and weights.
- Sustainable: Many consumers will look for an organic certificate. This will assure them that the fabric has not been treated with harsh chemicals.
3. Preparing cotton fabric for sewing
Proper preparation is paramount when working with cotton. Taking the time to prepare your fabric before you even start cutting will significantly impact the final result of your project. Skipping these steps can lead to disappointment down the line, with garments shrinking, distorting, or colors bleeding.
Here’s a step-by-step guide to preparing your cotton fabric:
1. Pre-washing: This is arguably the most crucial step. Washing your cotton fabric before you sew it addresses two major concerns:
- Shrinkage: As previously mentioned, cotton is prone to shrinking. Pre-washing allows this shrinkage to happen before you’ve invested time and effort in your project. Failing to pre-wash can result in a finished garment that’s too small after its first wash.
- Color bleeding: Some cotton fabrics, especially those with vibrant or dark colors, may bleed dye. Pre-washing helps to remove excess dye, preventing it from staining other fabrics or parts of your project later on.
2. Drying: After washing, you can either tumble dry the fabric on a low or medium setting or hang it to dry. The drying method should also mimic how you plan to care for the finished project.
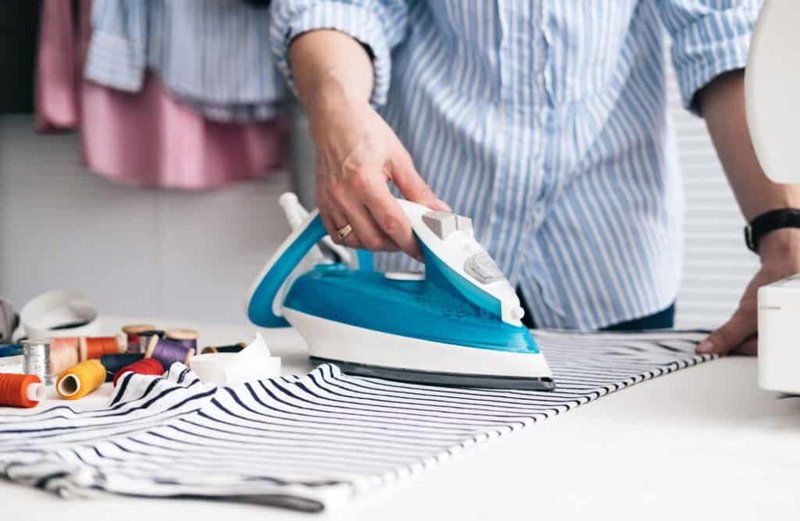
3. Ironing: Once the fabric is dry, ironing is essential for removing wrinkles.
- Wrinkles: Cotton is prone to wrinkling, and ironing creates a smooth, flat surface for accurate cutting and sewing.
- Accuracy: Working with a wrinkle-free fabric ensures that your pattern pieces will be cut to the correct size and shape.
4. Finding the grainline: Understanding the grainline is crucial for ensuring that your finished project drapes and hangs correctly, as it influences the fabric’s drape.
- Selvage: The selvage is the tightly woven edge of the fabric that runs parallel to the lengthwise grain. It prevents the fabric from unraveling.
- Lengthwise grain: This runs parallel to the selvage and is the strongest, most stable direction of the fabric.
- Crosswise grain: This runs perpendicular to the selvage and has slightly more give.
- Bias: This is the diagonal direction across the fabric, and it has the most stretch.
4. Essential tools for sewing with cotton
Having the right tools at your disposal can significantly enhance your sewing experience and the quality of your finished project. While a top-of-the-line sewing machine isn’t strictly necessary for beginners, investing in a few essential, good-quality tools will make the process smoother and more enjoyable.
Here’s a breakdown of the must-have tools for sewing with cotton:
- Sewing machine: While hand-sewing is possible, a sewing machine is highly recommended for efficiency and consistent stitches. A basic machine with straight stitch and zigzag stitch capabilities is sufficient for most cotton projects.
Needles: Using the correct needle size is crucial for preventing fabric damage and achieving neat seams.
- Sharp needle: A sharp, new needle is essential for piercing the cotton fabric cleanly without snagging or creating holes.
- Universal needle: A universal needle is a good all-purpose choice for most cotton fabrics.
- Ballpoint needle: While typically used for knit fabrics, a ballpoint needle can be helpful for very fine or delicate cottons to prevent snagging.
Needle Size Chart:
| Cotton Fabric Type | Needle Size (Universal) |
|---|---|
| Lightweight (lawn, voile) | 60/8 – 70/10 |
| Medium-weight (poplin) | 70/10 – 80/12 |
| Heavyweight (canvas) | 90/14 – 100/16 |
| Extra Heavy-Weight | 100/16 -120/20 |
Thread: The thread you choose should be compatible with both your fabric and your sewing machine.
- Cotton thread: While cotton thread can be used, it’s generally weaker than polyester thread.
- Polyester thread: An all-purpose polyester thread is a strong and versatile choice for most cotton projects.
- All-purpose thread: This is usually a polyester or poly-cotton blend and is a good option for general sewing.
Cutting Tools: Accurate cutting is essential for a well-fitting and professional-looking finished project.
- Fabric scissors: Invest in a good-quality pair of fabric scissors that are only used for cutting fabric. This will keep them sharp and prevent damage to the blades.
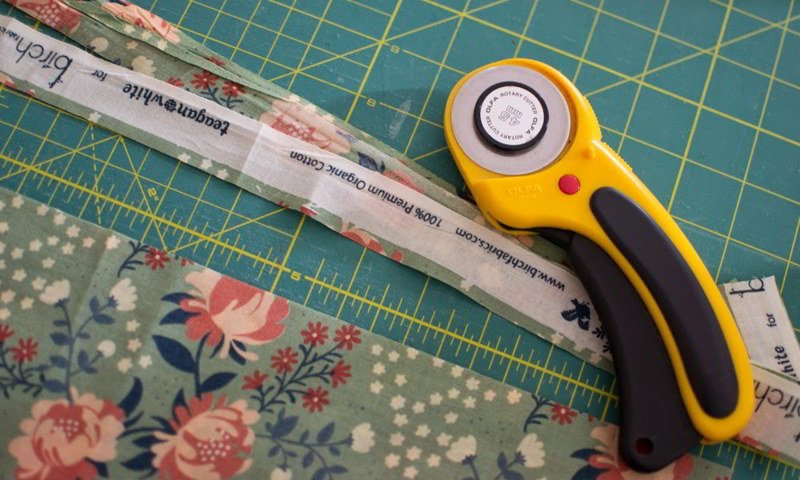
- Rotary cutter: A rotary cutter, used in conjunction with a cutting mat, is excellent for cutting straight lines and curves quickly and accurately.
- Cutting mat: A self-healing cutting mat protects your work surface and provides a stable base for using a rotary cutter.
Measuring and Marking Tools:
- Tape measure: A flexible tape measure is essential for taking body measurements and measuring fabric.
- Ruler: A clear, see-through ruler is helpful for measuring and marking straight lines.
- Seam gauge: A small, handy tool for measuring seam allowances and hems.
- Chalk/fabric pens: Use tailor’s chalk or fabric pens with disappearing ink to mark pattern markings, notches, and other important details on your fabric.
- Tracing wheel: Use a serrated tracing wheel with the fabric pen to create marks on your fabric.
- Pins: Pins are used to hold fabric pieces together before and during sewing.
- Straight pins: Standard straight pins are suitable for most cotton fabrics.
- Ball point pins: Use these pins to prevent snags on more delicate cotton fabrics.
Other Useful Tools:
- Seam ripper: An essential tool for removing stitches when mistakes happen (and they will!).
- Pinking shears: Specialized scissors create a zigzag edge, minimizing fraying on seam allowances.
- Bias tape maker: Tool used to fold and press fabric strips, making it easy to create single or double-fold bias tape.
- Tailor’s ham: A tailor’s ham is a firmly stuffed cushion used to press curved seams and darts, providing a contoured surface that helps shape garments effectively.
5. Cutting cotton fabric
Precise cutting is a fundamental step in any sewing project. Inaccurate cutting can lead to misaligned seams, ill-fitting garments, and wasted fabric. Taking your time and using the correct techniques will ensure that your fabric pieces are the correct size and shape, setting you up for success in the subsequent sewing stages.
Here’s a detailed guide to cutting cotton fabric:
Pattern Layout:
- Lay your fabric flat on a large, clean surface.
- Follow the pattern layout guide provided with your sewing pattern. This guide shows you how to arrange the pattern pieces on the fabric efficiently, minimizing waste.
- Pay close attention to the grainline markings on the pattern pieces. These markings must be aligned with the grainline of your fabric.
Cutting with Fabric Scissors:
- Use long, smooth strokes to cut along the pattern lines. Avoid short, choppy cuts, which can create jagged edges.
- Keep the lower blade of the scissors in contact with the cutting surface for greater stability and control.
- Cut notches outwards, rather than inwards, to avoid weakening the seam allowance.
Cutting with a Rotary Cutter:
- Place your fabric on a self-healing cutting mat.
- Use a clear ruler as a guide for your rotary cutter.
- Apply firm, even pressure to the rotary cutter as you roll it along the pattern lines.
- Safety precautions: Always use a rotary cutter with a blade guard. Keep your fingers away from the blade’s path. Engage the safety lock when the cutter is not in use.
Addressing Fraying: Cotton fabric, particularly lighter weights, is prone to fraying at the raw edges.
- Pinking shears: These scissors create a zigzag edge that helps to minimize fraying. Use pinking shears to trim the raw edges of your fabric pieces after you’ve cut them out.
- Fray check: This is a liquid sealant that can be applied to the raw edges of fabric to prevent fraying. Use it sparingly, as it can stiffen the fabric slightly.
6. Sewing cotton fabric: Techniques and settings
With your cotton fabric prepared and cut, you’re ready to start sewing! This section covers the essential techniques and settings for achieving strong, neat seams and professional-looking finishes.
Here’s a comprehensive guide:
Stitch Selection: The stitch is what joins fabric pieces together.
- Straight stitch: The workhorse of sewing, the straight stitch is used for most seams in cotton projects.
- Zigzag stitch: This stitch is used for finishing raw edges to prevent fraying, and it can also be used for sewing stretch fabrics (though cotton itself is not stretchy).
- Basting stitch: A long, temporary straight stitch used to hold fabric layers together before sewing the final seam.
Stitch Length: The appropriate stitch length affects seam strength and depends on the weight of your cotton fabric.
| Cotton Fabric Type | Stitch Length (mm) |
|---|---|
| Lightweight (lawn, voile) | 1.8 – 2.2 |
| Medium-weight (poplin) | 2.0 – 2.5 |
| Heavyweight (canvas) | 2.5 – 3.0 |
Tension: Correct thread tension, adjusted on your sewing machine, is crucial for creating balanced, even stitches.
- Balanced tension: The top and bottom threads should interlock smoothly in the middle of the fabric layers, without any loops or puckering.
- Puckering: If the tension is too tight, the fabric may pucker.
- Loose stitches: If the tension is too loose, the stitches may be loopy and weak.
- Always test your stitch length and tension on a scrap of your fabric before sewing your project.
Seam Allowance: The seam allowance is the distance between the stitching line and the raw edge of the fabric. Most sewing patterns specify a particular seam allowance (e.g., 1.5cm or 5/8 inch).
Sewing Straight Seams:
- Place the fabric pieces right sides together, aligning the raw edges.
- Pin the fabric layers together, perpendicular to the seam line.
- Begin sewing at the start of the seam, backstitching (sewing a few stitches in reverse) to secure the stitches.
- Sew along the seam line, using the appropriate seam allowance.
- Remove the pins as you sew.
- Backstitch again at the end of the seam.
Sewing Curved Seams:
- Pin the fabric layers together, placing pins closer together than you would for a straight seam.
- Sew slowly and carefully, guiding the fabric around the curve.
- Clip into the seam allowance of concave curves (curves that curve inwards) to allow the fabric to lie flat.
- Notch out small wedges of fabric from the seam allowance of convex curves (curves that curve outwards) to reduce bulk.
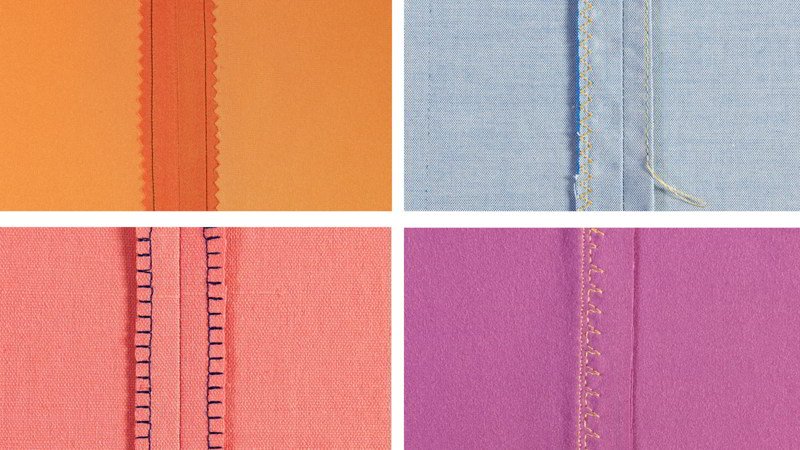
Seam Finishing: Finishing the raw edges of your seams prevents fraying and creates a more durable and professional-looking finish.
- Zigzag finish: Sew a zigzag stitch along the raw edge of each seam allowance.
- French seams: An elegant finish ideal for sheer and lightweight fabrics, this technique neatly encloses all raw edges within the seam itself. It involves sewing the seam twice, resulting in a clean, durable, and highly professional look on both the inside and outside of the garment.
- Bias tape finish: Using bias tape to encase the raw edges creates a clean and decorative finish, often used on necklines, armholes, and hems.
7. Troubleshooting common problems
Even with careful preparation and technique, you may encounter some challenges when sewing with cotton. This section provides solutions to some of the most common problems.
1. Fraying:
Causes: Cotton, especially lighter weights, is naturally prone to fraying due to its woven structure. Cutting against the grain, using dull scissors, or not finishing raw edges can exacerbate fraying.
Solutions:
- Use sharp fabric scissors or a rotary cutter.
- Cut along the grainline.
- Finish raw edges with a zigzag stitch, French seam, bias tape, or pinking shears.
- Apply a small amount of fray check to the raw edges.
2. Puckering:
Causes: Puckering is when the fabric gathers or wrinkles along the seam line. This is often caused by incorrect thread tension (usually too tight), using the wrong needle size, or sewing too quickly.
Solutions:
- Adjust the thread tension on your sewing machine. Test on a scrap of fabric until the stitches are balanced.
- Use a smaller needle size.
- Sew more slowly and carefully, guiding the fabric gently.
- Make sure the presser foot is lowered.
3. Skipped Stitches:
Causes: Skipped stitches occur when the needle fails to pick up the bobbin thread, resulting in gaps in the seam. This can be caused by using the wrong needle type or size, a dull or bent needle, incorrect threading of the machine, or the fabric being too thick for the needle.
Solutions:
- Replace the needle with a new, sharp needle of the correct size and type for your fabric.
- Re-thread the sewing machine, making sure the thread is properly seated in the tension discs and the bobbin is correctly inserted.
- If sewing through multiple layers of thick cotton, try using a walking foot.
4. Shrinkage:
Causes: As discussed, cotton is prone to shrinkage, especially when exposed to heat.
Solutions:
- Always pre-wash and dry your cotton fabric before cutting and sewing.
- Wash and dry the finished garment according to the care instructions for the fabric.
5. Needle Breaking:
Causes: Needle breakage can be caused by hitting a pin, sewing through fabric that is too thick for the needle, using a bent or damaged needle, or the needle not being securely inserted into the machine.
Solutions:
- Remove pins as you sew, rather than sewing over them.
- Use the correct needle size for the fabric thickness.
- Replace the needle if it is bent or damaged.
- Ensure the needle is properly inserted and tightened in the machine.
6. Fabric Slipping:
Causes: Fabric may slip if you are using the incorrect presser foot for the task.
Solutions: A walking foot can help feed the top and bottom layers of fabric evenly, preventing slippage.
8. Advanced techniques
Once you’ve mastered the basics of sewing with cotton, you might want to explore some more advanced techniques to expand your skills and tackle more challenging projects.
Delicate cottons: Working with very lightweight and delicate cottons like lawn, voile, and Swiss dot requires extra care.
- Fine needles: Use a very fine needle (size 60/8 or 70/10) to prevent holes and snags.
- Tissue paper: Place a layer of tissue paper beneath the fabric while sewing to provide extra stability and prevent the fabric from being pulled down into the feed dogs. Tear away the tissue paper after sewing.
- Walking foot: A walking foot has its own set of feed dogs that move in sync with the machine’s feed dogs, helping to feed multiple layers of fabric evenly. This is particularly useful for quilting and sewing delicate or slippery fabrics.
Quilting: Involves sewing together multiple layers of fabric to create a warm and decorative blanket.
- Batting: Batting is a layer of fluffy material (often cotton, wool, or polyester) that provides insulation in a quilt.
- Straight line quilting: Sewing straight lines across the quilt layers, often following the seams of the pieced top.
- Free-motion quilting: Using a special darning foot and dropping the feed dogs, you can move the fabric freely under the needle to create decorative designs.
Garment sewing: Sewing garments requires a greater understanding of pattern markings, fitting, and construction techniques.
- Fitting: Making a muslin (a test garment made from inexpensive fabric) allows you to check the fit of a pattern and make adjustments before cutting into your final fabric.
- Pattern markings: Understanding pattern markings (notches, darts, buttonholes, etc.) is crucial for accurately assembling a garment.
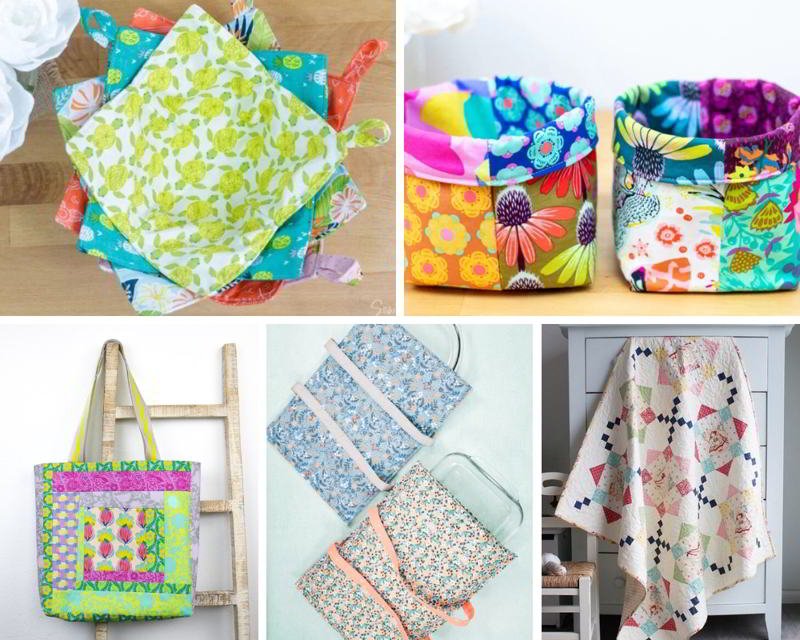
9. Project ideas for cotton fabric
The versatility of cotton fabric opens up a world of creative possibilities. Here are some project ideas to inspire you, ranging from beginner-friendly to more advanced:
- Pillowcases: A simple and satisfying project for beginners, pillowcases require only straight seams.
- Tote bags: Another great beginner project, tote bags can be customized with different fabrics and embellishments.
- Napkins: A quick and easy project that’s perfect for practicing your seam finishing techniques.
- Simple skirts: A-line or gathered skirts are relatively easy to sew and are a great way to start garment sewing.
- Shirts: With some experience, simple cotton shirts are a manageable project.
- Dresses: Once comfortable with patterns, cotton is suitable for a variety of dress styles.
- Pajama bottoms: Create comfortable and breathable nightwear.
- Quilts: From simple patchwork squares to intricate designs, quilting offers endless creative opportunities.
- Tailored garments: More experienced sewers can use cotton for tailored garments, although it’s often blended with other fibers for added structure.
10. Related questions
10.1 Can I use polyester thread to sew cotton fabric?
Yes, all-purpose polyester thread is suitable for most cotton projects.
10.2 How do I prevent my cotton fabric from wrinkling so much?
To minimize wrinkling, try ironing the cotton while it’s still slightly damp or using a starch spray.
10.3 What is the best way to store cotton fabric?
Fold your fabric neatly and store it in a cool, dry place away from direct sunlight to prevent fading.
10.4 What’s the difference between quilting cotton and apparel cotton?
Quilting cotton is typically a medium-weight cotton with a wide variety of prints, designed for quilting and crafts. Apparel cotton can encompass a broader range of weights and weaves, including lighter fabrics like lawn and voile, and is chosen based on the desired drape and structure of the garment.
10.5 How can I sew cotton knit fabrics?
When sewing cotton knit fabrics, use a ballpoint needle to prevent snags and runs. A stretch stitch or a narrow zigzag stitch is recommended to allow the seam to stretch with the fabric. Avoid stretching the fabric while sewing.
Read more:
Cotton fabric stands as a testament to versatility, ease of use, and comfort in the realm of sewing. Whether you’re just starting your sewing journey or are a seasoned crafter, the forgiving nature and wide availability of cotton make it an ideal choice for a vast array of projects.
By mastering the essential techniques of preparation, utilizing the right tools, and understanding how to address common challenges, you can confidently create beautiful and durable items. Remember, practice is key – the more you sew with cotton, the more proficient and creative you’ll become. So, embrace the possibilities, experiment with different types of cotton, and enjoy the rewarding process of bringing your sewing visions to life!


