


Natural Waist vs Clothing Waistline: Sizing for Brands


Mastering the waist measurement is fundamental for apparel business success. This guide clarifies the crucial difference between the anatomical ‘natural waist’ and the ‘clothing waistline’ where garments sit. Discover why precise waist measurement is non-negotiable – it drives consistent fit, slashes costly returns, and builds customer trust.
Learn the definitive step-by-step technique to measure accurately, avoiding common mistakes that sabotage fit. Understand how to translate this core data into reliable size guides and tech packs, leading to better products and a stronger brand reputation. Unlock consistent sizing and enhance customer satisfaction starting now.
1. What is the waist, really? Clearing up confusion for clothing brands
For apparel businesses, understanding the term “waist” correctly is foundational, yet common usage often differs from the specific definitions needed in garment creation. The everyday mention of “waist” can be ambiguous, sometimes referring to where trousers sit rather than a precise anatomical point.
This section aims to clarify the crucial distinctions between the body’s natural waist and the clothing waistline, ensuring clothing brands can operate with greater accuracy in design and sizing.
1.1 Understanding the “natural waist”: Locating your body’s narrowest torso point
The natural waist is an anatomical landmark defined as the part of the torso located between the bottom of the rib cage and the top of the hip bones. This area typically represents the narrowest point of the midriff (the middle part of the human body).
To locate the natural waist accurately, stand straight and bend sideways; the crease that forms indicates the natural waistline. Recognizing this specific body measurement point is essential before considering garment design.
1.2 The “clothing waistline”: Recognizing where different garment styles sit
In contrast to the body’s natural waist, the clothing waistline refers to where the waistband of a garment (like pants or skirts) actually sits on the wearer. Fashion trends heavily influence this placement. For instance, high-waisted styles position the garment’s waistline at or near the natural waist.
Mid-rise garments sit lower, often slightly below the navel, while low-rise designs rest closer to the hips. Understanding these variations in clothing waist position is key for accurate garment fitting descriptions.
1.3 Why this distinction is vital for accurate apparel sizing
Confusing the natural waist with the clothing waistline directly impacts apparel sizing and garment fit. Using an incorrect reference point for measurements leads to poorly fitting clothes, particularly noticeable in structured items like tailored trousers or fitted dresses where the waist dimension is critical.
The natural waist measurement serves as the standard reference for pattern making (creating the template for garment pieces) and grading (scaling the pattern for different sizes), even if the finished garment’s waistline sits elsewhere. This standard provides a reliable foundation for accurate sizing charts and better fit outcomes for customers.
2. The business case: Why precise waist measurements fuel apparel success
Investing the effort to secure precise waist measurements goes beyond mere technical accuracy; it represents a strategic decision essential for apparel success and business growth.
2.1 Achieving consistent fit across your product line
Standardized and accurate measurements, starting with critical points like the waist, are the bedrock of consistent fit across your entire product line. Customers gain confidence when all garments, regardless of style or production batch, adhere to consistent sizing standards based on reliable measurement techniques.
They can trust that a size M in one style will offer a comparable fit to a size M in another, encouraging repeat purchases and simplifying their shopping experience, leading to better garment fitting outcomes overall.
2.2 Slashing return rates and boosting customer satisfaction
Inaccurate sizing, particularly concerning the waist, is a primary driver of high return rates, a significant cost factor especially for e-commerce clothing sales. When garments fit correctly the first time because they are based on precise measurements, customer satisfaction naturally increases.
This positive experience translates into fewer returns due to poor fit, better product reviews, and enhanced customer loyalty. Reducing fit-related returns saves costs associated with reverse logistics and restocking, directly impacting profitability.

2.3 Building trust: Accurate sizing as a mark of quality
Consistently delivering garments that fit well, underpinned by accurate sizing protocols, signals professionalism and a commitment to quality. This attention to detail, starting with fundamental measurements, helps build trust with consumers.
In a competitive market, a reputation for reliable sizing differentiates your brand, fostering trustworthiness and contributing positively to your overall brand reputation. Accurate sizing becomes a tangible indicator of the care invested in your products.
3. How to measure waist circumference accurately for garment development
This section provides a clear, step-by-step method for obtaining an accurate measurement of the waist circumference, specifically tailored for the needs of garment development and production.
3.1 Gearing up: The simple tape measure is key
The essential measurement tool required is a flexible measuring tape, typically made of plastic or fiberglass, not a rigid metal one. Ensure the tape measure starts accurately at the zero mark and is in good condition.
3.2 A step-by-step guide to reliable waist measurement (tailored for apparel)
Follow these steps consistently to achieve a reliable waist measurement, which forms a critical part of accurate garment specification.
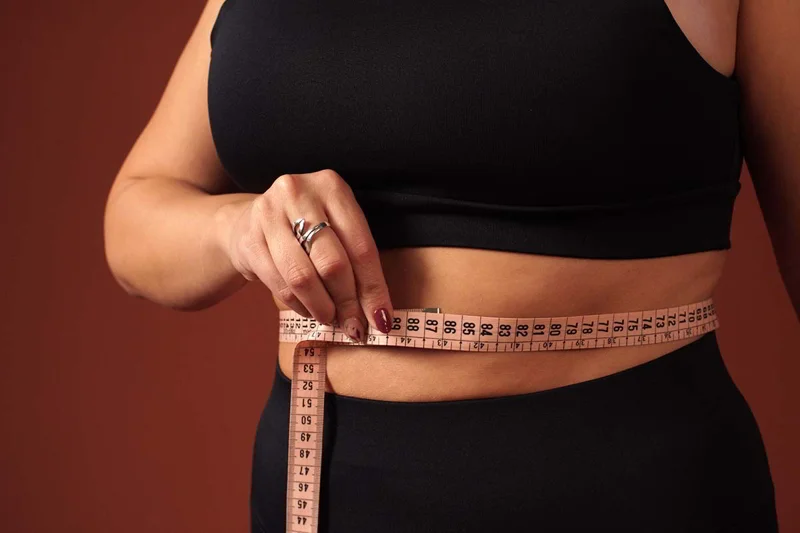
- Step 1: Pinpointing the natural waistline (reference: between rib cage and hip bone, torso crease). Reconfirm the natural waistline location: midway between the lowest point of the rib cage and the highest point of the hip bone. The crease formed when bending sideways (the torso crease) is a helpful guide. Measurements should be taken directly on bare skin or over thin, non-compressive undergarments for accuracy.
- Step 2: Ensuring correct posture and preparation (relaxed, normal breath out). The individual being measured should stand upright with correct posture but remain relaxed, feet close together, and arms hanging naturally at the sides. Critically, take the measurement at the end of a normal exhale – the person should not be sucking in their stomach or holding their breath. This ensures the measurement reflects a natural state for accurate measurement.
- Step 3: Applying the tape measure correctly (snug, not tight; parallel to floor). Wrap the tape measure around the identified natural waistline. The tape measure must be kept parallel to the floor all the way around the body. Apply the tape so it is snug against the skin, meaning it makes contact without leaving an indentation or compressing the flesh. Ensure the tape is not twisted. This measurement technique captures the true waist circumference.
- Step 4: Recording the measurement accurately. Read the number on the tape where the zero end meets the rest of the tape. For improved measurement accuracy, take the measurement twice to ensure consistency. Record the measurement immediately, clearly noting the units used (e.g., centimeters (cm) or inches).
3.3 Avoiding common pitfalls: Measurement mistakes that hurt fit
Inaccurate measurements often result from easily avoidable errors. Steering clear of these common mistakes is crucial for preventing poor fit issues:
- Measuring over bulky clothing: adds extra, unwanted inches to the measurement.
- Pulling the tape too tightly: compresses the body, resulting in a measurement smaller than the actual waist and leading to overly tight garments.
- Allowing the tape to sag or not keeping it parallel: creates an inaccurate, usually larger, measurement.
- Measuring at the wrong location: taking the measurement at the belly button or where trousers usually sit, instead of the natural waist, will skew garment fit based on body proportions.
- Subject holding their breath or sucking in: temporarily alters the waist size, leading to garments that don’t fit during normal wear.
4. Key factors influencing waist measurement and garment fit
While obtaining an accurate waist measurement is a critical first step, achieving optimal garment fit involves considering several other influencing factors.
4.1 Accounting for diverse body shapes (beyond apple/pear)
Individuals sharing the same waist measurement can possess vastly different body shapes and proportions. Factors like relative hip size, torso length, and variations in fat distribution mean that a single waist number doesn’t tell the whole story.
Pattern making often requires adjustments beyond the basic waist circumference to accommodate these diverse body shapes. Recognizing this anatomical diversity is part of developing truly well-fitting apparel, often requiring experience in pattern adjustments.

4.2 How posture affects measurement outcomes
The significance of maintaining consistent, correct posture during measurement cannot be overstated. Slouching, leaning, or unnaturally tensing the body can significantly alter the waist dimension recorded. Ensuring the subject stands naturally and relaxed is vital for capturing a measurement that reflects their typical posture, directly impacting how the final garment hangs and fits during wear. Consistent posture leads to more reliable measurement outcomes.
4.3 Understanding garment ease: Body vs. finished garment size (brief explanation)
“Ease” is a fundamental concept in garment construction. Ease refers to the difference between the actual body measurement (like the waist circumference just measured) and the measurement of the finished garment at the same point.
This extra room is intentionally added during pattern making to allow for comfort, movement, and style. The amount of garment ease varies greatly depending on the intended fit (e.g., close-fitting vs. oversized), the garment type, and the fabric’s properties (stretch knits require less ease than rigid woven fabrics).
Crucially, ease is calculated and added during pattern making, separate from the initial body measurement, and defines the finished garment’s size relative to the body. Understanding ease is key for interpreting garment specifications correctly.
5. From measurement to market: Applying waist data effectively
Gathering accurate waist measurements is only part of the process; the real value lies in applying this data effectively throughout the apparel development and sales cycle, bringing the measurement from the body to the market.
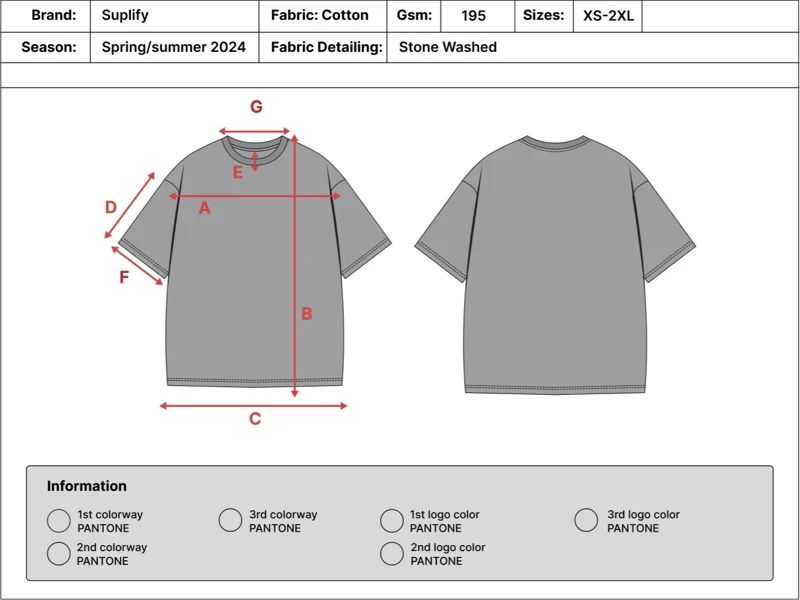
5.1 Translating body measurements into your technical specifications
The precise natural waist measurement is a key piece of data inputted into technical specifications, commonly known as tech packs. These documents provide manufacturers with the essential details needed for production.
The waist measurement, along with other critical body measurements like hip and bust, forms the basis for drafting the initial clothing pattern and subsequently grading it across the desired size range. Consistent use of accurate measurements in garment specification is fundamental for reliable production outcomes.
5.2 Creating clear, customer-friendly size guides
When presenting sizing information to customers, clarity is paramount. Size guides (or sizing charts) should primarily feature the body measurements that each size is designed to fit, including the natural waist measurement range.
Avoid listing finished garment measurements unless explicitly labeled as such, as this can cause confusion. Including a simple explanation or a link to instructions on “how to measure” alongside the chart empowers customers to select the correct size.
Consistency and transparency in customer communication regarding sizing builds trust. Visual aids, such as diagrams showing how to measure or images of models of different sizes wearing the garments, can also significantly help customers
| Size | Natural waist (inches) | Natural waist (cm) | Hip (inches) | Hip (cm) |
|---|---|---|---|---|
| S | 26-27 | 66-69 | 36-37 | 91-94 |
| M | 28-30 | 71-76 | 38-40 | 96-101 |
| L | 31-33 | 79-84 | 41-43 | 104-109 |
| XL | 34-36 | 86-91 | 44-46 | 112-117 |
5.3 A note on international sizing variations (briefly mention potential differences)
Apparel businesses selling globally should be aware that standard sizing conventions (what constitutes a size S, M, L, etc.) can vary significantly between countries and regions. While the method for measuring the natural waist remains consistent worldwide, the body measurements corresponding to a specific size label might differ.
Researching the typical sizing standards in your target markets is advisable to ensure your size offerings align with local customer expectations.
6. Related questions (FAQs for apparel businesses)
This section addresses some frequently asked questions apparel businesses encounter regarding waist measurements and sizing.
6.1 How does the waist measurement differ from the hip measurement for clothing patterns?
The waist measurement is taken at the natural waistline, typically the narrowest part of the torso. In contrast, the hip measurement is taken around the fullest part of the hips and buttocks. Both measurements are independent and equally crucial for creating accurate clothing patterns, especially for bottom-wear like trousers and skirts, as they define the key circumferences of the lower body shape.
6.2 How much ‘ease’ should typically be added to a waist measurement for comfortable fit?
There isn’t a universal answer for how much ease to add. The ideal amount depends heavily on the specific garment style (a fitted pencil skirt needs less ease than loose palazzo pants), the fabric type (stretch fabrics naturally accommodate the body, requiring minimal ease, while non-stretch wovens need more), and the desired overall fit.
While a very general guideline for standard-fit woven trousers might be 1-2 inches (2.5-5 cm) of ease at the waist, relying on fixed numbers is risky. Consulting detailed pattern making resources or working with experienced pattern makers is the best approach for determining appropriate ease for specific designs to ensure a comfortable fit.
6.3 What’s the clearest way to display waist sizing information on product pages?
The most effective method is to clearly state the body measurement range the size is intended for directly on the product page, for example: “Size M fits natural waist 28-30 inches (71-76 cm)”. Supplement this with a prominent link to a comprehensive size guide page that includes detailed charts for all relevant measurements and clear “how to measure” instructions, potentially with diagrams or video.
Visual guides depicting the garment on models of specified sizes and measurements can also significantly aid customer understanding of waist sizing.
Read more:
Understanding the nuances of the natural waist, implementing accurate measurement techniques, and consistently applying this data are fundamental practices for any successful apparel business. Mastering waist measurement translates directly into tangible business benefits: improved garment fit, significantly reduced return rates, and enhanced customer trust and loyalty.
By prioritizing accurate sizing, starting with foundational measurements like the waist, apparel brands can strengthen their reputation for quality and build a more resilient business. Implementing these detailed measurement and data application practices is a strategic step towards achieving greater customer satisfaction and sustainable business growth.
For further insights into optimizing apparel production and branding strategies, continue exploring resources dedicated to elevating your apparel business.


