


Pattern Drafting: Custom Fit And Design Freedom


Unlock true custom fit and unleash your design creativity with this essential guide to pattern drafting for beginners. Say goodbye to ill-fitting commercial patterns and learn the fundamentals of creating garments tailored precisely to unique body measurements.
Discover the crucial tools needed, understand the concept of foundational slopers (blocks), and master the art of taking accurate measurements. This comprehensive tutorial walks you through drafting a basic skirt sloper step-by-step, introduces vital pattern manipulation techniques like dart rotation, and explains the critical process of fitting with a muslin. Gain the skills and confidence needed to bring your unique clothing visions to life.
1. What is pattern drafting?
1.1 Defining pattern drafting
Pattern drafting is the process of creating a two-dimensional (2D) template, essentially a blueprint, for a garment. It’s like creating the architectural plans for a building, but instead of walls and rooms, the pattern maker (or sewer) creates templates for the pieces of a shirt, dress, or pair of pants. These flat templates, called patterns, guide the cutting of fabric, ensuring that when the pieces are sewn together, they will form the desired three-dimensional garment.
1.2 The benefits of pattern drafting
Pattern drafting offers a multitude of advantages for both individuals and clothing businesses:
1. Custom fit: This addresses the common problem of ill-fitting clothes. Standard sizes rarely fit everyone perfectly. Pattern drafting allows for a garment to be tailored precisely to an individual’s unique body measurements, resulting in a superior fit.
2. Design freedom: Instead of being limited to existing commercial patterns, you gain the ability to create completely unique designs. One can dream up any garment imaginable and bring it to life.
3. Cost savings: Over time, drafting patterns can be more economical than purchasing individual commercial patterns or relying on custom-made clothing.
4. Professional skill: For aspiring fashion designers or small business owners, pattern drafting is an invaluable skill.
- For individuals: This skill empowers individuals to create their personalized clothing, offering a truly bespoke wardrobe.
- For businesses: It provides a significant business advantage, allowing businesses to offer unique designs and potentially a better fit, giving them a competitive edge in the market.
1.3 Pattern drafting vs. draping vs. pattern alteration
It’s essential to understand the differences between these three related, but distinct, methods:
- Pattern drafting (flat pattern making): This involves creating a pattern from scratch using specific body measurements and drafting tools on a flat surface, typically paper.
- Draping: This method involves manipulating fabric directly on a dress form (a mannequin representing the human body) to create the three-dimensional shape of the garment. The fabric is pinned, cut, and shaped until the desired design is achieved. The fabric is then removed and used as the pattern.
- Pattern alteration: This involves modifying an existing commercial pattern (a pre-made pattern purchased from a store) to improve its fit or change design details. It’s a faster method than drafting from scratch but offers less design freedom.
1.4 Who can benefit from it?
This skill can benefit a wide range of people:
- Beginner sewists: To get better fits and expand creative ability.
- Aspiring fashion designers: A fundamental skill for creating original designs.
- Home sewers: To create custom-fit clothing for themselves and their families.
- DIY enthusiasts: People enjoy making things by hand and appreciate the control and creativity that pattern drafting provides.
- Fashion students: An essential part of any fashion design curriculum.
- Small clothing businesses / entrepreneurs: Allows for unique product lines, quality control, and potential cost reduction.
2. Essential tools and materials for pattern drafting
2.1 Measuring tools
Accurate measurements are the foundation of well-fitting garments. Here are the essential measuring tools:
- Measuring tape: A flexible tape measure is used to take body measurements. Look for one that is durable and has both imperial (inches) and metric (centimeters) markings.
- Ruler: A clear, see-through ruler is essential for drawing straight lines and measuring pattern pieces. A 2″ x 18″ (5cm x 45cm) clear grid ruler is highly recommended.
- L-square: This L-shaped ruler is used to create perfect 90-degree angles, which are crucial for drafting accurate patterns.
- Hip curve: This curved ruler is used to shape the hip area of skirts, pants, and dresses, replicating the natural curve of the body.
- French curve: This ruler has a variety of curves and is used to shape armholes, necklines, and other curved areas of a pattern.
2.2 Marking tools
Precise markings are essential for transferring the pattern to fabric and ensuring accurate sewing:
- Pencils: Sharp pencils are used for drafting the pattern on paper. Mechanical pencils with fine leads (0.5mm or 0.7mm) are preferred for their precision.
- Tailor’s chalk: This chalk is used to mark fabric. It comes in various colors and can be easily brushed off or removed with water.
- Tracing wheel: A tool with a small, spiked wheel used to transfer markings from the pattern to the fabric. It’s used in conjunction with tracing paper.
- Awl: A sharp, pointed tool used to make small holes in the pattern, marking points such as dart ends or buttonhole placements.
2.3 Cutting tools
Separate cutting tools for paper and fabric are essential:
- Paper scissors: Use dedicated scissors for cutting pattern paper. This keeps the scissors sharp and prevents them from dulling quickly.
- Fabric shears: High-quality, sharp shears are essential for cutting fabric accurately. Never use fabric shears to cut paper, as this will dull the blades.
- Pattern notcher: A specialized tool that creates small, U-shaped notches on the edges of pattern pieces. These notches help align pattern pieces during sewing.
2.4 Paper and other supplies
- Pattern paper: Large rolls of paper specifically designed for pattern drafting are recommended. This paper is typically wider than regular paper and is often semi-transparent, making it easier to trace and modify patterns.
- Muslin (toile fabric): An inexpensive, plain-woven cotton fabric used to create test garments (also called “toiles”). Muslin allows you to check the fit and make adjustments before cutting into the final fashion fabric.
- Tape: Use tape to secure pattern pieces together, make adjustments, or reinforce areas of the pattern.
- Pattern weights: Weights are used to hold pattern pieces in place on the fabric while cutting, preventing shifting and ensuring accuracy.
3. Getting started: Understanding basic pattern blocks (slopers)
3.1 What are slopers?
Slopers (also known as “blocks”) are the foundation of pattern drafting. They are close-fitting, basic patterns that represent the core shape of a garment, without any design details (like pockets, pleats, or gathers) or seam allowances (the extra fabric added for sewing seams). Think of a sloper as a blank canvas upon which a design can be created. It’s a personalized template that reflects the unique shape and contours of a body.
3.2 Different types of slopers
The most common slopers, particularly for beginners, focus on the core parts of the body:
- Bodice sloper: This covers the upper body, from the shoulders to the waist. It includes darts (wedge-shaped folds) to shape the fabric around the bust and sometimes the back.
- Skirt sloper: This covers the lower body, from the waist to a desired length (usually around the knee). It typically includes darts to shape the fabric around the hips.
- Pants sloper: This covers the lower body, from the waist to the ankle. It’s more complex than the skirt sloper, accounting for the curves of the hips, thighs, and crotch.
3.3 Taking accurate body measurements
Accurate body measurements are absolutely critical for creating a well-fitting sloper. Even small errors can lead to significant fit problems. Here’s a detailed guide:
1. Wear appropriate undergarments: Wear the type of undergarments that would be worn with the finished garment. This ensures that the measurements reflect the actual shape and support of the body.
2. Use a good measuring tape: Use a flexible, non-stretchy measuring tape.
3. Stand naturally: Stand tall with weight evenly distributed, but don’t stiffen up unnaturally.
4. Be precise: Take measurements snugly, but not tightly. The tape should be level and not twisted.
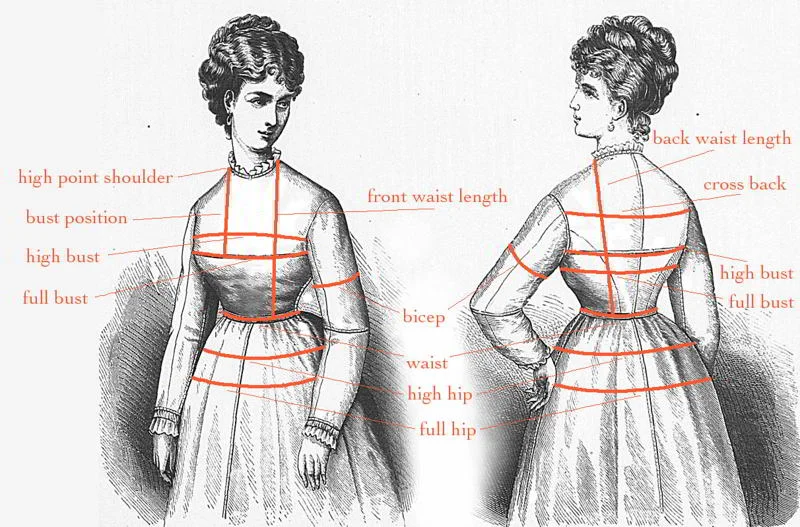
5. Key measurements (with detailed instructions):
- Bust: Measure around the fullest part of the bust, keeping the tape measure level and parallel to the floor.
- Waist: Measure around the natural waistline, which is the narrowest part of the torso (often above the belly button). Tie a string or ribbon around the waist to help locate the natural waistline.
- Hips: Measure around the fullest part of the hips, keeping the tape measure level.
- Back waist length: Measure from the prominent bone at the base of the neck (C7 vertebra) down to the natural waistline.
- Shoulder width: Measure straight across the back from one shoulder point to the other.
- Other necessary measurements: Depending on the sloper being drafted, other measurements may be needed, such as front waist length, arm length, bicep circumference, thigh circumference, etc.
6. Record measurements accurately: Use a body measurements chart to record all measurements.
3.4 Choosing your sloper drafting method
There are two main approaches to obtaining a sloper:
- Drafting from scratch (recommended): This involves using body measurements and a set of drafting instructions (like the ones that will be provided later for the skirt sloper) to create the sloper from scratch. This method provides a deeper understanding of how patterns are constructed and how they relate to the body.
- Using pre-drafted slopers: This involves purchasing pre-made slopers in a range of standard sizes. While this can be a faster option, it’s important to understand that standard sizes may not perfectly match an individual’s body. Some adjustments may still be necessary. Acknowledge it can be a good option to go faster.
4. Drafting a basic skirt sloper: A step-by-step guide
4.1 Preparing your paper and tools
- Pattern paper
- Ruler (preferably a clear grid ruler)
- L-square
- Hip curve
- Pencil
- Eraser
- Measuring tape
- Body measurements chart
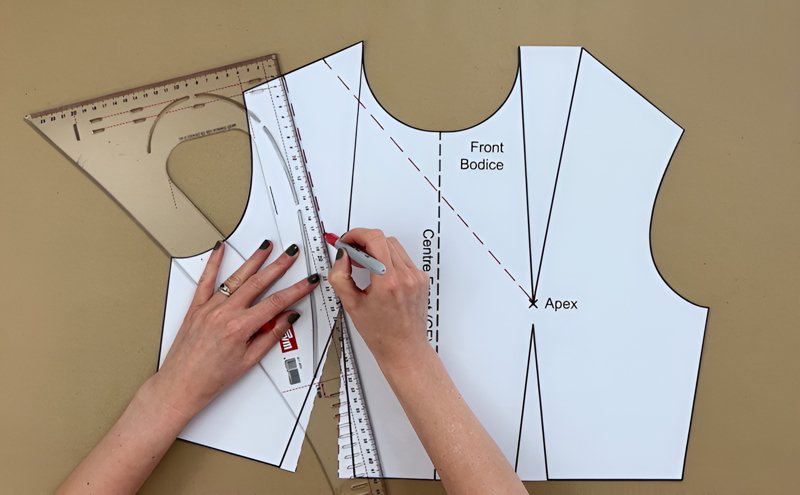
4.2 Drafting the front skirt piece
1. Draw a rectangle:
- Width: (Hip measurement / 2) + Ease (typically 1-2 inches / 2.5-5 cm for a fitted skirt)
- Length: Desired skirt length (from waist to hem)
2. Mark the center front (CF): Draw a vertical line down the center of the rectangle. This is the Center Front line.
3. Mark the waistline: Measure down from the top edge of the rectangle the “Front Waist Length” measurement. Draw a horizontal line across. This is the waistline.
4. Mark the hipline: Measure down from the waistline a standard distance (typically 7-9 inches / 18-23 cm, or use a personalized hip depth measurement if available). Draw a horizontal line across. This is the hipline.
5. Shape the side seam:
- At the hipline, measure inward from the side edge of the rectangle by 1/2 inch (1.3 cm). Mark this point.
- Use the hip curve ruler to draw a smooth curve connecting the waistline to the hipline, passing through the marked point.
- Continue the curve slightly downward to the hemline, blending it smoothly.
6. Add darts:
- Dart placement: Divide the waistline into thirds. The dart will typically be placed at the first 1/3 mark from the side seam.
- Dart width: The total dart width depends on the difference between the waist and hip measurements. A typical dart width for the front skirt is 1 inch (2.5 cm). The total dart width needed is determined by the difference between your hip measurement (plus ease) and your waist measurement (plus ease). This total width is then distributed among the front and back darts. For example, if the difference requires 4 inches of waist shaping, you might allocate 1 inch to the front dart and 1.5 inches to each of the two back darts (totaling 4 inches).
- Dart length: A typical dart length for the front skirt is 3-4 inches (7.5-10 cm).
- Draw the dart legs: Draw two lines from the dart point at the waistline, extending down to the dart length. The distance between these lines at the waistline equals the dart width.
4.3 Drafting the back skirt piece
1. Draw a rectangle: Use the same measurements as the front skirt piece.
2. Mark the center back (CB): Draw a vertical line down the center of the rectangle. This is the Center Back line.
3. Mark the waistline: Measure down from the top edge of the rectangle the “Back Waist Length” measurement. Draw a horizontal line across. This is the waistline.
4. Mark the hipline: Use the same hip depth measurement as the front skirt.
5. Shape the side seam:
- At the hipline, measure inward from the side edge of the rectangle by 1/2 inch (1.3 cm). Mark this point.
- Use the hip curve ruler to draw a smooth curve connecting the waistline to the hipline, passing through the marked point.
- Continue the curve slightly downward to the hemline, blending it smoothly.
6. Add darts:
- Dart placement: Divide the waistline into thirds. The back skirt typically has two darts. Place the first dart at the first 1/3 mark from the side seam, and the second dart at the second 1/3 mark.
- Dart width: The total dart width depends on the difference between the waist and hip measurements. A typical dart width for each back skirt dart is 1 inch (2.5 cm).
- Dart length: A typical dart length for the back skirt darts is 4-5 inches (10-12.5 cm).
- Draw the dart legs as described for the front skirt.
4.4 Trueing the sloper
Make sure to have an accurate sloper.
- Compare side seam lengths: Place the front and back skirt pieces together, aligning the hiplines. The side seams should be the same length. If not, adjust the hemline of the longer piece.
- Check dart placement: Ensure the darts are positioned correctly and are symmetrical.
- Smooth curves: Use the French curve and hip curve rulers to ensure all curves are smooth and blend seamlessly. There should be no sharp angles.
- Walk the seams: Check if connecting seam lines match in length by pivoting one pattern piece against the other along the seam line, edge to edge, using a pencil or awl to check for any discrepancies.
4.5 Adding seam allowance
Add seam allowance for the sewing step. Seam allowance is the extra fabric added to the edges of pattern pieces to allow for sewing seams. It’s not included in the sloper itself, but it’s added after the sloper has been drafted and trued.
- Standard seam allowance: A common seam allowance for skirts is 1/2 inch (1.3 cm) or 5/8 inch (1.5 cm).
- Add to all edges: Use a ruler to add the seam allowance to all edges of the front and back skirt pieces, including the waistline, hemline, and side seams.
- Mark clearly: Draw the seam allowance lines clearly and distinctly from the original sloper lines.
5. Basic pattern manipulation techniques
5.1 Understanding grainline and notches
- Grainline: The grainline is a crucial marking on a pattern piece that indicates the direction of the fabric’s warp threads (the threads that run parallel to the selvage, the finished edge of the fabric). The grainline is typically represented by a long, straight line with arrows at both ends. It’s essential to align the grainline with the warp threads of the fabric when cutting to ensure the garment hangs and drapes correctly. If the grainline is not followed, the garment may twist, stretch unevenly, or fit poorly.
- Notches: Notches are small, V-shaped or U-shaped marks on the edges of pattern pieces. They are used to align pattern pieces accurately during sewing. When matching pattern pieces, the notches should be aligned perfectly, ensuring that the seams are sewn correctly and the garment is assembled as intended. Notches are particularly important for curved seams, such as armholes and necklines.
5.2 Dart manipulation: Rotating and combining darts
Dart manipulation is a fundamental technique for changing the shape and fit of a garment without altering the overall size. Darts (wedge-shaped folds) control the fullness of the fabric and create three-dimensional shape.
Rotating darts: This involves moving the position of a dart around a pivot point (typically the bust point for bodice darts or the hip point for skirt darts). Rotating a dart changes the direction of the fullness but doesn’t add or remove any fabric. For example, a bust dart can be rotated from the side seam to the shoulder, creating a different design line but maintaining the same bust shaping.
- Mark the pivot point: Identify the pivot point (e.g., the bust point).
- Draw a line: Draw a line from the pivot point to the tip of the dart.
- Draw a new dart line: Draw a line from the pivot point to the desired new dart location (e.g., the shoulder).
- Cut and rotate: Cut along the first line (from the pivot point to the original dart tip). Pivot the pattern piece until the cut edge meets the new dart line. Tape the pattern in place.
- Redraw the dart: Redraw the dart legs, ensuring they are equal in length and meet at a point about 1 inch (2.5 cm) away from the pivot point.
Combining darts: This involves merging two or more darts into a single, larger dart. This can simplify the pattern and create a cleaner look. The process is similar to rotating darts, but instead of moving one dart, multiple darts are moved to the same location and combined.
5.3 Adding ease
Ease is the extra room added to a pattern beyond the actual body measurements. It allows for comfort, movement, and the desired style of the garment. There are two main types of ease:
- Wearing ease: This is the minimum amount of ease needed for a garment to be comfortable to wear. It allows for basic movement, such as breathing, sitting, and walking. The amount of wearing ease varies depending on the garment type and the desired fit (e.g., a fitted dress will have less wearing ease than a loose-fitting coat).
- Design ease: This is additional ease added to a pattern to create a specific style or silhouette. For example, a gathered skirt has design ease to create fullness, while a boxy jacket has design ease to create a relaxed, oversized fit.
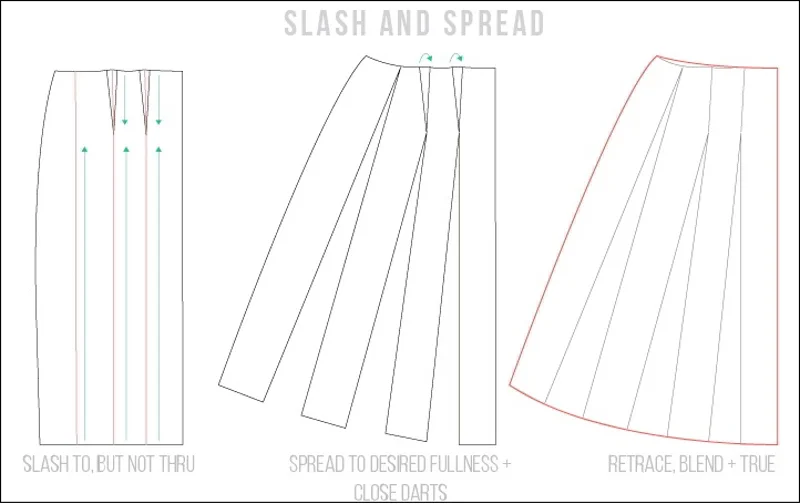
5.4 Slash and spread method
The slash and spread method is a versatile technique used to add fullness to a pattern. It’s commonly used to create gathers, pleats, flares, and other design features that require extra fabric.
Basic principle: The pattern is literally slashed (cut) along a designated line, and the cut edges are spread apart to create the desired amount of fullness. The gap created by spreading the pattern is then filled with paper.
6. Making a muslin and checking the fit
6.1 What is a muslin?
A muslin (also known as a “toile”) is a test garment made from inexpensive fabric, typically unbleached cotton muslin. It’s a crucial step in the pattern drafting process, allowing for checking the fit of the pattern before cutting into the final fashion fabric. The muslin serves as a prototype, revealing any areas that need adjustment, such as too much tightness, looseness, or improper shaping.
6.2 Cutting and sewing your muslin
- Transfer the pattern: Trace the pattern pieces (including seam allowances) onto the muslin fabric.
- Cut the fabric: Carefully cut out the muslin pieces.
- Sew the muslin: Sew the muslin pieces together using a basting stitch (a long, easily removable stitch). This allows for quick adjustments if needed. Don’t worry about finishing the seams or adding closures (like zippers or buttons) unless specifically testing those elements.
- Mark important lines such as the waistline, hipline, center front (CF), center back (CB), and grainlines onto the muslin fabric before sewing.
6.3 Fitting the muslin and identifying issues
1. Try it on: Try the muslin on the intended wearer (or a dress form that accurately represents the wearer’s measurements).
2. Evaluate the fit: Carefully assess the fit of the muslin, looking for any of the following common issues:
- Too tight: The muslin feels restrictive, and there may be pulling or straining across the fabric.
- Too loose: The muslin hangs loosely and has excess fabric.
- Gaping: The fabric doesn’t lie flat against the body and creates gaps, often around the neckline or armholes.
- Pulling/drag lines: Wrinkles or lines in the fabric indicate areas of stress or poor fit. These lines often point towards the source of the problem.
3. Pin and mark: Use pins to mark any areas that need adjustment. For example, pin out excess fabric to make the garment tighter, or mark areas where more fabric needs to be added.
6.4 Transferring corrections to your pattern
1. Remove pins (carefully): Carefully remove the muslin from the body or dress form, taking note of the pin placements.
2. Mark adjustments: On the muslin itself, use a pen or marker to clearly mark the adjustments indicated by the pins.
3. Transfer to paper pattern: Place the muslin pieces on top of the corresponding paper pattern pieces. Transfer the marked adjustments from the muslin to the paper pattern. This might involve:
- Redrawing lines: Redraw seam lines, dart lines, or other pattern lines to reflect the adjustments.
- Adding or subtracting paper: Add small pieces of paper to the pattern where more fabric is needed, or trim away excess paper where the garment was too loose.
4. True the pattern: After making adjustments, “true” the pattern again, ensuring that all lines are smooth and that seams match in length.
7. Troubleshooting common pattern drafting problems
Here are solutions to some common pattern drafting challenges.
7.1 Sloper too tight or too loose
1. Possible reasons:
- Inaccurate measurements: This is the most common reason. Double-check all body measurements to ensure accuracy.
- Incorrect formulas/calculation: Review the drafting instructions and calculations to make sure there are no errors.
- Ease: If the sloper feels restrictively tight even with accurate measurements, remember that slopers are meant to be close-fitting but not uncomfortable. A small amount of wearing ease might be needed, even in a sloper.
2. Solutions:
- Double-check all body measurements.
- Review the drafting instructions.
7.2 Uneven lines or curves
1. Possible reasons:
- Using the wrong tools: For the specific lines, use the correct tool.
- Lack of experience: It is easy to understand. With more and more practice, the result will be better
2. Solutions:
- Double-check and use the correct tools.
- Consistent practice will improve your technique and precision.
7.3 Darts not fitting correctly
1. Possible reasons:
- Inaccurate dart point placement: The dart point should be positioned correctly in relation to the body (e.g., bust point, hip point).
- Incorrect dart angle: The angle of the dart legs affects the shape and fit of the dart.
- Incorrect dart width or length: The dart width and length should be appropriate for the amount of shaping needed.
2. Solutions:
- Double-check body measurements.
- Review the drafting instructions.
- Use muslin
7.4 Understanding and correcting drag lines
1. Explain: Drag lines are wrinkles or folds in the fabric that indicate stress or poor fit. They typically point towards the source of the problem.
2. Reasons and solutions:
- Horizontal drag lines across bust/hips: Indicate the garment is too tight in that area. Add width to the pattern at the side seams.
- Vertical drag lines from shoulder: May indicate the shoulder slope is incorrect or the armhole is too small. Adjust the shoulder slope or increase the armhole size.
- Diagonal drag lines: Often indicate a combination of issues. Analyze the direction of the lines and adjust the pattern accordingly.
7.5 Other issues
For any other problems, creating a test muslin is the most effective way to visually diagnose fit issues.
8. Resources for further learning
8.1 Recommended books
- “Patternmaking for Fashion Design” by Helen Joseph Armstrong: A comprehensive textbook covering all aspects of pattern drafting, widely used in fashion schools.
- “How Patterns Work” by Assembil Books: Excellent for understanding the fundamental principles of patternmaking.
- “Fitting and Pattern Alteration” by Elizabeth Liechty, Judith Rasband, and Della Pottberg-Steineckert: A valuable resource for addressing fit issues and making pattern adjustments.
8.2 Online courses and tutorials
- Craftsy: Offers a variety of pattern drafting courses, including the “Sloper Series” by Suzy Furrer.
- Skillshare: Features courses like “Fashion Design Pattern Making” by Nino Via and “Pattern Making for Beginners” by Caroline Barulius.
- YouTube: Many excellent tutorials are available on YouTube, covering various pattern drafting techniques. Search for specific topics like “drafting a skirt sloper” or “dart manipulation.”
8.3 Websites and blogs
- The Shapes of Fabric: Offers tutorials and insights into pattern making.
- Threads Magazine: A reputable sewing magazine with articles and resources on pattern drafting and fitting.
- Curvy Sewing Collective: A blog focused on sewing and pattern drafting for plus-size figures.
9. Related questions
9.1 Can I use commercial patterns as a starting point for pattern drafting?
Yes, commercial patterns can be a useful starting point, especially for learning about pattern shapes and construction techniques. However, it’s important to remember that commercial patterns are based on standard sizes and may require alterations to fit an individual body. Using a commercial pattern as a base for modifications is essentially pattern alteration, not drafting from scratch.
9.2 What’s the difference between a sloper and a block?
The terms “sloper” and “block” are often used interchangeably, particularly in North America. In some contexts (especially in the UK), “block” may refer to a slightly looser-fitting pattern that includes some wearing ease, while “sloper” is strictly close-fitting with no ease. For the purposes of this beginner’s guide, they are considered the same.
9.3 How do I learn pattern grading?
Pattern grading is the process of creating a range of sizes from a single base pattern. It’s a more advanced skill than basic pattern drafting. To learn grading, one should first have a solid understanding of pattern drafting principles. Resources for learning grading include books like “Concepts of Pattern Grading” by Kathy K. Mullet and online courses.
9.4 What is the best software for pattern drafting as a beginner?
For beginners, complex professional software (like Gerber or Lectra) is not recommended due to the high cost and steep learning curve. Vector graphics programs like Adobe Illustrator can be used for pattern drafting, but they are not specifically designed for this purpose. Some more accessible options include:
- Wild Ginger Cameo: A relatively affordable pattern drafting software.
- PatternMaster Boutique: Another option for home sewers.
These programs often have a learning curve, but they are more user-friendly than professional CAD software.
9.5 Do you offer clothing labels for new businesses?
Yes, Packlove offers a wide range of clothing labels, hang tags, and packaging solutions specifically designed for small businesses and startups in the fashion industry. We understand the needs of new brands, and we are committed to providing high-quality, customizable products to help businesses create a professional and cohesive brand identity. We can create unique and eye-catching designs.
Read more:
Pattern drafting is a rewarding skill that opens up a world of creative possibilities for anyone interested in sewing and garment design. This guide has covered the fundamental concepts, tools, and techniques needed to get started, focusing on drafting a basic skirt sloper as a practical example.
While it may seem daunting at first, remember that pattern drafting, like any skill, develops with practice and patience. Start with the basics, experiment with different techniques, and don’t be afraid to make mistakes – they are valuable learning opportunities. As you progress, consider professional finishing touches. For businesses looking for custom labels, hang tags, and packaging, services like Packlove can help create a cohesive brand identity.


