


Sewing with Woven Fabric: Get Crisp Seams & Pro Tips


This comprehensive guide dives into the world of woven fabrics, addressing common sewing challenges and providing solutions to make your projects a smooth success. Whether you’re a seasoned sewist or just starting, this article will equip you with the knowledge to handle various woven materials, understand their properties, and achieve professional-looking results.
You’ll learn about different weaves, essential tools, fabric preparation, cutting techniques, seam finishes, and troubleshooting common problems. By the end of this guide, you’ll have the confidence to tackle any woven fabric project.
1. Understanding woven fabrics
1.1 What is woven fabric?
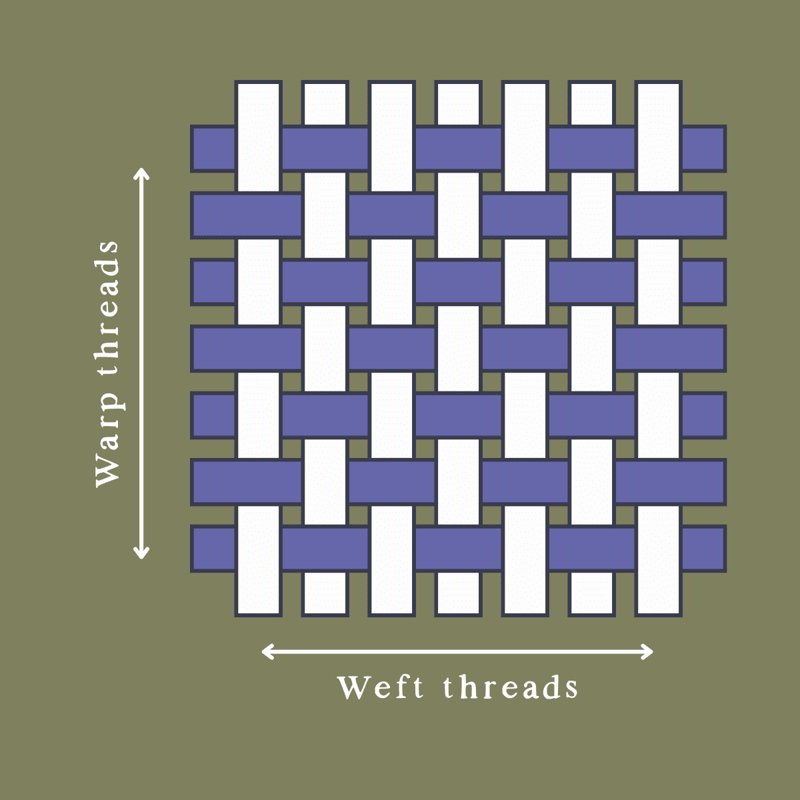
Woven fabric is created by interlacing two sets of yarns, called the warp and the weft, at right angles to each other. Think of it like interlacing your fingers – the yarns go over and under each other to create a stable structure.
This is different from knit fabrics, which are made by looping yarns together, resulting in a stretchier material. Woven fabrics, because of their structure, generally have less stretch than knit fabrics. Common examples of woven fabrics include cotton, linen, silk, wool, and rayon. Each of these fibers brings its own unique properties to the final fabric, such as breathability (cotton, linen), drape (silk, rayon), or warmth (wool).
1.2 The importance of grain line
The grain line is the direction of the warp yarns in a woven fabric. It runs parallel to the selvedge (the finished edge of the fabric). The bias, on the other hand, runs diagonally across the fabric at a 45-degree angle to the grain line.
Understanding the grain line is crucial for garment construction because it affects how the fabric drapes and hangs. Cutting pattern pieces along the correct grain line ensures that the garment will be stable and hang properly. Cutting on the bias allows for more drape and stretch, which can be used for specific design elements.
1.3 Different weaves
- Plain weave: The simplest weave, where the weft yarn goes over one warp yarn and under the next, creating a balanced and durable fabric. It has a checkerboard appearance.
- Twill weave: Characterized by diagonal lines (called “wales”) on the fabric surface. The weft yarn floats over multiple warp yarns, then under one, creating a stepped pattern. It has a durable construction.
- Satin weave: Known for its smooth, lustrous surface. The weft yarn floats over several warp yarns and under only one, creating a minimal interlacing pattern. It drapes beautifully.
2. Essential tools and materials
2.1 Sewing machine
When working with woven fabrics, certain sewing machine features can be particularly helpful. Look for a machine with adjustable presser foot pressure, which allows you to control the amount of pressure the presser foot exerts on the fabric.
This is useful for preventing delicate fabrics from being stretched or damaged. A walking foot (also known as an even feed foot) is another valuable feature. It has feed dogs on the top that work in conjunction with the machine’s feed dogs to evenly feed multiple layers of fabric, preventing shifting and puckering. Regular maintenance, such as cleaning and oiling, will keep your machine running smoothly.
2.2 Needles
Choosing the correct needle is crucial for successful sewing. Different needle types and sizes are designed for specific fabric types and weights.
| Fabric Type | Needle Type | Needle Size | Thread Type |
|---|---|---|---|
| Lightweight Cotton | Universal/Sharp | 60/8 – 70/10 | Cotton, Polyester |
| Medium Weight Linen | Universal/Sharp | 70/10 – 80/12 | Cotton, Polyester |
| Heavyweight Denim | Sharp/Denim | 90/14 – 100/16 | Polyester, Heavy Duty |
| Silk | Sharp/Microtex | 60/8 – 70/10 | Silk, Fine Polyester |
2.3 Thread
Different thread types have varying properties, such as strength and elasticity. Cotton thread is a good choice for natural fiber fabrics like cotton and linen. Polyester thread is strong and has some elasticity, making it suitable for a wider range of fabrics, including synthetics and blends. All-purpose thread is often a blend of cotton and polyester and can be used for many projects. Consider the fabric’s fiber content and the project’s requirements when selecting thread.
2.4 Cutting tools
Both scissors and rotary cutters have their advantages. Fabric scissors are essential for cutting out pattern pieces and trimming seams. Rotary cutters, used in conjunction with a cutting mat, are excellent for cutting straight lines and multiple layers of fabric quickly and accurately. Whichever tool you choose, ensure the blades are sharp. Dull blades can snag the fabric and lead to inaccurate cuts.
2.5 Other essential tools
- Pins: Fine pins are recommended for delicate fabrics to minimize holes.
- Measuring tape: Essential for accurate measurements.
- Tailor’s chalk or marking pens: For transferring pattern markings to fabric. Water-soluble or air-soluble options are preferred.
- Seam ripper: For correcting mistakes.
- Iron and ironing board: For pressing seams and fabric.
- Pressing cloth: Protects fabric from direct heat and shine.
2.6 Optional but helpful
- Serger: Creates a professional finish on seams, preventing fraying.
- Pinking shears: Has a zigzag blade to reduce the fraying of fabrics.
3. Preparing woven fabric for sewing
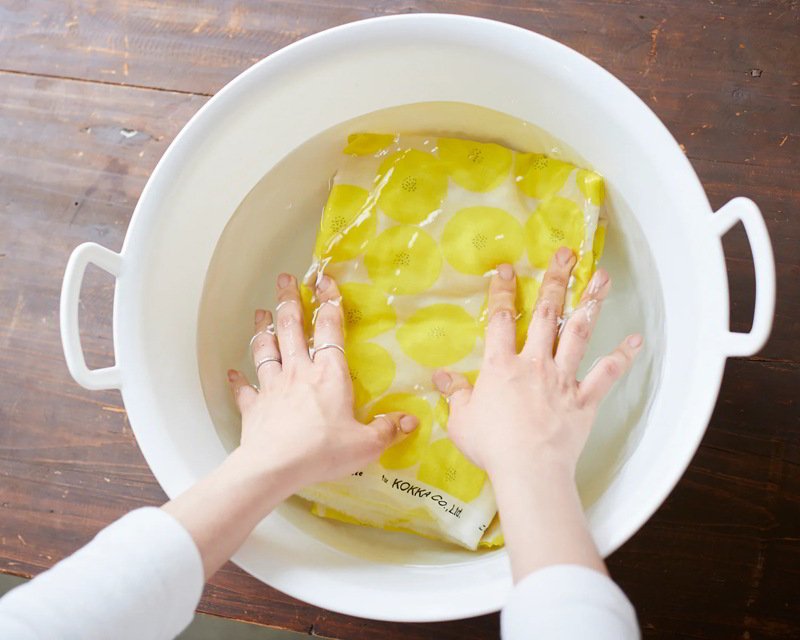
3.1 Pre-washing
Pre-washing woven fabric is a crucial step before cutting and sewing. The primary reasons for pre-washing are to address shrinkage and color bleeding. Many fabrics, especially natural fibers, tend to shrink when washed for the first time.
Pre-washing ensures that the majority of this shrinkage occurs before the garment is constructed, preventing it from becoming too small after the first wash. Some fabrics may also release excess dye during the first wash, potentially staining other items in the load. Pre-washing helps to remove this excess dye.
The washing method should be similar to how you plan to care for the finished garment. Generally, for cotton and linen, warm or cold water is suitable. For delicate fabrics like silk or rayon, hand washing or using a delicate cycle with cold water is recommended. Drying methods also vary; tumble drying on low is often safe for cotton and linen, while delicate fabrics should be air-dried.
3.2 Starching (optional but recommended)
Starching woven fabric offers several benefits, particularly for lightweight or loosely woven materials. Starch adds stability to the fabric, making it easier to handle, cut, and sew. It also helps to reduce fraying, especially along cut edges. There are two main types of starch: spray starch and liquid starch. Spray starch is convenient for applying a light to medium hold, while liquid starch can be used for a heavier, crisper finish.
To starch fabric, spray it evenly with starch and then press with an iron. For liquid starch, follow the manufacturer’s instructions for diluting and applying it to the fabric. Allow the fabric to dry completely before cutting.
3.3 Pressing
Pressing the fabric before cutting is essential for accuracy. Wrinkles in the fabric can distort the pattern pieces, leading to inaccurate cuts and a poorly fitting garment. Use an iron and ironing board to remove all wrinkles.
For delicate fabrics, use a pressing cloth (a piece of cotton or muslin) between the iron and the fabric to prevent scorching or shine. Adjust the iron’s heat setting according to the fabric type; cotton and linen can withstand higher temperatures, while silk and synthetics require lower heat.
4. Cutting woven fabric
4.1 Pattern layout
Correct pattern layout is critical for ensuring the finished garment drapes correctly and utilizes fabric efficiently. Pattern pieces usually have markings indicating the grain line, often represented by a straight line with arrows at both ends.
This line should be aligned parallel to the selvedge of the fabric. Pattern markings, such as notches (small marks indicating matching points) and darts (folds that shape the fabric), should be carefully transferred to the fabric.
To lay out the pattern, fold the fabric in half lengthwise, matching the selvedges. Place the pattern pieces on the fabric, aligning the grain line markings with the selvedge. Use pattern weights or pins to secure the pieces. Minimize waste by placing large pieces first and then fitting smaller pieces in the remaining spaces.
4.2 Cutting techniques
Both scissors and rotary cutters can be used for cutting woven fabric, but each requires slightly different techniques. When using scissors, use long, smooth strokes to avoid jagged edges. Keep the lower blade of the scissors on the cutting surface for stability. For a rotary cutter, use a cutting mat and a ruler or straight edge as a guide. Apply even pressure and roll the cutter along the edge of the pattern piece.
Regardless of the cutting method, minimize handling of the fabric, especially loosely woven fabrics, to prevent fraying. Cut accurately along the pattern lines; small inaccuracies can accumulate and affect the fit of the garment.
5. Sewing techniques for woven fabrics
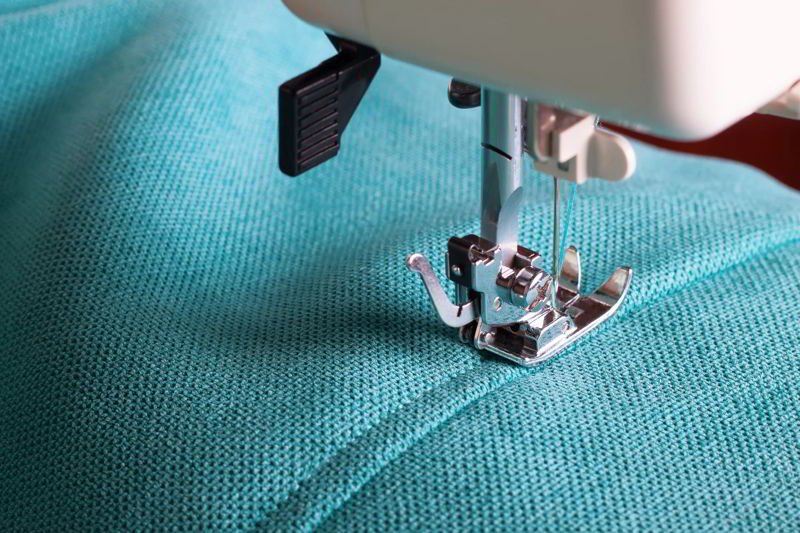
5.1 Machine settings
Appropriate machine settings are essential for achieving neat and durable seams. Stitch length and tension should be adjusted based on the fabric type.
| Fabric Type | Stitch Length (mm) | Tension | Walking Foot (Yes/No) |
|---|---|---|---|
| Lightweight Cotton | 2.0 – 2.5 | Normal | No |
| Medium Weight Linen | 2.5 – 3.0 | Normal | No |
| Heavyweight Denim | 3.0 – 4.0 | Slightly Higher | Yes |
| Silk | 1.5 – 2.0 | Slightly Lower | No |
A walking foot can be beneficial for thicker fabrics or multiple layers, as it helps feed the fabric evenly through the machine.
5.2 Seam allowances
A seam allowance is the distance between the stitching line and the raw edge of the fabric. Standard seam allowances vary depending on the pattern, but 5/8 inch (1.5 cm) is common. Maintaining a consistent seam allowance throughout the project is crucial for accurate garment construction. Inconsistent seam allowances can lead to ill-fitting garments and difficulty matching seams.
5.3 Stitching techniques
When sewing straight seams, guide the fabric gently through the machine, allowing the feed dogs to do the work. Avoid pulling or pushing the fabric, which can cause stretching or puckering. For curves, sew slowly and use your fingers to pivot the fabric around the needle.
At corners, stop with the needle down in the fabric, lift the presser foot, pivot the fabric, and then lower the presser foot to continue sewing. Backstitching (sewing a few stitches in reverse at the beginning and end of a seam) secures the stitching and prevents it from unraveling.
5.4 Handling delicate fabrics
Lightweight or slippery woven fabrics, such as silk and rayon, require special handling. To prevent shifting and distortion, consider using tissue paper or a fabric stabilizer. Place a layer of tissue paper under the fabric or apply a lightweight, water-soluble stabilizer to the fabric before sewing. These materials provide added stability and prevent the fabric from being pulled into the feed dogs. After sewing, the tissue paper or stabilizer can be easily removed.
6. Seam finishing techniques
6.1 Why finish seams?
Finishing seams is essential for several reasons. It prevents the raw edges of the fabric from fraying, which can weaken the garment and lead to unraveling. Seam finishes also improve the durability of the garment, making it more resistant to wear and tear. Additionally, finished seams create a neater and more professional-looking interior, enhancing the overall quality of the garment.
6.2 Common seam finishes
-
Zigzag stitch
A zigzag stitch is a simple and effective seam finish that can be done on most sewing machines. Set the machine to a medium-width and medium-length zigzag stitch. Stitch along the raw edge of the seam allowance, encasing the edge in the zigzag stitches. This prevents fraying and adds some stability to the seam.
-
Serging (overlocking)
A serger (also known as an overlocker) is a specialized sewing machine that trims the seam allowance and encloses the raw edge with an overcast stitch simultaneously. Serging creates a very clean and professional finish that is highly resistant to fraying. It’s an excellent choice for a wide range of fabrics.
-
Pinking
Pinking shears have blades with a zigzag pattern. Cutting the raw edge of the seam allowance with pinking shears creates a series of small notches that help to reduce fraying. Pinking is a quick and easy method, but it’s generally less durable than other seam finishes, especially for fabrics that fray easily.
-
French seam
A French seam is a more advanced technique that completely encloses the raw edges of the seam allowance within the seam itself. It’s ideal for lightweight and delicate fabrics.
- Step 1: With wrong sides together, sew a narrow seam (about 1/4 inch).
- Step 2: Trim the seam allowance close to the stitching.
- Step 3: Press the seam open, then fold the fabric with right sides together, encasing the raw edges.
- Step 4: Sew a second seam (about 3/8 inch) along the folded edge, enclosing the first seam.
-
Hong Kong finish (bias bound seam)
A Hong Kong finish, also known as a bias bound seam, uses bias tape to encase the raw edges of the seam allowance. It creates a very clean and professional finish, often used in high-end garments.
- Step 1: Cut bias strips of lightweight fabric.
- Step 2: Encase the raw edge of each seam allowance with the bias tape.
- Step 3: Stitch the bias tape in place.
6.3 Choosing the right seam finish
The best seam finish depends on several factors, including fabric type, project requirements, and desired durability.
| Fabric Type | Recommended Seam Finishes |
|---|---|
| Lightweight Cotton | Zigzag, French Seam, Serging |
| Medium Weight Linen | Zigzag, Serging, Pinking |
| Heavyweight Denim | Serging, Hong Kong Finish |
| Silk | French Seam, Hong Kong Finish, Serging |
7. Special considerations for handwoven fabrics
7.1 Unique properties of handwoven fabric
Handwoven fabrics often exhibit variations in weave structure and stability compared to commercially produced fabrics. The tension and density of the weave may not be as uniform, leading to potential irregularities. Handwoven fabrics, especially those made with loosely spun yarns, can be more delicate and prone to fraying. Careful handling is essential throughout the sewing process.
7.2 Stabilizing handwoven fabric
Stabilizing handwoven fabric before cutting is often necessary to prevent distortion and fraying. Several methods can be used. Interfacing, a fusible or sew-in fabric, can be applied to the back of the handwoven fabric to add stability. Staystitching, a line of straight stitching sewn just inside the seam allowance, can also help to stabilize edges and prevent stretching.
7.3 Seam finishes for handwoven fabric
Appropriate seam finishes are crucial for protecting handwoven fabrics from fraying. Due to their potentially looser weave, finishes that provide extra protection are recommended. Serging is an excellent choice, as it encases the raw edges completely. A Hong Kong finish is another good option, offering both durability and a refined appearance.
8. Troubleshooting common problems
8.1 Fraying
Excessive fraying can occur during the sewing process, even with careful handling. To prevent fraying, reiterate the importance of pre-washing, starching, and using appropriate seam finishes. If fraying occurs, consider applying a fray check product (a liquid sealant) to the raw edges. Handle the fabric as little as possible and avoid pulling loose threads.
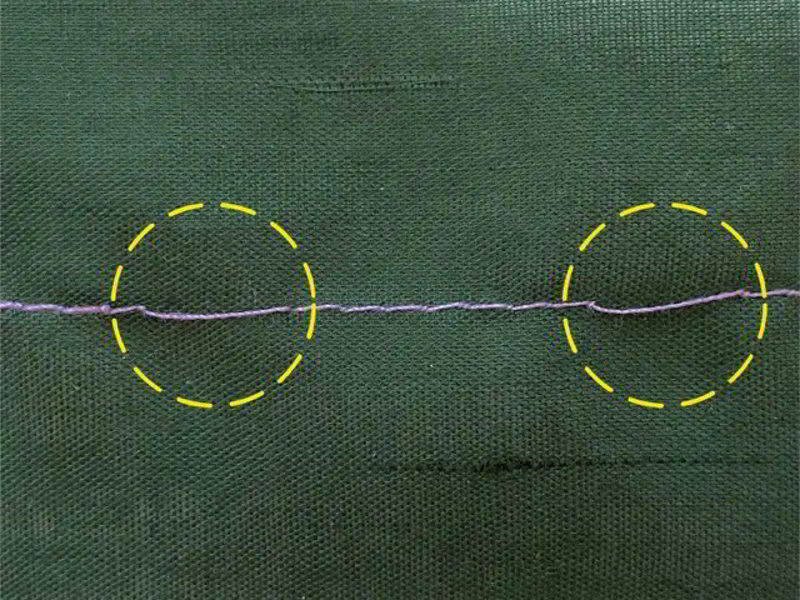
8.2 Puckering
Puckering is when the fabric gathers or wrinkles along the seam line. Potential causes include incorrect tension settings on the sewing machine, using the wrong needle size or type, or improper handling of the fabric during sewing. Solutions include adjusting the tension, using a sharper or smaller needle, and ensuring the fabric is fed evenly through the machine.
8.3 Uneven seams
Uneven seams can result from fabric slippage or inconsistent seam allowances. To prevent slippage, use pins, a walking foot, or consider basting the seams before sewing. To maintain consistent seam allowances, use a seam guide on the sewing machine or mark the seam allowance on the fabric.
8.4 Skipped stitches
They are usually caused by an incorrect needle type, an incorrect size, or machine problems. Replacing the needle or performing machine maintenance can resolve this issue.
9. Related questions
9.1 What is the best type of woven fabric for beginners?
Plain weave cotton or linen fabrics are generally the easiest for beginners to work with. They are stable, relatively easy to cut and sew, and less prone to fraying than some other woven fabrics.
9.2 Can I use a regular sewing machine for all woven fabrics?
Yes, a regular sewing machine can handle most woven fabrics. However, certain features, such as adjustable presser foot pressure and a walking foot, can be helpful for specific fabric types or projects.
9.3 How do I sew woven fabric without a serger?
There are several alternative seam finishing techniques to serging. Zigzag stitching, pinking, French seams, and Hong Kong finishes can all be used to prevent fraying and create durable seams.
9.4 How to choose the right color of thread?
Generally, thread that matches the fabric is chosen to create the most inconspicuous. However, you can choose contrasting threads to make a design statement.
9.5 What’s the difference between interfacing and stabilizer?
Interfacing is used to add structure and support to specific areas of a garment, such as collars, cuffs, and buttonholes. Stabilizer, on the other hand, is used to temporarily support fabric during sewing, preventing stretching or distortion, especially with delicate or slippery fabrics.
Read more:
Mastering sewing with woven fabrics involves understanding the fabric’s properties, using appropriate tools and techniques, and finishing seams properly. Preparation is key, including pre-washing, starching (if desired), and pressing.
Careful cutting and consistent seam allowances are essential for accurate garment construction. Seam finishing prevents fraying and enhances durability. Practice and experimentation are encouraged; don’t be afraid to try different techniques and learn from your mistakes. With these skills, the clothes and projects will become more professional. If you are looking for custom printed labels and tags, check out Packlove.


