


Size Chart: Why Your Clothing Business Needs One


Tired of costly returns and customer frustration due to poor fit? An accurate, easy-to-understand size chart isn’t just a helpful addition – it’s a fundamental tool. Discover why implementing one is crucial for boosting sales, building trust, and ensuring your clothing business thrives. Let’s start!
1. The foundation: Defining the clothing size chart (measurement guide)
1.1 What a size chart represents: Your customer’s body blueprint
At its core, a size chart acts as a crucial translation tool for any clothing brand. It converts the ideal body measurements of your target customer into the specific sizes your brand offers (such as S, M, L, or numerical sizes like 8, 10, 12).
Crucially, this chart is built upon the dimensions of the customer’s body, not the measurements of the finished garment itself. Think of it as the foundational blueprint defining the customer body type your brand intends to fit.
1.2 More than numbers: Its role in design and fit
A size chart extends beyond mere numbers; it serves as a fundamental guide throughout the design and pattern making phases. This document ensures that various styles within a collection maintain fit consistency. In practical terms, a customer who fits your size ‘medium’ top should ideally find a similar fit relative to their body in your size ‘medium’ dress. Adhering to a defined sizing system helps achieve this predictability.
1.3 Internal vs. external size charts: Tailoring information for purpose
It’s important to recognize that clothing brands typically utilize more than one size chart. The information needed internally differs significantly from what’s presented to customers. Therefore, two distinct versions are commonly developed: an internal size chart for production teams and an external size chart for shoppers, each tailored with specific sizing information.
1.3.1 Internal charts: The manufacturer’s guide
The internal size chart functions as a detailed technical document, essential for designers, pattern makers, and manufacturing partners. This version contains significantly more measurement points, often 15 to 25 or more, compared to what customers see.
These might include detailed garment specifications such as shoulder width across back, armhole depth, bicep circumference, or thigh circumference. The primary purpose here is achieving precision in garment construction and forms a key part of the technical package (the set of documents sent to a factory to produce a style).
| Measurement Point | Size S | Size M | Size L | Unit |
|---|---|---|---|---|
| Across Shoulder | 14.5 | 15 | 15.5 | In |
| Bust (Body Measure) | 34 | 36 | 38 | In |
| Bicep Circumference | 11 | 11.5 | 12 | In |
| Thigh Circumference | 22 | 23 | 24 | In |
| Waist (Body Measure) | 26 | 28 | 30 | In |
1.3.2 External charts: The customer’s shopping companion
Conversely, the external size chart is the simplified version displayed to shoppers, typically found on e-commerce product pages or hang tags. This chart focuses on providing clear customer guidance for selecting the right size during online shopping.
It usually includes only the essential measurements needed for a purchase decision, such as bust measurement, waist measurement, hip measurement, and sometimes inseam or height, depending on the garment. The goal is straightforward product information to facilitate customer sizing.
2. The business imperative: Why accurate sizing (apparel dimensions) is crucial for success
2.1 Enhancing customer confidence and reducing online shopping hesitation
A clear and trustworthy size chart significantly boosts customer confidence. When shoppers feel assured about choosing the correct size, the hesitation often associated with online shopping diminishes. This confidence directly translates into higher conversion rate figures, as uncertainty is a major barrier to clicking buy.
2.2 Significantly lowering return rates and saving costs
Ill-fitting garments are consistently cited as one of the primary reasons for returns in the online apparel sector. Each return incurs costs – including return shipping, inspection, restocking, potential damage write-offs, and handling time. Implementing and maintaining accurate size charts is a key strategy to reduce returns, improve operational efficiency, and protect profit margins.
2.3 Achieving consistent fit across your entire collection
Employing a unified brand sizing system ensures consistent sizing across your product range. When a customer purchases a size ‘Small’ jacket and finds it fits well, they can more confidently order a size ‘Small’ blouse later, expecting a comparable fit consistency relative to their body shape. This predictability fosters customer loyalty and encourages repeat purchases across the collection.
2.4 Defining your brand’s unique fit and target customer
The process of developing a size chart necessitates a deep dive into defining your brand’s ideal target customer. You must consider the specific customer body type you aim to dress. This exercise informs not only sizing but also critical design decisions and marketing strategies, ensuring your products and messaging resonate with the intended audience.
2.5 Streamlining communication with manufacturing partners
A well-defined internal size chart, included in the technical package, serves as an unambiguous communication tool with manufacturing partners. It minimizes misunderstandings, reduces the likelihood of errors during production, and decreases the need for excessive sampling and corrections. This clarity leads to greater efficiency, saving both time and money in the production cycle.
3. Mastering the measurements: How to accurately measure for clothing (how to measure)
3.1 Gathering your tools: The simple essentials
Achieving accurate measurements starts with the right equipment. The primary tool needed is a soft, flexible tape measure, the kind used for sewing (avoid rigid metal construction tapes). You will also need a way to record the measurements, whether it’s a simple notepad and pen or a digital note-taking app.
3.2 Key body measurement points explained (measurement points)
Understanding how to take key body measurements is fundamental. The following measurement points are among the most common ones needed for creating apparel size charts.
3.2.1 Measuring the upper body: Chest/bust, waist, shoulders, sleeve length
Accuracy in measuring the upper body is crucial for tops, dresses, and jackets. Follow these steps for how to measure:
- Chest/bust measurement: Measure around the fullest part of the chest or bust. Ensure the tape measure is kept level and parallel to the floor all the way around. For womenswear, this measurement should be taken while wearing the type of undergarment typically worn with the clothing.
- Waist measurement: Measure around the natural waistline. This is usually the narrowest part of the torso, often located near the navel. Keep the tape snug but not constricting, and breathe normally – don’t hold your breath or pull the tape excessively tight.
- Shoulder measurement: Measure across the back, from the bony point at the edge of one shoulder to the bony point at the edge of the other.
- Sleeve length measurement: Start at the shoulder bone point (where the shoulder measurement ended) and measure down the outside of the arm to the desired endpoint, typically the wrist bone for long sleeves. The arm should be slightly bent for this measurement.
3.2.2 Measuring the lower body: Waist, hips, inseam, outseam
For pants, skirts, and shorts, lower body measurements are essential:
- Waist measurement: Measure the natural waistline as described for the upper body, ensuring consistency.
- Hip measurement: Stand with feet close together and measure around the fullest part of the hips and buttocks. Keep the tape measure level.
- Inseam measurement: This measures the length of the inner leg. Measure from the crotch seam down the inside of the leg to the desired hem length. This can be tricky to do accurately on oneself; measuring a pair of well-fitting pants laid flat, or having someone assist, often yields better results.
- Outseam measurement: Less commonly required for standard size charts but useful to know, the outseam measures from the top of the waistband down the outside of the leg to the desired hem length.
3.2.3 Specific considerations: Neck (for shirts), dress length
Certain garment categories require specific measurements:
- Neck measurement: Primarily used for collared dress shirts. Measure around the base of the neck, where a shirt collar would naturally sit. It’s advisable to insert one finger between the tape and the neck to allow for comfortable ease.
- Dress/garment length: This is often a garment measurement specified by the designer (e.g., measured from the highest point of the shoulder down to the hem), rather than a direct body measurement. However, understanding the target customer’s general height range helps determine appropriate standard lengths for different garment categories like dresses or tunics.
3.3 Pro tips for ensuring measurement accuracy
Consistency is vital for useful measurements. Follow these tape measure tips:
- Always use a soft, flexible tape measure.
- Keep the tape snug against the body, but avoid pulling it so tight that it digs in.
- For circumference measurements (bust, waist, hips), ensure the tape measure remains parallel to the floor all around the body.
- Measure directly on the body or over minimal, non-bulky undergarments. Measuring over thick clothing will lead to inaccurate results.
- If possible, have another person assist with measurements, especially for points like shoulder width or inseam, which can be difficult to take accurately by oneself.
- For greater consistency, especially when first establishing measurements, take each measurement two or three times and calculate the average. This helps minimize minor variations.
4. Building your own: A step-by-step guide to creating a foundational size chart
4.1 Step 1: Know your customer – Defining the target body profile
The foundation of an effective size chart is a clear understanding of your target customer. A generic chart rarely serves a brand well. Instead, define the specific body profile you are designing for. Consider factors such as:
- Age range
- General body shape tendencies (e.g., athletic build, curvier figures)
- Average height range
- Potential regional sizing nuances, if relevant to your market
4.2 Step 2: Gather your data – Researching sizing information
Once you know who you’re sizing for, gather relevant sizing information. Potential sources include:
- Competitor analysis: Examine the size charts of successful brands targeting a similar customer. Use these as reference points, but avoid copying directly, as their target profile or fit philosophy may differ.
- Sizing standards: Industry standards like those from ASTM International (American Society for Testing and Materials) exist, providing detailed body measurement data tables. However, accessing these standards often involves a cost, and interpreting them can be complex.
- Fit model measurements: If your brand utilizes fit models (individuals whose bodies closely match your target customer profile), their specific measurements are invaluable data points for size chart creation.
- Sales data & customer feedback: Analyze which sizes sell best, which have higher return rates due to fit, and any direct customer comments regarding sizing.
- Textbooks & online resources: Reputable fashion design textbooks or technical design resources can offer guidance on standard measurement increments between sizes.
4.3 Step 3: Analyze and compare – Finding patterns in the data
With data gathered from various sources, the next step is data analysis. Compile the measurements into a structured format, such as a spreadsheet. Compare the key measurement points (like bust, waist, hip) for equivalent sizes across your different sources. Look for:
- Common averages: Identify typical measurements for each size within your target demographic.
- Patterns and trends: Notice how measurements typically increase between sizes (the ‘grade’).
- Outliers: Note any significant deviations and consider if they align with your specific target customer profile defined in Step 1.
Focus on identifying the measurements most relevant to your brand and customer.
| Measurement Point | Size | Competitor A (in) | Competitor B (in) | ASTM Ref (in) | Notes |
|---|---|---|---|---|---|
| Bust | S | 34 | 33.5 | 34 | Consistent |
| Bust | M | 36 | 35.5 | 36 | Slight variation |
| Bust | L | 38 | 38 | 38.5 | B seems smaller |
| Waist | S | 26 | 27 | 26.5 | Comp B larger |
| Waist | M | 28 | 29 | 28.5 | Comp B larger |
| Waist | L | 30 | 31.5 | 31 | Comp B much larger |
| Hip | S | 36 | 36.5 | 36.5 | Close |
| Hip | M | 38 | 38.5 | 38.5 | Close |
| Hip | L | 40 | 41 | 41 | Close |
4.4 Step 4: Decide your core measurements and size range
Based on your customer profile and data analysis, make the crucial decision for your brand’s sizing system. Define:
- Your size range: Determine the scope of sizes you will offer (e.g., XS through XL, or numerical sizes 0 through 14).
- Core measurements per size: Assign specific body measurements to each size designation. For instance, decide that your size medium corresponds to a 36-inch bust, 28-inch waist, and 38-inch hip.
- Key measurement points for external chart: Select the most critical measurements (typically bust, waist, hips, possibly inseam) to display publicly.
4.5 Step 5: Design a clear and user-friendly external chart
The final step is presenting your sizing information effectively to customers. Design an external chart that prioritizes clarity and ease of use:
- Format: Use a simple table layout, with sizes listed across the top or down one side, and measurement points on the other axis.
- Units: Clearly state the units of measurement. For the US market and international reach, including both inches and centimeters is highly recommended.
- Placement: Ensure the chart is easily accessible on your e-commerce website, ideally via a prominent link near the size selection options on every product page.
- Visual aids: Consider including simple diagrams illustrating where each measurement should be taken on the body, providing additional customer guidance.
- Mobile-friendly: The chart must be readable and navigable on mobile devices.
5. Expert insights: Best practices for effective size charts
5.1 The critical difference: Body measurements vs. garment measurements
This is a fundamental distinction often misunderstood. Your size chart must list body measurements – the dimensions of the customer’s actual body. These are not the same as garment measurements, which are the dimensions of the finished clothing item itself. Garments always include ‘ease’ (extra space added beyond the body measurement for comfort, movement, and style).
For example, a size chart might list a medium bust as 36 inches (body measurement), but the actual shirt labelled medium could measure 40 inches across the chest (garment measurement, including 4 inches of ease). Confusing these two leads to significant fit issues and customer frustration. Clearly communicate that your chart refers to body size.
5.2 Clarity is key: Using single measurement points (not ranges)
Avoid ambiguity on your external size charts by using single numbers for each measurement point, rather than ranges (e.g., avoid “Waist: 28-30 inches”). Ranges create customer confusion, especially for shoppers whose measurements fall between the numbers (“Should I size up or down?”).
Instead, use a single figure, typically representing the maximum body measurement for that size (e.g., “Waist: 28 inches” implies this size fits up to a 28-inch waist). This provides a much clearer guideline and reduces guesswork.
5.3 Visual aids: Incorporating simple diagrams or illustrations
Reinforce clear communication by including simple visual aids, such as line diagrams or illustrations, alongside your size chart table. These visuals should clearly indicate where on the body each listed measurement (bust, waist, hip, etc.) should be taken. This guidance-oriented approach helps customers measure themselves more accurately, leading to better size choices.
5.4 Thinking inclusively: Addressing diverse body shapes
Standard sizing systems inherently cannot accommodate all body types perfectly. Acknowledge this reality. Depending on your brand’s focus and resources, consider strategies for inclusive sizing. This might involve developing separate charts or offering specific fit notes for categories like petite size, tall size, or plus size ranges if your brand serves these markets.
5.5 Addressing international sizing differences
For businesses selling into multiple regions, particularly the US market, be aware of significant international sizing differences. Size labels like S/M/L or numerical sizes (e.g., US 8 vs. UK 12 vs. EU 40) vary widely. The most reliable approach is to always prioritize the actual body measurements on your chart, clearly listing them in both inches and centimeters.
Relying solely on size labels across different markets is a recipe for confusion. You might include a very basic size conversion reference table if highly relevant and kept simple, but measurements should always be the primary guide.
| Region | Small (S) | medium (M) | Large (L) |
|---|---|---|---|
| US | 4-6 | 8-10 | 12-14 |
| UK | 8-10 | 12-14 | 16-18 |
| EU | 36-38 | 40-42 | 44-46 |
5.6 Keeping it current: The need for periodic review and updates
A size chart should be treated as a living document, not a one-time setup. Implement a process for periodic review. Regularly analyze customer feedback regarding fit, examine return data specifically citing sizing issues, and stay aware of any shifts in your target market’s demographics or general sizing trends.
Make updates as necessary to maintain accuracy and ensure your chart remains a reliable tool. This demonstrates responsiveness and a commitment to quality based on customer data.
6. Related questions
6.1 How often should I update my brand’s size chart?
A regular review cadence is recommended. Aim to conduct a customer feedback analysis related to sizing and review return data at least annually, or perhaps semi-annually if you receive a high volume of feedback or notice concerning trends.
Major updates might be necessary sooner if you introduce significantly different product categories (e.g., adding tailored outerwear if you previously only sold knitwear), shift your target demographic, or receive consistent complaints about the fit of a particular size range. The ideal update frequency depends on your business dynamics and customer input.
6.2 What’s the best way to display my size chart on my E-commerce website?
Visibility and accessibility are key for a positive user experience in online retail. The best practice is to place a clear, easily identifiable link – labelled size guide or “Size Chart” – directly next to or below the size selection options on each individual product page.
This link should typically open the chart in a pop-up window (modal) or navigate to a dedicated, well-formatted page. Avoid burying the size chart link in the website footer or within lengthy FAQ sections. Crucially, ensure the size guide display is fully responsive and easily readable on mobile devices.
6.3 Should my size chart account for “vanity sizing”?
Vanity sizing refers to the practice of labeling garments with sizes smaller than their actual measurements would traditionally indicate (e.g., labeling a garment that fits a 30-inch waist as a size 8, when historically it might have been a 10 or 12). It’s generally advisable to avoid intentionally engaging in vanity sizing.
While tempting as a marketing tactic, it erodes brand trust and undermines the purpose of providing accurate body measurements. Focus on transparency: provide clear, honest body measurements for each size and let customers choose based on that data, rather than relying on potentially misleading size labels.
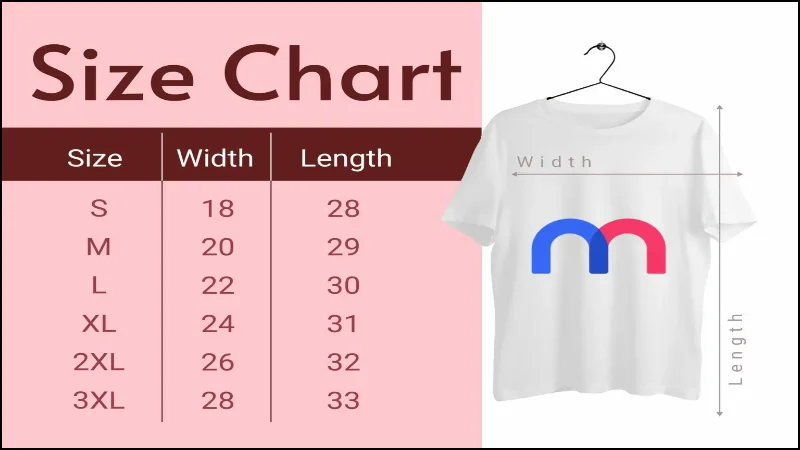
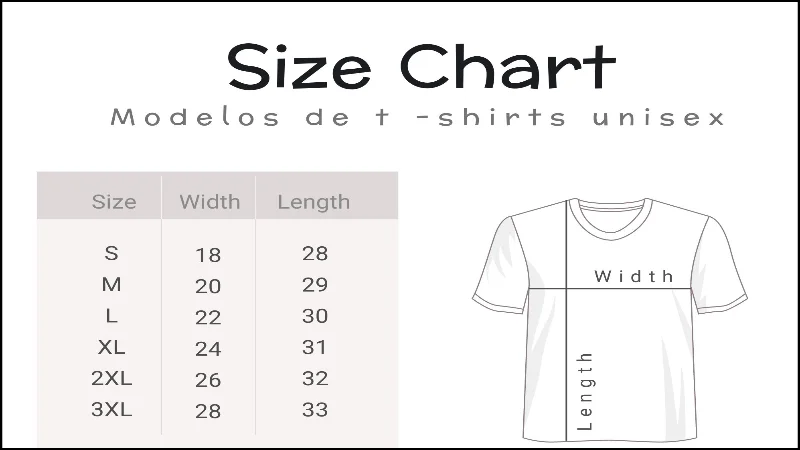
6.4 How do I create a size chart for unisex apparel items?
Creating a size chart for unisex apparel requires careful consideration. Often, these charts prioritize measurements less influenced by traditional gendered body shapes, such as chest measurement, and sometimes waist or hip. Alternatively, some unisex sizing relies on key garment dimensions like width and length. A crucial element is providing clear fit comparison guidance.
For example, state explicitly how a unisex size relates to typical men’s or women’s sizing (e.g., “Unisex medium generally fits like a Men’s Small or a Women’s medium”). Accurate measurements remain essential for size chart creation, even for unisex items.
Read more:
Investing the time and effort to create and maintain an accurate size chart is not merely an operational task; it’s a strategic investment in your brand’s future. As we’ve explored, the benefits are substantial: building customer satisfaction and trust, significantly helping to reduce returns and their associated costs, ensuring brand consistency across your collection, and ultimately strengthening your bottom line.
While it requires initial diligence, accurate sizing information is fundamental to brand success in the competitive apparel market. Implementing these practices demonstrates a commitment to your customers and the quality of their experience with your products.


