


What Is Binding: A Beginner’s Guide To Flawless Sewing Edges


If you love sewing, quilting, or making crafts, you want your projects to look great and last long. One important skill is called “binding.” If you love sewing, quilting, or making crafts, you want your projects to look great and last long.
One important skill for achieving this is “binding.” Knowing great techniques is the first step to making your projects shine.
This guide will explain what binding is in simple terms. You’ll learn how it makes your fabric items neat, strong, and more professional-looking.
1. What exactly is binding in sewing and crafts?
1.1 Simple definition of binding
Binding is a thin strip of fabric. You use it to cover the raw, cut edges of your fabric projects. Think of it like putting a neat frame around a picture – it makes everything look finished and tidy.
Or, it’s like the protective cap on the end of a shoelace, stopping it from unraveling. When fabric edges are left raw, they can start fraying. Binding stops this!
By making the edge more durable and giving it a clean look, binding is a key technique for finishing seams professionally.
1.2 Why is binding used?
Binding is not just about looks; it has many important jobs:
- Makes it stronger: Binding protects fabric edges from wear and tear. This makes your items last much longer, especially things you use or wash often, like quilts, baby bibs, or bags.
- Makes it look neat: It hides messy raw edges (the cut, unfinished edges of fabric), making your project look very tidy and professional.
- Adds decoration: You can choose binding in a fun color or pattern to add a special design touch. Imagine a plain bag with a bright, colorful binding!
- Gives shape: Sometimes, binding can add a little firmness to an edge, helping it hold its shape, like on placemats or the opening of a bag.
2. Different types of binding explained simply
2.1 Understanding fabric grain
To understand the main types of binding, it helps to know a little about fabric grain. Fabric threads run in different directions:
- Straight grain: Runs along the length of the fabric (parallel to the selvages – the finished non-fraying edges). It has very little stretch. Think of it as the strongest, most stable direction.
- Cross grain: Runs across the width of the fabric (from selvage to selvage). It has a little more stretch than the straight grain.
- Bias grain: This is cut at a 45-degree angle to the straight and cross grains. Fabric cut on the bias (a diagonal cut across the fabric) is the stretchiest. This stretch is super useful for binding!
The grain direction affects how the binding strip will behave when you sew it.
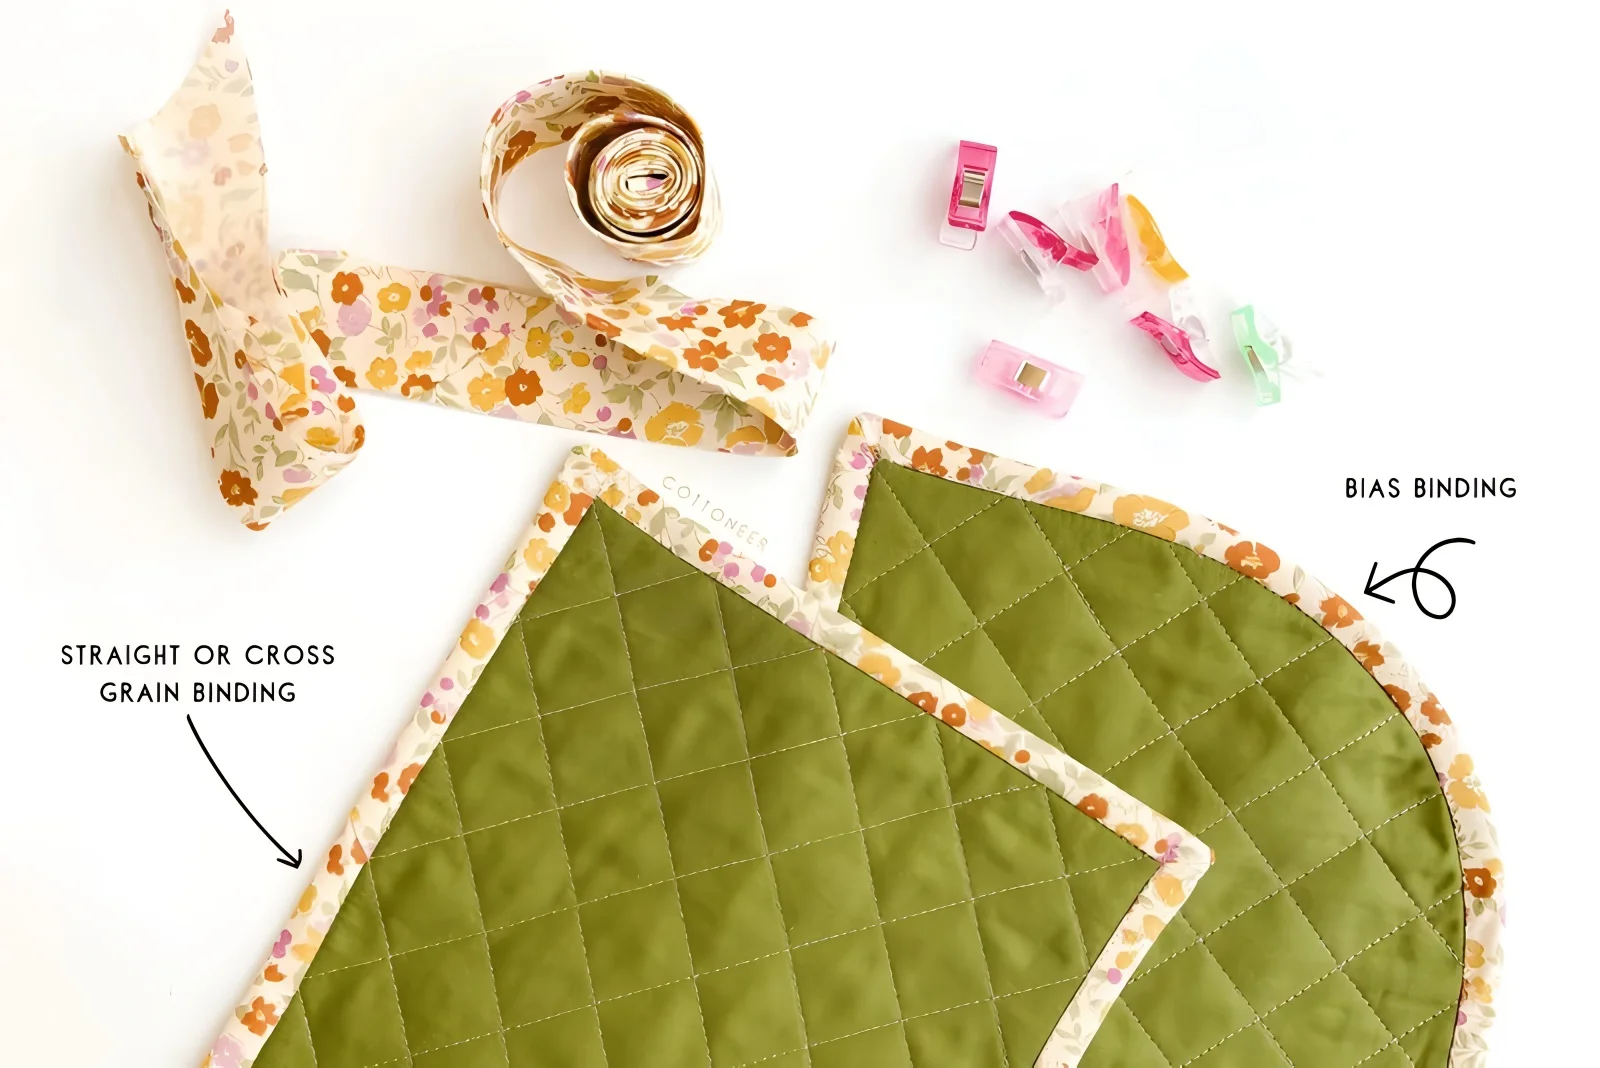
2.2 Bias binding
Bias binding (often sold as bias tape) is cut on the fabric’s bias (that stretchy 45-degree angle). Because it’s cut on the bias, it is naturally stretchy.
This stretchiness is its key advantage. It allows the binding to lie flat and smooth around curved edges without puckering or making awkward folds.
Straight binding would bunch up on a curve. It’s perfect for finishing curved edges like necklines on shirts, armholes, the edges of round placemats, or curvy quilt borders. Many sewists use bias tape for curved edges.
2.3 Straight-grain binding
Straight-grain binding is cut along the fabric’s straight grain (parallel to the selvage, the finished edge of the fabric bolt). It’s excellent for straight edges where you don’t need any stretch.
It’s very stable, won’t stretch out of shape, and gives a crisp, neat finish. Think straight quilt borders, the edges of square or rectangular placemats, table runners, straight apron edges, or curtain sides.
It often wastes less fabric than cutting bias strips because you can cut long, efficient strips along the length of your fabric. It’s a go-to for fabric trims & edgings for linear projects.
2.4 Cross-grain binding: A little stretch
Cross-grain binding is cut across the fabric’s width. It has a little bit of stretch – more than straight-grain, but less than bias binding. This can be good for very gentle curves where bias might be too stretchy.
It can also work for straight edges where you want just a tiny bit of flexibility. It can also be an economical choice if you need long strips and your fabric piece is wider than it is long.
It’s less commonly used for binding than bias or straight-grain, but it’s another option to know.
2.5 Pre-made vs. DIY binding
You can either buy binding ready to use or make it yourself:
Pre-made binding
You can either buy binding ready to use or create it yourself. Pre-made binding, like bias tape from a craft store, saves time and offers consistency.
DIY binding allows for perfect fabric matching and custom widths but requires more effort. The choice depends on your project’s needs.
In contrast, double-fold binding, which is essentially single-fold tape folded in half again, is perfect for encasing a raw edge and is therefore a popular choice for finishing projects.
DIY binding
Alternatively, you can create your own fabric trim by cutting and pressing strips from your chosen material. This method offers the distinct advantages of achieving a perfect match with your project fabric, the freedom to select any fabric you desire, the ability to create custom widths, and an excellent way to utilize fabric scraps.
However, it inherently requires more time and effort due to the necessary cutting and pressing involved.
Which to choose? Pre-made is great for speed or if you find a color you love. DIY is best for a perfect match or a unique look.
| Feature | Pre-made binding | DIY (self-made) binding |
|---|---|---|
| Main benefit | Quick & easy | Perfect match, custom fabric |
| How to get | Buy from store | Cut & press fabric strips yourself |
| Fabric choice | Limited to store stock | Any fabric you choose |
| Time involved | Minimal | More time-consuming |
3. What materials are used to make binding?
Binding can be made from many material types. The best choice often depends on your main project fabric:
- Cotton: Very popular, especially cotton lawn (a lightweight, smooth cotton fabric) or quilting cottons for quilts and general sewing. It’s easy to sew, presses well, is durable, and comes in endless colors and prints.
- Satin/polyester: Gives a shiny, elegant look, like for polyester satin binding on special occasion dresses, fancy blankets, or lingerie. Can be a bit slippery to sew, so use more pins and sew slowly.
- Knit binding: If your main project fabric is stretchy (like t-shirt jersey), you need knit binding. It will stretch along with your fabric, preventing popped stitches or wavy edges.
- Linen: Offers a natural, textured look. Great for home decor like table runners, rustic bags, or eco-friendly projects. Softens nicely with washing.
- Other materials: For unique effects, people sometimes use materials with rare attributes, like faux leather for trim on bags, or denim for a sturdy edge on rugged items.
Key consideration: Always try to match your binding material to your main project fabric in terms of weight and care needs (how you wash and dry it). For example, don’t use a heavy canvas binding on a delicate silk fabric. It will be too bulky and might pull the silk out of shape.
If the binding shrinks differently than the main fabric in the wash, your edge will pucker. Choosing the right fabric for making binding is key for a good, long-lasting result.
4. How is binding used? Common applications and examples
4.1 The general idea of attaching binding
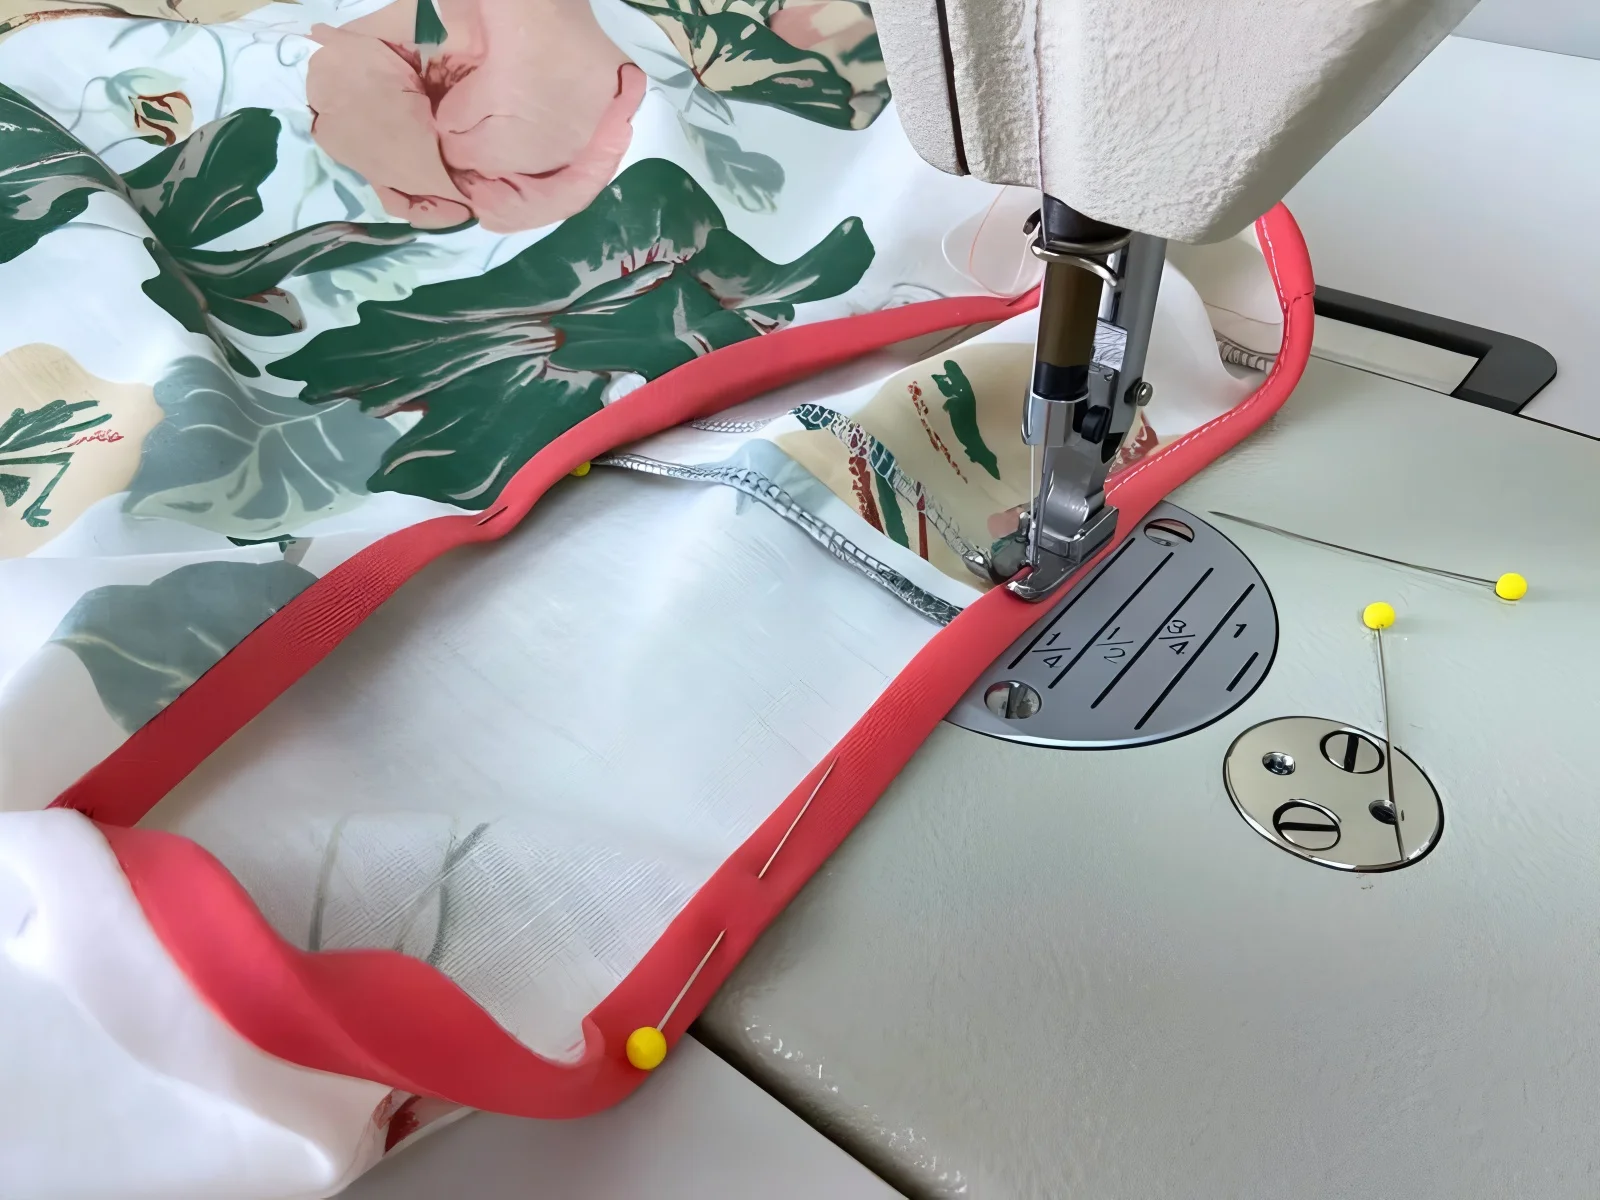
The basic way to attach double-fold binding (the most common for finishing edges) usually involves these general steps:
- Open one fold of your binding strip. Align its raw edge with the raw edge of your project fabric, right sides (the ‘pretty’ sides) together. Sew along the fold line of the binding.
- Fold the binding strip up and over the raw edge of your fabric, towards the other side.
- The folded edge of the binding should now cover the stitching line you just made. Make sure the binding is snug against the fabric edge.
- Sew the binding down from the top side, close to its folded edge. This final visible stitching is often called topstitching (a straight stitch sewn on the right side of the fabric).
This method neatly wraps, or ‘encases,’ the raw edge. Remember, this is a very general guide. Specific techniques like how to apply binding to a quilt edge may have more detailed steps or variations.
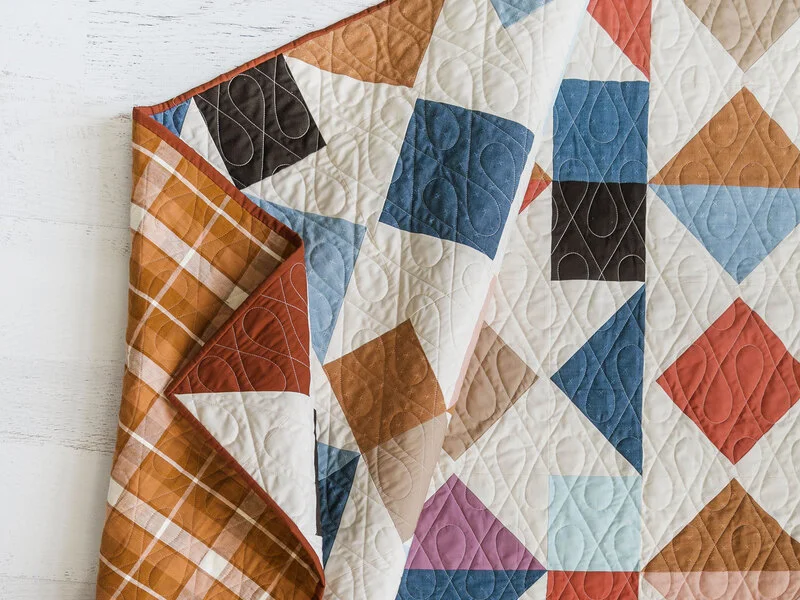
4.2 Binding on quilts
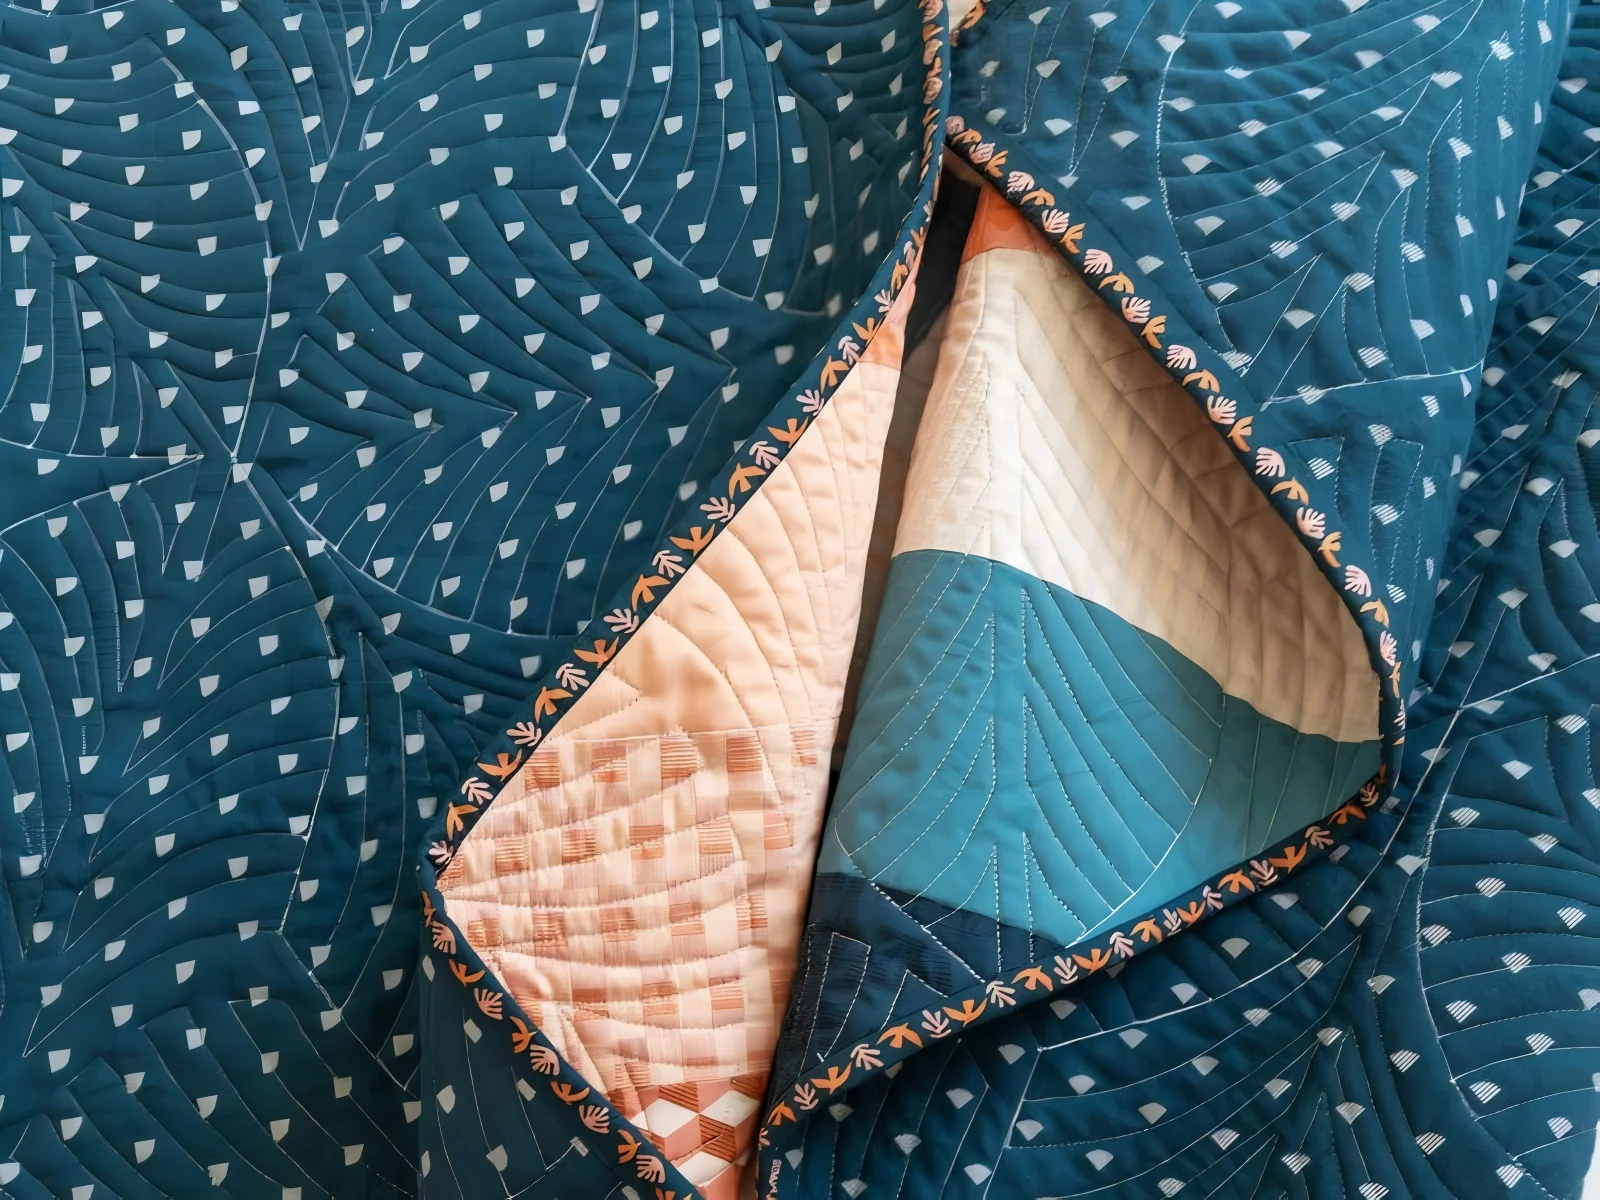
Quilt edging is one of the most classic uses for binding. It neatly finishes all the outer edges of a quilt (a bed covering made of three layers of fabric stitched together). It encloses the top fabric, the soft middle layer called batting, and the backing fabric.
Binding protects the quilt edges from wear and tear. This is important as quilts are often used and loved for many years. A special detail quilters often use is a mitered corner (a neat, diagonal fold where binding strips meet at a corner).
This gives a very sharp, professional look, like a picture frame. Quilt binding application for edge finishing is a crucial skill for quilters. Quilt binding is typically double-fold. It is often made from cotton bias tape for strength and flexibility around corners.
4.3 Binding on garments
Binding is very handy for different types of fabric binding for clothes:
- Necklines and armholes: Bias binding is perfect for a clean neckline finish or armhole finish. This is especially true on casual tops or children’s clothes. Because it stretches, it lies smoothly around these curves. It’s often used instead of a ‘facing’ (an extra piece of fabric sewn inside to finish an edge).
- Hems: Binding can be a fun and decorative way to finish garment hems (the finished bottom edge of a garment) on skirts, sleeves, or even pants. It can add a pop of contrasting color or extra durability.
- Decorative edges & details: Use binding to highlight pocket edges or yokes (the shaped pieces often on shoulders or waists). It can also be used along seams as a design feature. Think of a contrasting binding on a sporty jacket.
- Stretch binding is also commonly used on activewear and swimwear edges.
4.4 Binding on bags and accessories
Binding is a fantastic way to finish bags and accessories:
- Edges and seams: It’s great for finishing the top edges of tote bags, pouches, and makeup bags. This is often called bag trim. You can also use it to cover raw internal seams in unlined bags. This makes the inside look as good as the outside and prevents fraying.
- Materials: For bags, you might use sturdy cotton binding, canvas, denim, or even faux leather for a more structured and durable finish.
- Straps and handles: Wider binding strips can sometimes be used to create simple straps or handles for lightweight bags. They can also neatly finish the edges of webbing straps.
- Other accessories: Think about binding the edges of eyeglass cases, laptop sleeves, key fobs, or fabric bookmarks.
4.5 Binding on home decor
Binding adds a polished and durable touch to many home items:
- Kitchen and dining: Edges of placemats, table runners, napkins, aprons, and potholders often look great and last longer with binding. For aprons, binding can also be used for neck straps and ties.
- Baby items: Baby bibs nearly always use soft (often bias) binding for the curved necklines and outer edges. It’s gentle and easy to clean.
- Other decor: Consider binding for fabric coasters, edges of simple cushions (though piping is also common), or fabric storage bins.
It’s a very practical fabric edge finishing technique for these everyday textile craft materials (fabrics and related items used in crafts), especially those that need frequent washing.
4.6 Binding for other crafts
The uses for binding don’t stop there! Any craft project using fabric with raw edges can often be improved with a bound finish. Think about fabric book covers, journal covers, organizers for your craft supplies, pet bandanas, or even the edges of soft toys. Let your creativity guide you – if an edge needs finishing, binding is a great option to consider!
5. Finishing touches: What tools can help with binding?
While you can sew binding with just basic sewing supplies, a few tools can make the process, especially making fabric trim (DIY binding), much easier:
- Rotary cutter, mat, and ruler: Essential for cutting accurate, straight fabric strips quickly. This is especially important for DIY binding.
- Bias tape maker: A small, clever gadget. You feed your fabric strip through it, and it folds the edges perfectly as you iron. They come in different sizes for various binding widths.
- Iron and ironing board: Crucial for pressing DIY binding strips neatly. Also for giving your finished binding a crisp, professional look.
- Sewing machine binding foot (optional): Some sewing machines have a special attachment foot. It’s designed to guide pre-folded binding and the fabric edge together as you sew. This helps you get even stitches. Check your machine’s manual.
- Clips or pins: To hold the binding securely in place on your fabric edge before and during sewing. Sewing clips are great for thick layers are great for thick layers or fabrics you don’t want to mark with pins.
- Sharp fabric scissors: Good for trimming threads and fabric edges neatly.
Remember, if you’re using pre-made binding, you’ll mainly need pins/clips, scissors, your iron, and your sewing machine with standard sewing machine needles.

6. Frequently asked questions (FAQs) about binding
6.1 Is binding difficult for beginners to sew?
It can take a little practice, especially around curves or making neat corners. But start with simple straight edges. Use straight-grain binding or pre-made bias tape.
Watch a few online tutorials – seeing it done helps a lot! Understanding bias binding for beginners gets easier with each try.
6.2 Do I always have to use bias binding?
No. Bias binding is best for curved edges because it stretches. For straight edges, straight-grain binding is often better. It’s more stable and can save fabric. Cross-grain binding gives a little stretch for very gentle curves.
6.3 What’s the difference between single fold and double fold bias tape?
Single fold tape: Each long raw edge is folded once towards the center on the wrong side. It lays flatter. It’s good for applique or as a decorative finish where only one side is mostly seen.
Double fold tape: This is single fold tape that is then folded in half again, wrong sides together. It essentially encases the raw edges within the fold.
It’s most common for finishing raw edges on quilts, necklines, and armholes because it neatly ‘sandwiches’ the fabric edge.
6.4 Can I buy binding, or do I have to make it?
You can do either! Buying pre-made binding (usually bias tape) is convenient and comes in many colors. Making your own lets you choose any fabric for a perfect match or a custom design, but it takes more time.
6.5 How much binding fabric do I need for my project?
First, measure the total length of all the edges you need to bind (e.g., all four sides of a quilt). Add about 6-10 inches (15-25 cm) extra. This gives you enough to join strips if needed and to finish the ends neatly.
For the width of DIY double-fold binding, a common rule is to cut your fabric strips four times the desired finished width. For example, for a 1/2 inch finished binding, cut 2-inch wide strips. Pre-made tape will state its finished width.
6.6 How do I join DIY binding strips to make a long piece?
It’s best to join binding strips with a diagonal (45-degree angle) seam. This makes the seam less bulky. It is also less noticeable in your finished binding compared to a straight seam.
7. Showcasing your beautifully bound creations
A beautifully bound edge truly shows the care and skill you’ve put into your sewing project. It’s a wonderful finishing touch! Once your item is expertly finished with binding, you might want to add a professional branding touch.
This is especially true if you plan to sell your items or give them as special, high-quality gifts. To add a final professional touch, especially if you sell your items or give them as high-quality gifts, consider adding a custom brand label.
Consider these options from Packlove for your beautifully bound creations:
- Custom woven labels: These add a very professional and durable branding element. Packlove offers high-quality custom woven labels (labels made by weaving threads together, like on clothing necklines). They can be sewn into a seam near your binding, flat onto the item (like a quilt back), or inside a garment. They really elevate the perceived value of your handmade goods.
- Printed fabric labels: A softer option, perfect for items that go against the skin, like baby clothes or lingerie where you’ve used a soft binding. Great for brand names, logos, or care instructions. They can also be easily sewn in.
- Hang tags: If you’re selling your items, hang tags are a great way to share your brand story, product details, pricing, or care instructions. Attach them with a simple string or pin to your beautifully bound products.
Adding a label or tag is a lovely way to complement the beautiful binding work you’ve done. Attaching brand labels near bound edges is a popular choice for many creators.
We understand that many crafters and small businesses start with smaller quantities. That’s why we offer low minimum order quantities (MOQs – the smallest number of units you can order) for custom labels at Packlove, making professional branding accessible to everyone.
Adding a simple, well-designed label can significantly boost brand recognition for handmade goods.
The Packlove team can offer expert advice on selecting the right label type and placement to best complement your bound items.
Explore more:
As you’ve learned, binding is a very important technique in sewing, quilting, and all kinds of fabric crafts. It’s the key to finishing edges so they are neat, strong, and look wonderfully professional.
Whether you choose pre-made bias tape for convenience or enjoy making fabric trim yourself for a custom touch, understanding binding helps improve sewing skills significantly.
We hope this guide has helped you clearly understand what binding is, why it’s so useful, and how it can make your projects even better. Don’t be afraid to practice – you’ll soon love the difference it makes!
Ready to elevate your creations with your own branding? The Packlove team is excited to help you choose the perfect custom labels or hang tags. Contact us today for a friendly consultation or browse our full range of branding solutions at Packlove!


