


Buttonhole Stitch: A Step-by-Step Guide


Navigating the world of sewing, especially for beginners, often presents unique hurdles. One such challenge is mastering essential hand stitches. This article is your guide to confidently learning the buttonhole stitch – a fundamental technique with a wide array of applications.
Through detailed instructions, clear visuals, and expert insights, you’ll acquire the skills to neatly secure fabric edges, create durable buttonholes, and even explore decorative embellishments. By the end of this guide, you’ll not only understand the mechanics of this versatile stitch but also gain the practical knowledge to apply it to your future sewing projects.
The buttonhole stitch is a hand-sewing technique specifically designed to reinforce the edges of fabric, particularly around openings like buttonholes. Its defining characteristic is the small knot created with each stitch, which provides superior strength and durability compared to a simple overcast stitch.
This knot locks the stitches together, preventing unraveling and ensuring a secure finish. While visually similar to the blanket stitch, the buttonhole stitch’s knot is the crucial difference. A blanket stitch lacks this knot, making it less suitable for areas experiencing significant wear.
In contrast, machine-made buttonholes, while efficient, often lack the tailored precision of a hand-sewn buttonhole. Tailors and experienced sewers often prefer the hand-sewn method, especially for couture garments or historical reproductions, as it offers greater control over the stitch size and shape. The added durability of this hand stitch helps the textile secure and protect the garment.

2. Materials and tools you’ll need
- Fabric: The material you’ll be working with. The type of fabric will influence the choice of thread and needle.
- Thread: Choose a thread that matches or complements your fabric. For added strength, consider using embroidery floss or pearl cotton.
- Needle: An embroidery needle is recommended due to its sharp point and larger eye, which accommodates thicker threads.
- Scissors: Sharp embroidery scissors are ideal for precise cutting of the fabric and thread.
- Marking tool: A pencil, chalk, or fabric marker can be used to mark the buttonhole placement.
- Thimble: (Optional) A thimble can protect your finger while pushing the needle through the fabric.
- Interfacing: (Optional) Interfacing can be used to reinforce the fabric, particularly for delicate or loosely woven materials. It helps to prevent stretching and fraying.
- Button: To determine the correct size for your buttonhole.
- Sewing pattern: Provides the placement and specifications for your buttonhole.
3.1 Step 1: Prepare the fabric
Begin by accurately marking the position and length of your buttonhole. A common formula is to add the button’s diameter and its thickness for the total buttonhole length. For instance, a 1/2-inch wide button that’s 1/8-inch thick requires a 5/8-inch opening. This ensures the button passes through smoothly without excessive strain.
For added stability, especially on lighter fabrics, consider applying interfacing to the back of the fabric in the buttonhole area. This will reinforce the edges and prevent stretching. You may find it helpful to outline the buttonhole with a running stitch.
This acts as a guide and further secures the fabric edges, a technique often employed in hand-sewn buttonholes for a neater finish. The cause and effect of not taking these precautions can result in a less durable, less professional-looking buttonhole.
3.2 Step 2: Thread the needle
Select your thread. Embroidery floss or pearl cotton provides excellent strength and a slightly raised appearance, beneficial for buttonholes. Cut a length of thread and thread your needle. Tie a secure knot at the end of the thread.
Bring the needle up from the back of the fabric to the front, emerging at one end of your marked buttonhole line, just inside the running stitch outline (if used). This first stitch is crucial for setting the foundation of your buttonhole.
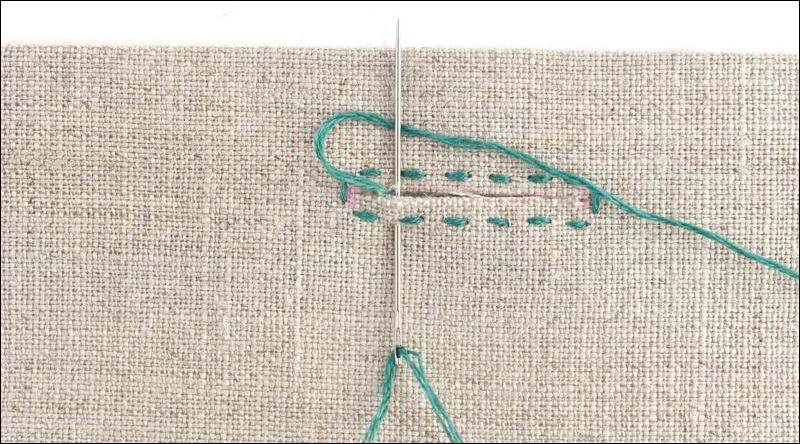
Now, insert the needle back down through the fabric, just outside the running stitch line (or at the edge of your marked line if not using a running stitch), a short distance away from where you emerged. Before pulling the thread tight, bring the needle tip back up inside the buttonhole opening, close to where you initially came up.
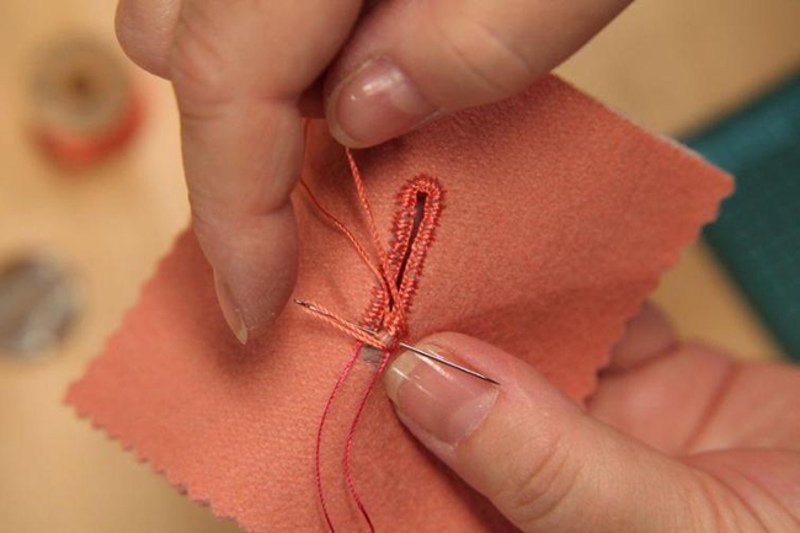
Crucially, loop the working thread (the thread coming from the needle’s eye) behind the needle. This creates the signature knot of the buttonhole stitch. Pull the thread through, drawing the knot snugly to the edge of the fabric. This knot is what differentiates the buttonhole stitch from a blanket stitch and provides its superior strength.
3.4 Step 4: Continue stitching
Repeat the process outlined in Step 3. Insert the needle down just outside the marked line, bring it back up inside the buttonhole opening, loop the working thread behind the needle, and pull through to create the knot at the fabric edge. Maintain consistent spacing between stitches and even thread tension control. This ensures a neat and uniform appearance.

3.5 Step 5: Stitching around corners
- Square corners: To create a sharp, square corner, work your last stitch on one side straight out from the corner point. Then, insert the needle at a 90-degree angle to begin the next side, continuing the buttonhole stitch as usual. This creates a reinforced corner.
- Rounded corners (tailor’s buttonhole style): For a rounded corner, gradually fan out your stitches. As you approach the curve, slightly angle your needle outwards with each stitch. This creates a series of stitches that radiate from the corner point, providing a smooth, curved edge.
Once you’ve stitched around the entire buttonhole, secure the thread. Bring the needle to the back of the fabric. Make a few small, inconspicuous stitches to anchor the thread, then tie a knot close to the fabric. Trim the excess thread.
3.7 Step 7: Ending and starting new thread (if needed)
To end a thread, secure it on the back of the fabric with a few small stitches. To start a new thread, bring the needle up through the opening, catching the last stitch so the new thread locks with the previous one. Using a running stitch to change the thread helps to keep it seamless.
4. Buttonhole stitch variations
The tailor’s buttonhole stitch is a reinforced version of the basic buttonhole stitch, prized for its exceptional durability. It’s often used on tailored garments and areas that experience significant stress. The key difference lies in an extra knot created before each stitch is pulled tight. This adds an extra layer of security, making the buttonhole even more resistant to wear and tear.
4.2 Buttonhole bars
Buttonhole bars are short, straight stitches used to reinforce the ends of a buttonhole, particularly on heavier fabrics or areas prone to high stress. These bars are typically created using a few straight stitches worked perpendicular to the buttonhole opening, effectively creating a “bar” that prevents the fabric from tearing.
4.3 Buttonhole wheels
Buttonhole wheels, also known as round buttonholes, are circular variations of the buttonhole stitch. They’re often used for decorative purposes in embroidery and needlework, or for small, round buttons. The stitches radiate outwards from a central point, creating a wheel-like appearance.
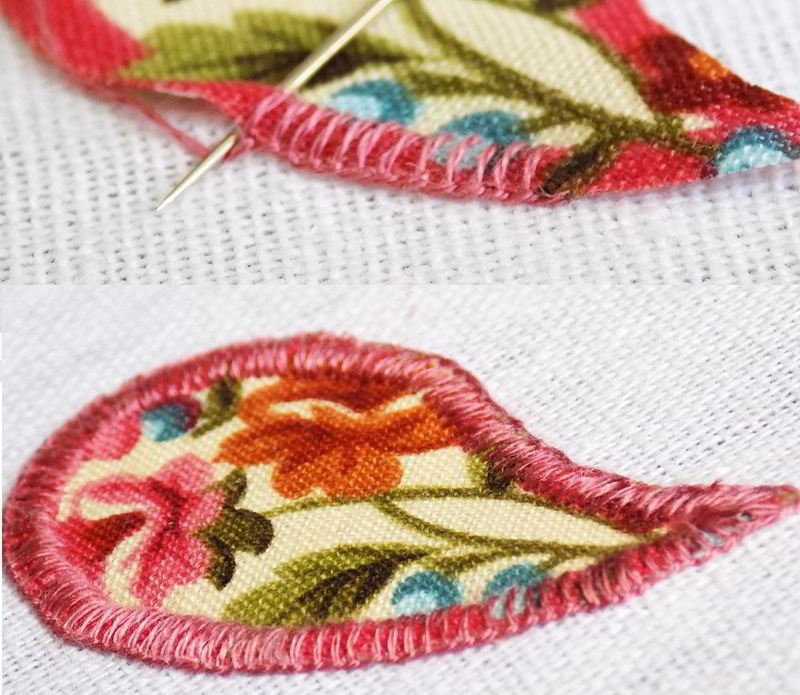
The buttonhole stitch is a popular choice for securing the edges of applique pieces. Its neat, knotted edge provides a clean finish and prevents the applique fabric from fraying. The stitch can be worked closely together for a solid outline or spaced further apart for a more decorative effect.
4.5 Decorative edging
The buttonhole stitch can be an elegant detail to any design. It can be seen used commonly to make the edging of a dress, a collar, or even a pocket. The buttonhole stitch offers a way to have the colors pop while maintaining structural integrity.
5. Troubleshooting common mistakes
- Uneven stitches
- Solution: Practice maintaining consistent spacing between stitches. Using a marked guideline or a running stitch outline can help.
- Loose tension
- Solution: Ensure you’re pulling the thread snugly after each stitch, creating a firm knot at the fabric edge. Thread tension control is key.
- Knots not forming correctly
- Solution: Double-check that you’re looping the working thread behind the needle before pulling it through. This is essential for creating the characteristic buttonhole knot.
- Fabric puckering
- Solution: Use interfacing to stabilize the fabric, especially on delicate or loosely woven materials. Avoid pulling the thread too tightly.
- Thread breaks
- Solution: This could be due to old or poor-quality thread. Also, try working with shorter lengths of thread (about 18 inches) to reduce friction and wear as you sew. Ensure the eye of your needle is smooth and not damaged.
- Buttonholes: The primary and most obvious application is creating durable and functional buttonholes on garments and other textile projects.
- Applique: Securing the edges of applique pieces, providing a clean and decorative finish.
- Edge finishing: Reinforcing and finishing raw fabric edges, preventing fraying and adding a decorative touch. This technique can be used on hems, collars, and pockets.
- Embroidery: Incorporating the buttonhole stitch into embroidery designs for textural and decorative effects. A valuable technique for needlework.
- Cutwork: Used in cutwork embroidery to reinforce the edges of cut-out areas in the fabric.
- Needle lace: A foundational stitch in some forms of needle lace.
7. Tips for different fabric types
- Delicate fabrics (silk, satin): Use a fine needle and thread. Interfacing is highly recommended to prevent stretching and distortion. Consider using a silk thread for a luxurious finish.
- Loosely woven fabrics (linen, burlap): Interfacing is essential to provide stability. A slightly thicker thread, like pearl cotton, may be preferable. A running stitch outline can also help control fraying.
- Thick fabrics (denim, canvas): Use a stronger needle and thread, such as heavy-duty cotton or upholstery thread. You may need to use pliers to pull the needle through, especially at corners.
- Stretch fabrics (knitwear): A ballpoint needle is recommended to prevent snagging. Use a thread with some elasticity, such as polyester. Avoid pulling the stitches too tightly, as this can cause the fabric to pucker.
- Felt: When working with non-fraying fabrics, you can choose to forgo interfacing.
8. Related questions
Most modern sewing machines have a built-in buttonhole function. However, a hand-sewn buttonhole stitch offers greater control and a more tailored finish, particularly for delicate fabrics or couture garments.
The key difference is the knot. A buttonhole stitch has a knot at the edge of the fabric, providing superior strength and preventing unraveling. A blanket stitch lacks this knot.
Consider the fabric type and the desired appearance. Embroidery floss or pearl cotton offers strength and a slightly raised look. For delicate fabrics, a fine silk thread may be preferable.
Interfacing is the best solution for preventing fraying. You can also use a running stitch outline as a guide and to further secure the fabric edges.
Consider the tailor’s buttonhole because of its extra knot.
Read more:
The buttonhole stitch is a fundamental hand-sewing technique with a surprisingly wide range of applications, from its namesake function to decorative embellishments. By mastering this versatile stitch, you’ll gain a valuable skill that enhances the durability and aesthetic appeal of your sewing projects.
While it may seem challenging initially, consistent practice and attention to detail will lead to neat, professional-looking results. Experiment with different variations and applications to fully explore the creative potential of the buttonhole stitch.


