


Creative Ways to Display Iron-On Patches: Ideas and Tips


Iron-on patches offer a versatile medium for personalization, branding, and creative expression on apparel, accessories, and even decor. Understanding application and display options helps businesses and individuals maximize the impact of these embellishments.
This guide explores the fundamentals of patch application, diverse display methods from wearable flair to static art, and essential tips for achieving durable, professional results, helping you turn simple patches into compelling visual statements.
1. Unleashing the Potential of Your Patches
1.1 The Science of Adhesion: How heat activation works with adhesive backing
At its core, an iron-on patch relies on a layer of heat-activated adhesive applied to its back. This adhesive backing is a specific type of thermal glue designed for textiles. When sufficient heat is applied, typically from a household iron or heat press, the solid adhesive melts and transforms into a liquid state.
This allows the molten glue to flow and penetrate the fibers of the fabric surface underneath. As the patch and fabric cool, the adhesive solidifies, creating a physical interlock between the patch and the material. This solidification creates a strong bond, securing the patch to the material.
1.2 Fabric & Material Compatibility
Successful garment customization with iron-on patches hinges on fabric compatibility. The surface material must withstand the heat required for adhesion without damage.
Ideal Fabrics:
- Denim: Strong, stable weave, excellent heat tolerance.
- Canvas: Durable and heat-resistant, provides a solid base.
- Cotton & Cotton Blends (non-stretch): Generally handle heat well, common in textile crafts.
- Stable Polyester Blends (check label): Some blends tolerate medium heat.
Challenging Materials (Avoid Ironing or Use Alternatives):
- Heat-Sensitive Synthetics (Nylon, Rayon, Vinyl, most Polyester): Risk melting, warping, or scorching under direct iron heat.
- Textured Fabrics (Corduroy, Velvet, Heavy Knits): Uneven surface hinders proper adhesion.
- Delicate Fabrics (Silk, Lace): Cannot withstand the required heat and pressure.
- Leather & Faux Leather: Prone to melting, scorching, or becoming brittle. Sewing or specialized leather glue is recommended.
- Stretch Fabrics (Spandex/Lycra blends): Heat can damage elasticity; stretching during application causes puckering.
Always check the garment’s care label for heat limitations before attempting application. Non-fabric surfaces require different types of adhesives entirely.
| Ideal Fabrics (Iron-On) | Challenging Materials (Avoid Ironing/Use Caution/Alternatives) |
|---|---|
| Denim | Nylon, Rayon, Vinyl, 100% Polyester |
| Canvas | Corduroy, Velvet, Heavy Knits |
| Cotton & Stable Cotton Blends | Silk, Lace, Delicate Synthetics |
| Some Polyester Blends (Test First) | Leather, Faux Leather (Sew or Use Specific Glue) |
| Fabrics with Spandex/Lycra (Risk Puckering/Damage) | |
| Waterproof or Coated Fabrics |
1.3 The Crucial Step: Testing Application on a Hidden Area.
Before committing a patch to its final location, testing application on an inconspicuous part of the garment is essential. This preliminary step prevents potential disasters like scorching, melting, or discovering poor adhesion only after ruining the main item.
Testing confirms that the specific fabric can handle the heat setting and that the patch adheres correctly using your chosen application method. Ideal test spots include an inside seam allowance, the back of a hem, or a matching fabric scrap if available.
A quick press in the hidden area provides valuable feedback without visible consequences, acting as crucial troubleshooting before the main event. For businesses managing inventory, this step protects valuable stock from damage.
2. Wearable Displays: Showing Off Patches on Apparel & Accessories
2.1 The Iconic Jacket or Vest (Denim Dominance & Alternatives)
The patched denim jacket or vest remains a quintessential canvas for self-expression. Alternatives like sturdy canvas or cotton twill jackets also work well. Effective patch arrangement involves thoughtful placement: consider balance (symmetrical or asymmetrical), flow, and whether the patches collectively tell a story or represent a theme. Plan the layout before applying.
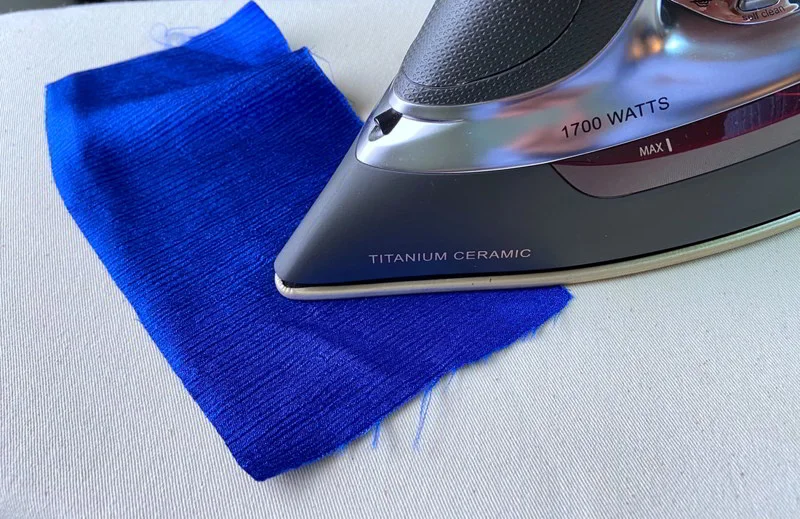
For attaching iron-on patches using a household iron:
- Prep: Ensure the garment surface is clean, dry, and wrinkle-free. Pre-heat the area slightly.
- Position: Place the patch precisely where desired.
- Protect: Cover the patch with a thin pressing cloth (like a cotton pillowcase or parchment paper) to prevent scorching.
- Press: Apply firm, even pressure with the pre-heated iron (check patch instructions for temperature/time – typically 15-30 seconds). Hold the iron still; do not slide it around.
- Check: Carefully lift the iron and cloth. Gently check the edges of the patch. If lifting occurs, re-cover and press again for 10-15 seconds.
- Cool: Allow the patch and garment to cool completely before moving or wearing. This sets the bond.
For enhanced durability, especially for items intended for sale or heavy use, consider the sewing advantage. A simple running stitch or whip stitch around the patch perimeter provides a truly permanent attachment.
2.2 Customizing Shirts, Hoodies & Sweatshirts
Popular placements on T-shirt and Hoodie styles include the chest pocket area, sleeves (bicep or forearm), upper back, or front chest. Challenges arise with thinner fabrics, where adhesive might show through slightly, or with stretchy knits, which can pucker if overheated or stretched during application.
Always use a pressing cloth. Select the appropriate heat setting, ensuring the garment structure is flat and relaxed (not stretched) while pressing. Light pressure and slightly shorter pressing times may be needed for delicate knits compared to sturdy denim.
2.3 Personalizing Bags, Totes & Backpacks
Begin with thorough surface prep: clean the area on the Backpack or Tote Bag where the patch will go. Ironing can be tricky due to seams and construction. If possible, create a flat, firm ironing surface inside the bag using a rolled-up towel or a pressing block.
Due to the significant wear and tear bags endure, achieving secure adhesion is critical. To ensure durability, strongly consider reinforcing iron-on patches by sewing patches on, especially around edges, on straps, or in areas subject to flexing.
2.4 Accessorizing Hats & Caps
Applying patches to the curved surfaces of a Hat or Cap presents a challenge for standard ironing. Using a tailor’s ham or a tightly rolled towel placed inside the cap can provide necessary support. Small patches that are relatively flexible conform better to curves.
For structured caps or difficult curves, sewing patches on or using a strong fabric glue specifically designed for textiles often yields better, more reliable results than ironing alone.
2.5 Flair on Footwear & Small Gear
Patches can add unique flair to canvas Shoes (like sneakers) or fabric sections of small accessories. However, the constant flexing of footwear means standard iron-on adhesive might not offer long-term durability. For shoes or items like fabric phone cases, a flexible fabric glue (such as E6000 Fabri-Fuse or similar) is often a superior choice.
Creative placement ideas include the shoe tongue, heel tab, or outer side panels. Ensure the surface is clean before applying any adhesive.

3. Static Displays: Integrating Patches into Decor & Creative Projects
3.1 Framing Your Patches: From Simple to Showcase
Displaying patches as wall art elevates them from simple embellishments to collectible items. A single, significant patch can be mounted and placed in a simple Frame. Alternatively, create a patch collage display within a larger frame. For thicker, embroidered patches, a Shadow box offers depth and protection, transforming patches into a collectible patch display. Effective mounting techniques include:
- Pinning patches onto a fabric-covered backboard (foam core wrapped in fabric).
- Using archival double-sided tape sparingly on the back of the patch (not ideal for long-term preservation unless tape is acid-free).
- Applying small dots of fabric glue to affix the patch to a backing material within the frame.
3.2 Crafting Patch Banners & Wall Hangings
Create a custom Patch banner or Wall Hanging for a personalized piece of textile art.
- Choose Base: Select base materials like felt, canvas, denim, or burlap, considering weight and how it will hang.
- Plan Layout: Sketch your layout design first, arranging patches for visual appeal.
- Attach Patches: Either iron patches directly onto the banner fabric (best for flat patches and stable fabrics) or sew them on (recommended for longevity, mixed patch types, and less heat-stable banner fabrics).
- Finish for Hanging: Fold over the top edge and sew a channel to insert a dowel rod. Alternatively, add grommets or sew simple fabric loops for hanging. This DIY patch display method offers great creative freedom.
3.3 DIY Patch Display Boards
Several DIY patch display board ideas cater to different needs:
- Corkboard: The simplest method involves a standard Corkboard. Patches are attached using pinning patches with decorative pins, allowing for easy rearrangement and temporary adhesion.
- Fabric-Covered Board: Wrap a corkboard or foam board tightly with fabric (secured on the back with staples or glue). This provides a more customized aesthetic background for pinning patches.
- Magnetic Display: Paint a board with magnetic paint or cover a sheet metal piece with fabric. This requires patches with magnetic backing or gluing small, strong magnets to the back of standard patches.
Each patch display board method offers a trade-off between flexibility (corkboard) and integrated aesthetics (fabric-covered or magnetic).
3.4 Decorative Textiles: Custom Patch Pillows & Blankets
Transform plain pillow covers or quilt blocks into unique home decor items. A patch cushion or patch blanket (sometimes called a memory quilt) can showcase travels, hobbies, or achievements. Plan the layout carefully before attaching patches.
For items that will be handled or washed, sewing patches on is strongly recommended. Iron-on adhesive can degrade or loosen with repeated laundering, whereas sewing ensures permanence. This approach allows businesses to create distinct textile products.
3.5 Unique Surfaces: Patches on Furniture & Beyond
Explore unconventional craft technique applications by adding patches to unexpected surfaces. Consider fabric lampshades, wooden keepsake boxes, or even fabric inserts on upcycled furniture. Standard iron-on methods are unsuitable for these materials.
Instead, use strong craft adhesives appropriate for both the patch backing and the target surface (e.g., E6000, specific wood glues, or fabric glues designed for non-porous surfaces). This technique allows for unique personalization.
4. Curating & Preserving Your Patch Collection
4.1 Dedicated Shadow Boxes: Protecting Prized Patches
For valuable patches or cherished memorabilia preservation, a Shadow box offers significant protection. Enclosing patches shields them from dust accumulation and physical damage. Opting for UV-protective glass or acrylic further safeguards against fading caused by light exposure (UV protection).
Within the box, arrange patches thematically or chronologically using archival mounting methods like pinning to an acid-free backing board.
4.2 Patch Books, Binders & Albums
A patch display book, scrapbook, or binder system provides excellent organization, especially for larger collections. Utilize archival-safe sleeves or plastic pocket pages (similar to those for trading cards) within binders. Patches can be easily slipped into pockets, protecting them from handling oils and dirt while allowing viewing (even both sides if applicable).
This method facilitates easy rearrangement and offers a scalable patch collecting showcase.

4.3 Open Display Methods: Shelves & Cabinets
Patches can be integrated into broader collection display furniture, positioned on shelves or inside glass cabinets alongside other collectibles. They might be propped up on small stands or mounted temporarily on cards.
However, this method leaves patches vulnerable to dust exposure and potential fading from ambient light exposure unless the cabinet offers UV filtering. Open display is generally better suited for less valuable patches or in environments with controlled light and dust levels.
5. Pro Tips for Flawless Application & Lasting Displays
5.1 Mastering the Iron-On Technique
Successful iron-on application depends on balancing three key elements:
- Heat: Use the correct temperature setting recommended for both the patch adhesive and the fabric type (always check instructions and test first). Heat must be sufficient to melt the glue fully.
- Pressure: Apply firm, even pressure across the entire patch surface. This ensures the melted adhesive penetrates the fabric fibers effectively. Avoid uneven pressure.
- Time: Maintain heat and pressure for the recommended duration (often 15-30 seconds initially). This allows complete melting and bonding. Hold the iron stationary; do not slide it back and forth like regular ironing. Always use a pressing cloth between the iron and the patch/garment.
5.2 The Sewing Advantage Revisited
While iron-on provides convenience, the sewing advantage offers superior durability. Consider adding stitches when:
- Maximum longevity is crucial (essential for business quality items intended for sale).
- Attaching large or heavy patches that might peel under their own weight.
- Applying patches to non-ironable or heat-sensitive fabrics.
- Placing patches on high-stress areas (knees, elbows, bag straps).
- The iron-on bond weakens or fails over time due to washing or wear.
A simple running stitch or whip stitch around the border using matching or contrasting thread provides a secure, long-lasting hold. Sewing patches demonstrates a commitment to quality.
5.3 Design Principles for Impact
Effective patch placement tips go beyond simply sticking them on. Consider basic design principles for better visual storytelling and impact:
- Layout: Plan your patch arrangement techniques before applying. Lay patches out to visualize the final look.
- Balance: Decide between symmetrical (formal, balanced) or asymmetrical (dynamic, casual) arrangements.
- Grouping: Consider clustering patches by color palette or theme for coherence.
- Negative space: Avoid overcrowding. Leaving some empty space (“breathing room”) around patches often enhances their visibility and the overall design.
Ultimately, let personal style guide the final arrangement.
5.4 Care & Maintenance
Proper patch maintenance extends the life of both the patch and the garment. Follow these washing instructions for clothing with iron-on patches:
- Turn the garment inside out before washing.
- Use cold water and a gentle wash cycle.
- Choose a mild laundry detergent.
- Hang dry whenever possible. If machine drying is necessary, use the lowest heat setting (tumble dry low). High heat can weaken or reactivate the adhesive.
For static displays like framed patches or display boards, regular dusting with a soft cloth is usually sufficient.
5.5 Troubleshooting Common Issues
Encountering issues during application? Here’s some quick troubleshooting:
- Patches not sticking: Verify the iron temperature is correct for the patch/fabric. Ensure firm pressure was applied evenly for the full duration. Confirm fabric compatibility (avoid heat-sensitive or textured materials). Was the surface clean and dry? Try re-pressing, ensuring good contact.
- Corners lifting: This often indicates insufficient heat or pressure at the edges. Re-cover with the pressing cloth and press firmly again, focusing specifically on the lifting corners for 10-15 seconds. If problems persist, adding a few stitches at the corners is a reliable fix.
- Scorch marks: Prevention is the best approach: always use a pressing cloth and the correct temperature. Light marks on durable fabrics might sometimes fade with washing, but severe scorch marks are often permanent damage. Test heat settings diligently.
6. Related Questions
6.1 Can iron-on patches be removed?
Yes, patch removal is often possible by reheating the patch area with an iron (using a pressing cloth) to soften the adhesive. Once hot, carefully peel the patch away using tweezers (be cautious of heat). However, adhesive residue frequently remains on the fabric, which can be difficult to remove completely.
Attempting removal also carries a risk of damaging delicate or heat-sensitive fabrics. Specialized adhesive removers exist but should be tested first as they can cause discoloration.
6.2 How should I wash clothing with iron-on patches?
To properly wash clothing with iron-on patches and maximize their lifespan, always turn the garment inside out. Use a cold wash setting on a gentle cycle with mild detergent. Avoid bleach. Preferably, air dry the garment by hanging or laying flat. If machine drying is unavoidable, use the lowest heat setting, as high heat can compromise the adhesive bond over time.
6.3 What if my iron-on patch isn’t sticking properly?
If a patch not sticking occurs, review the core application factors:
- Was the iron temperature adequate for the specific patch adhesive and compatible with the fabric?
- Was firm pressure applied evenly across the entire patch for the recommended time?
- Is the fabric suitable for ironing?
- Was the application surface clean?
Try re-pressing carefully, focusing on any lifting edges. If adhesion remains poor, sewing the patch on is the most secure solution.
6.4 Are iron-on patches truly permanent?
Iron-on patches create a strong, semi-permanent bond that is durable for many applications. The actual permanence depends on factors like the quality of the adhesive, the fabric type, the application technique, and how the item is washed and worn.
Over time, especially with frequent washing or heavy use, edges may begin to lift. For guaranteed permanence, especially on items subjected to stress or regular laundering, reinforcement through sewing is recommended.
6.5 Can you iron patches onto heat-sensitive fabrics like nylon or polyester?
Applying iron-on patches directly to heat-sensitive fabrics like nylon, most polyester, rayon, or vinyl is generally not recommended due to the high risk of melting, scorching, or warping the material. While testing on a hidden area using the lowest possible iron setting and a pressing cloth might be attempted with extreme caution, sewing or using an appropriate cold-application fabric glue are significantly safer and more reliable methods for attaching patches to these types of fabrics.
Read more:
From classic denim jackets to custom home decor, iron-on patches provide a powerful tool for personalization and branding. By understanding the nuances of heat adhesion, fabric compatibility, and various display techniques – both wearable and static – you can effectively showcase patches with creativity and confidence.
Whether aiming for temporary flair or permanent embellishment, mastering application methods and considering thoughtful arrangement ensures your patches tell their intended story clearly and durably. Embrace the versatility of patches to add unique character to apparel, accessories, and creative projects.


