


Creative Ways To Patch Jeans: 6 Styles, DIY And Custom Ideas


A rip in your favorite jeans doesn’t have to be the end. This guide explores creative ways to patch denim, turning tears into stylish details that showcase your personality. From simple DIY techniques to a polished, professional finish with custom patches from Packlove, you’ll learn how to give your denim a second life that’s even more stylish than the first.
1. Cool reasons to patch your jeans creatively
Patching your jeans is more than just fixing a tear. It’s a chance to be creative and make something new and unique.
- Express your unique style: patching lets you show off your personality and make your jeans one-of-a-kind. It’s a simple way to achieve apparel customization.
- Sustainable fashion: fixing clothes is good for the Earth. This kind of sustainable repair means you use your jeans longer, which helps reduce waste and is a great way of upcycling denim garments.
- Save money: it’s simple logic that fixing jeans usually costs less than buying a new pair. This practical benefit is hard to ignore.
- Fun DIY project: patching can be a fun and satisfying DIY project. You get to make something cool with your own hands and add a personal touch to your clothing.
- Transform rips into features: a rip doesn’t have to be an eyesore. With creative patching, often called visible mending, the damage can become a stylish and deliberate design element.
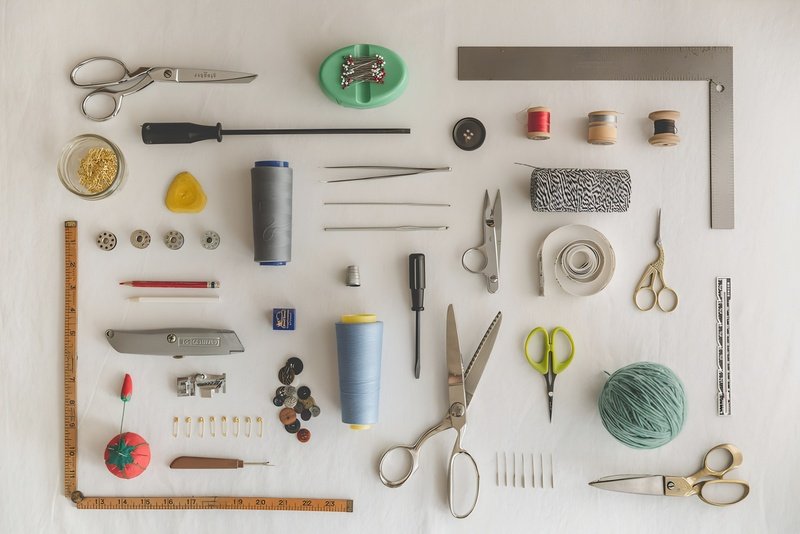
2. What you need for your jean patching project
Before you start your jean patching adventure, let’s gather some basic tools and materials. Having these on hand will make the process much smoother.
- Basic sewing kit: you’ll need needles and thread. Scissors are for cutting fabric, and pins help hold your patch in place while you work.
- Fabric scraps: look for old denim, colorful cotton pieces, or any patterned fabric. Old clothes you don’t wear anymore or small pieces of leftover fabric are perfect.
- Interfacing: this is a special fabric that can make your patch a bit stiffer or add an adhesive layer for iron-on patches. It isn’t always needed but can be helpful for a more structured result. You can learn more about interfacing here.
- Measuring tools: a ruler or measuring tape will help you cut patches to the right size.
- Marking tools: chalk or a fabric pen is useful for drawing lines on fabric before cutting or sewing.
- A professional touch: for a truly special and polished look, consider our custom options.
3. Fun ways to patch your jeans
Ready to get creative? Here are some fun ways to patch your jeans, with easy steps to follow for each technique.
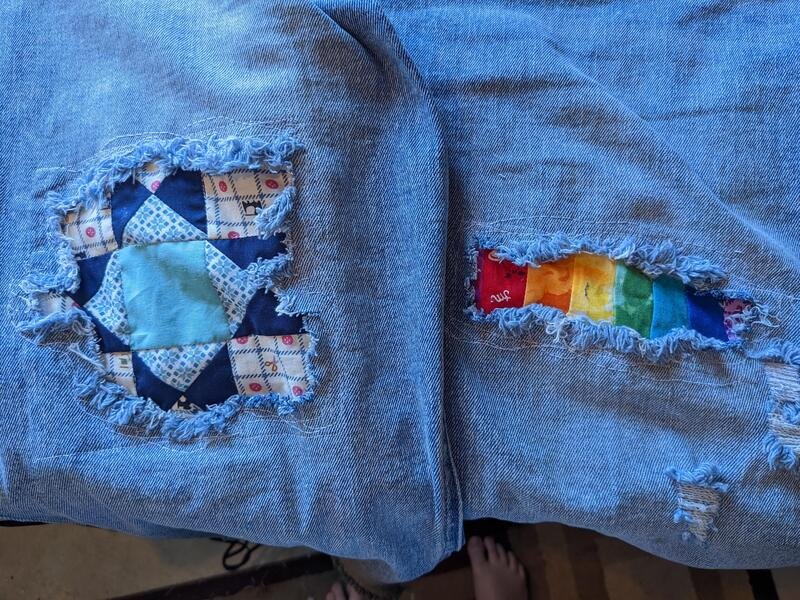
3.1. The inside denim patch
This method provides a strong, subtle repair that doesn’t show much from the outside. It’s great for a clean look or when you don’t want the patch to be a major design feature.
Materials needed: a scrap of denim fabric and thread that matches your jeans.
Step-by-step instructions:
- Clean the rip: first, trim any long, loose threads around the hole for a clean working area.
- Cut your patch: next, cut a piece of denim fabric that is about 1 inch (or 2.5 cm) larger than the hole on all sides.
- Place and pin: turn your jeans inside out and place the denim patch over the hole from the inside. Use pins to keep it securely in place.
- Sew: sew the patch on by hand or with a sewing machine. Stitch all around the edges of the patch. For extra strength, you can also sew back and forth across the hole itself.
3.2. Fun fabric patches on the outside
This method is all about making the patch a cool design element using the principle of visible mending. Use a colorful or patterned fabric on the outside of your jeans to make them stand out.
Materials needed: a fabric scrap of your choice and thread (either matching or a contrasting color for a bold look).
Step-by-step instructions:
- Choose your fabric: pick a fabric that you like. It can be bright, have a fun pattern, or a nice texture.
- Cut your patch: decide on a shape. It can be a simple square or circle, or something more creative like a heart or star. Make sure it’s larger than the hole.
- Finish patch edges: for a neat look, you can fold the edges of your patch under by about 1/4 inch (0.5 cm) and press them with an iron. Alternatively, leave the edges raw for a casual, frayed look.
- Place and pin: put the patch on the outside of your jeans over the rip and pin it in place.
- Sew with style: sew the patch on using a simple running stitch or a decorative stitch like a blanket stitch. Using a colorful thread for embroidery will make your stitches stand out.
3.3. Japanese sashiko stitching
Sashiko is a traditional Japanese mending technique that uses simple running stitches to create beautiful patterns. These stitches also reinforce the fabric, making this a form of visible mending that is both beautiful and functional.
Materials needed: Sashiko thread (or embroidery floss), a fabric patch for backing, and a suitable needle.
Step-by-step instructions:
- Back it up: place a piece of fabric on the inside of your jeans, under the ripped area. This is your backing patch. Pin it in place.
- Plan your pattern: Sashiko often uses patterns of straight lines, grids, or waves. You can lightly draw your pattern on the jeans with fabric chalk.
- Start stitching: use a simple, long, and even running stitch. Sew rows of these stitches over the rip and the backing fabric, following your pattern. The stitches should go through both the jeans and the backing patch.
3.4. Embroidery magic
Embroidery can be used to fix small holes or to decorate around bigger rips, adding a delicate and artistic touch. This is a great way to turn a repair into a feature.
Materials needed: an embroidery hoop, embroidery floss in various colors, and an embroidery needle.
Step-by-step instructions:
- Hoop it: place the ripped part of your jeans into an embroidery hoop, ensuring the fabric is smooth and tight.
- Choose your design: for small holes, you can fill them with a satin stitch. Around bigger rips, you can create a border or embroider small shapes like flowers, leaves, or stars.
- Stitch away: carefully embroider over the holes or around the edges of the rip. You can add more stitching nearby to make it look like a planned design.
3.5. Iron-on patches
This is often the fastest and easiest way to patch jeans, making it a great no-sew option for beginners or for a quick fix. An iron-on patch with adhesive on the back is all you need.
Materials needed: an iron-on patch, an iron, and a pressing cloth (like a tea towel or parchment paper).
Step-by-step instructions:
- Clean and flat: ensure the area on your jeans is clean and flat. Iron it first if it’s wrinkled.
- Position patch: place the patch where you want it, with the adhesive side down against the fabric.
- Press with iron: cover the patch with your pressing cloth. Heat your iron to the recommended temperature (usually a cotton setting, no steam). Press the iron firmly onto the patch for about 15-30 seconds.
- Cool down: let the area cool completely before checking if the patch is securely attached.
For patches on high-stress areas like knees, it’s a good idea to add a few simple stitches around the edges after ironing for extra durability.
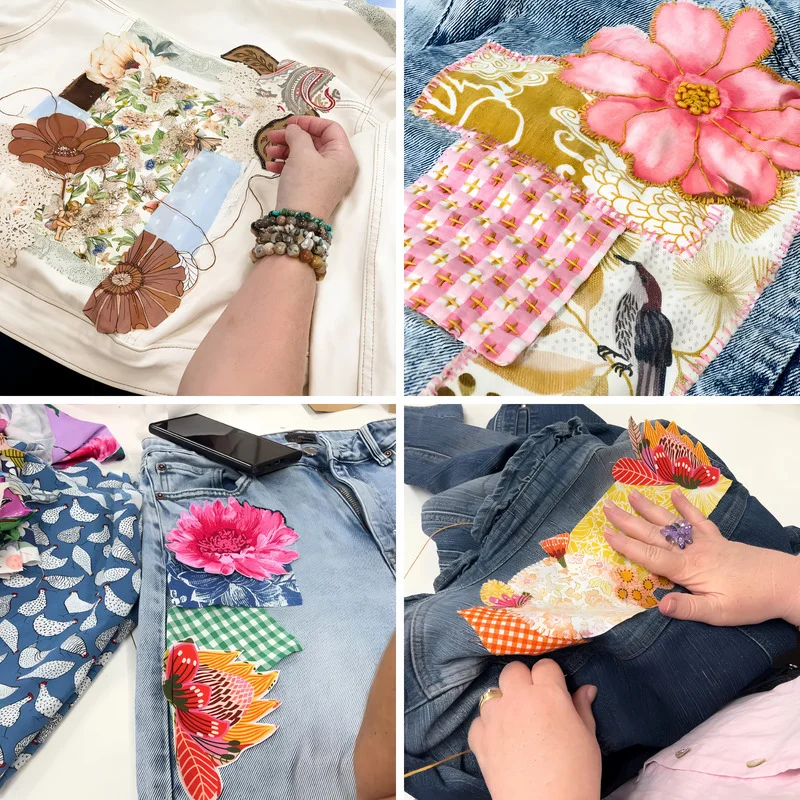
3.6. Layered patches for a cool 3D look
This technique involves using multiple patches of different fabrics, shapes, and sizes, layered on top of each other. This creates interesting textures and a 3D effect for a bolder, more artistic style.
Materials needed: various fabric scraps (denim, lace, canvas), different threads, and optional embellishments like buttons or beads.
Step-by-step instructions:
- Plan your layers: think about how you want your layered patch to look. Usually, the biggest patch goes on the bottom.
- Start with the base: attach your first (bottom) layer patch over the rip by sewing it on.
- Add more layers: now, add smaller patches on top of the base patch, sewing each one on. You can vary the stitches and leave some edges raw for more texture.
- Add details: you can add more details like decorative hand-stitching, frayed edges, or even sew on a small button as a final touch.
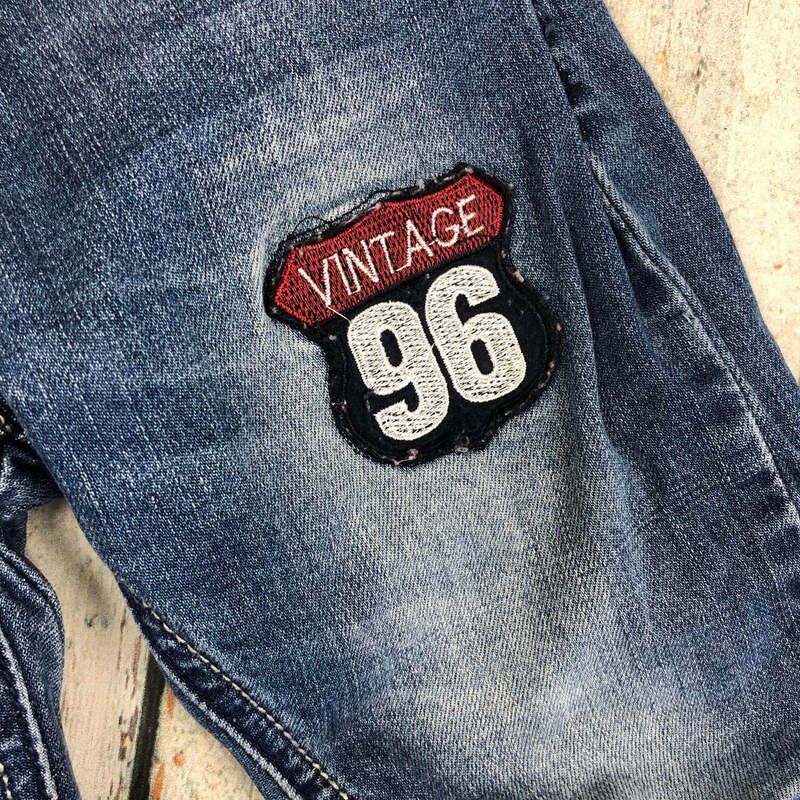
4. A professional finish with Packlove custom patches
While DIY patches are full of charm, sometimes you want a polished, high-end look that turns your repair into a true design statement. This is where custom patches from Packlove can elevate your project from crafty to designer-quality.

4.1. Custom woven patches
For a sophisticated touch, our custom woven patches are an ideal choice. Woven with fine threads, they capture intricate details and small text with incredible sharpness. They are soft, flexible, and durable, perfect for adding a subtle logo or a detailed piece of art. Choose a damask weave for maximum detail or satin for a smooth, elegant sheen. They are best attached by sewing.
4.2. Custom rubber patches
For a bold, modern, and tactile feel, our custom rubber patches are unmatched. Made from flexible PVC or Silicone, they can be designed with a cool 3D effect that literally stands out. They are waterproof and extremely tough, making them perfect for high-wear areas like knees or for adding a rugged, contemporary edge to your jacket. A built-in “sewing channel” makes them easy to stitch on.
4.3. Custom heat transfers
Have a photorealistic image or a design with complex color gradients? Our custom heat transfers are the perfect solution. They offer vibrant, full-color designs with a simple, no-sew iron-on application. For a unique twist, you can iron the transfer onto a piece of canvas or twill first, then cut it out and sew it on as a custom-printed patch with a fabric border.
5. Extra tips for awesome patched jeans
Here are a few more tips to make your patched jeans look amazing.
- Consider placement: think about where you put your patch. Knees, back pockets, and hems are popular spots. Aim for a look that feels balanced.
- Match or contrast thread: use matching thread if you want your stitches to blend in. Use a contrasting color if you want your stitches to be part of the design.
- Denim weight matters: for lighter-weight denim, try to use a patch that is also lightweight to avoid pulling or puckering.
- Wash care: to keep your patched jeans looking great, wash them inside out on a gentle cycle with cold water. Our woven, rubber, and well-applied heat transfer labels are durable. Learn more about how to wash jeans.
- Don’t be afraid to mix techniques: try putting an iron-on patch on a piece of fabric, then add embroidery around it before sewing the whole piece onto your jeans.
- Think about a theme: your patches can tell a story about a hobby, a place you love, or just colors and shapes that make you happy.
6. Your jean patching questions answered (FAQs)
6.1 Do I need a sewing machine to patch jeans creatively?
No, not at all. Many great techniques like hand-sewing, embroidery, Sashiko, and using iron-on patches don’t require a machine.
6.2. What’s the most durable way to patch jeans creatively?
A patch sewn on from the inside with strong stitches is very durable. For outside patches, sewing them on securely around all edges is key. Even iron-on patches are stronger with a few stitches added.
6.3 Can I use Packlove patches on stretchy jeans?
Yes. Our woven and heat transfer labels are flexible. For rubber labels, placing them on an area with less stretch is ideal. When sewing on stretchy fabric, don’t pull your stitches too tight.
6.4 How do I make my patches look stylish, not like a quick fix?
Treat your patch as a design choice. Choose colors and shapes you love, use neat stitching, and consider a unique custom patch from Packlove to make it look intentional and special.
6.5 What are the minimum order quantities for custom patches from Packlove?
We know many people just need a few patches for personal projects, so we offer small quantity options for many of our products. The exact minimum can vary, so check the product page or ask for a quote.
Explore more:
Mending denim is a celebration of sustainable style and personal expression. With these creative techniques, you can turn any tear into wearable art that tells your story. Ready to add that final professional touch? Explore Packlove’s range of custom woven, rubber, and heat transfer patches to make your next project truly stand out.


