


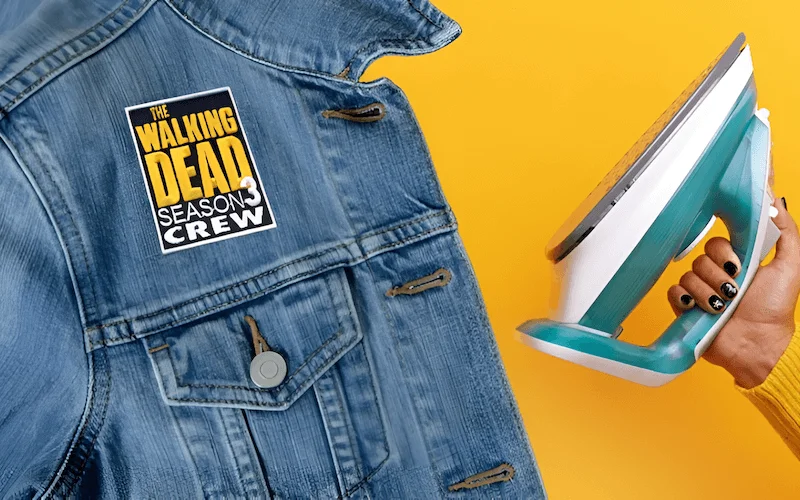
Cricut Patches: Design, Cut and Create DIY Fashion!


Tired of the same old mass-produced clothing and accessories? Want to add a unique, personal touch to your wardrobe, or offer your customers something truly special? Iron-on patches, combined with the magic of Cricut machines, are revolutionizing the DIY fashion world.
Custom patches (designs that adhere to fabric with heat) are allowing individuals and small businesses to create unique pieces, turning ordinary items into personalized statements. This article will guide you. Whether you’re a seasoned crafter or a complete beginner, this step-by-step guide will empower you to create your own stunning fabric embellishment and personalized clothing (clothing customized to individual preferences).
This will give you all the values and knowledge about designing, cutting, and applying iron-on patches using a Cricut. You’ll learn how to overcome common challenges, discover tips from those long in the trade, and create truly unique designs.
1. What are Iron-On Patches?
Iron-on patches are decorative pieces of fabric featuring a heat-activated adhesive backing (a sticky layer that melts and bonds with heat). This adhesive allows the patch to be permanently attached to another fabric surface using heat and pressure, typically from a household iron or a heat press. It is used to create accents on a variety of clothes. The method used to attach is called heat transfer (applying designs to materials using heat and pressure).
There are many benefits to choosing iron-on patches:
- Easy to apply
- No sewing experience needed
- Can be used on many items like jackets, bags, clothes, hats,…
Iron-on patches come in various materials, the most popular being Heat transfer vinyl (HTV) (a special type of vinyl with a heat-activated adhesive). Other options include embroidered patches with iron-on backing, and even patches made using sublimation printing.
They also offer a range of visual effects, from simple, solid colors to glitter, flocked (fuzzy texture), and even holographic finishes. Combining with a cutting plotter like a Cricut, custom cutting (cut the HTV sheet into the desired shape) to create a separate, unique iron-on patch becomes extremely easy.
This opens up great opportunities in the DIY fashion (creating and customizing clothing as a hobby) and allows for endless design (creating unique shapes and images) possibilities.
2. Materials and tools you’ll need
To embark on your iron-on patch journey, you’ll need the following materials and tools. Each plays a crucial role in ensuring a successful and professional-looking result:
Cricut Cutting Machine: This is your primary tool. Several models work well for this project:
- Cricut Maker Series (including Maker 3): Offers the most versatility, handling a wide range of materials, including thicker fabrics if you decide to create patches from materials other than HTV.
- Cricut Explore Air Series (including Explore 3): An excellent choice for cutting HTV and other common materials.
- Cricut Joy: A compact and portable option, perfect for smaller patches and on-the-go crafting.
Cutting Mat: This provides a stable, adhesive surface to hold your material in place during cutting.
- StandardGrip Mat: The go-to choice for most HTV projects.
Heat Transfer Vinyl (HTV): The core material for your patches. There’s a vast array of options available:
- Regular HTV: Comes in a wide variety of colors and finishes (matte, glossy).
- Glitter HTV: Adds sparkle and shine to your designs.
- Flocked HTV: Provides a soft, velvety texture.
- Specialty HTV: Includes options like holographic, metallic, and patterned vinyl.
Weeding Tool: A sharp, pointed tool used to remove the excess HTV that isn’t part of your design.
- Heat Source: You’ll need a reliable heat source to apply the patch:
- Cricut EasyPress (or other heat press): Provides consistent, even heat and pressure, ideal for professional results. Different sizes are available; consider the size of your typical projects.
- Household Iron: A viable option, but requires more care to ensure even heat distribution.
Cricut Heat Guide (or the Cricut Heat app): Essential for determining the correct temperature and time settings for your specific HTV and base material.
Base Fabric: The item you’ll be applying the patch to (e.g., t-shirt, tote bag, jacket, hat). Consider the fabric’s composition and heat resistance.
Optional – For Creating Sturdier Patches:
- Heat N Bond Ultrahold: An iron-on adhesive that can be applied to the back of felt or other fabrics to create a more substantial, sewable patch.
- Felt: Used as a backing material to give the patch more structure and durability.
Optional – For Advanced Techniques:
- Sublimation printing (transferring a design using heat and special inks): For high complex and colorful, detailed and photorealistic patches
- Sublimation printer
- Sublimation paper
Having all these materials and tools readily available will streamline the process and make your creative experience more pleasant.
3. Designing your patch in Cricut Design Space
Cricut Design Space is the software where you’ll bring your patch design to life. Here’s a step-by-step guide, perfect for beginners:
- New Project: Open Cricut Design Space and click on “New Project” to start a fresh canvas.
- Basic Shapes (Optional): If you want a simple shape like a circle, square, or star, click the “Shapes” icon on the left-hand toolbar and select your desired shape.
- Uploading Images (Optional): To use a pre-designed image or logo, click the “Upload” icon. Choose “Upload Image” and select the file from your computer. Design Space supports various file types, including SVG, PNG, JPG, and GIF.
- Adding Text (Optional): To add text to your patch, click the “Text” icon. A text box will appear. Type your desired text and choose your font, size, and style from the top toolbar.
- Combining Elements: Arrange your shapes, images, and text as desired. You can resize, rotate, and reposition elements using the handles that appear around them when selected.
- Welding (Important!): If your design consists of multiple overlapping elements that you want to cut as a single, continuous piece, you must use the “Weld” function. Select all the overlapping elements, then click the “Weld” button in the bottom right corner of the Layers panel. This merges them into one shape. Crucial Note: Welding is permanent, so double-check your design before welding.
- Attaching (For Multi-Layer Designs): If you have a design with multiple layers that you want to cut in specific positions relative to each other (but not merge), use the “Attach” function. Select all the elements you want to attach and click the “Attach” button (next to “Weld”). This keeps them together on the cutting mat.
- Creating an Offset (Optional, but Recommended): An offset creates a slightly larger outline around your design, making it easier to weed and giving the patch a more defined edge. Select your entire design, click the “Offset” button on the top toolbar, adjust the distance (smaller is usually better for patches), and choose “Apply”. Then, select the offset layer and your main design, and “Weld” them. This is a secret weapon for creating professional-looking patches!
- Mirroring (Essential for HTV!): Before cutting, you must mirror your design. In the “Make It” screen, toggle the “Mirror” switch for each mat that contains HTV. This ensures that your design is applied correctly when ironed on.
- Design Tips:
- Keep it simple: Intricate designs can be difficult to weed. Start with bold shapes and text.
- Consider the size: Think about the size of the item you’re applying the patch to. A large patch might look great on a jacket, but too small on a hat.
- Use contrasting colors: Choose HTV colors that will stand out against the background fabric.
- For Small Business: If the patch is meant for clothing items to be sold, ensure the design complements the overall aesthetic of the brand. Simple, elegant designs often appeal to a broader audience.
4. Cutting your design with cricut
With your design finalized and mirrored in Cricut Design Space, it’s time to cut! Here’s a step-by-step guide:
- Prepare Your HTV: Place your Heat Transfer Vinyl (HTV) onto the Cricut cutting mat. The crucial thing to remember is to place the HTV with the shiny side down (carrier sheet down) and the dull, adhesive side up. This is because the Cricut cuts the adhesive side, and the shiny carrier sheet acts as a transfer tape.
- Load the Mat: Align the top edge of the cutting mat with the guides on your Cricut machine and press the “Load/Unload” button (usually a double-arrow icon). The machine will pull the mat in.
- Select Material Settings: In Design Space, you’ll be prompted to select your material. Choose the appropriate HTV setting (e.g., “Everyday Iron-On,” “Glitter Iron-On,” “Flocked Iron-On”). If you’re using a non-Cricut brand of HTV, consult the manufacturer’s instructions for the recommended cut settings. You can also create a custom material setting if needed.
- Perform a Test Cut (Highly Recommended): Before cutting your entire design, always perform a test cut. Design Space has a built-in test cut feature (usually a small triangle and circle). This allows you to check if your blade and settings are correct without wasting a large piece of HTV. If the test cut doesn’t weed easily (meaning you can’t easily remove the excess vinyl), adjust the pressure or blade depth accordingly. Repeat the test cut until you achieve a clean cut.
- Initiate the Cut: Once you’re satisfied with the test cut, click the “Go” or “Cut” button (usually a Cricut logo) on your machine. The Cricut will begin cutting your design.
- Unload the Mat: After the cutting is complete, press the “Load/Unload” button again to release the mat.
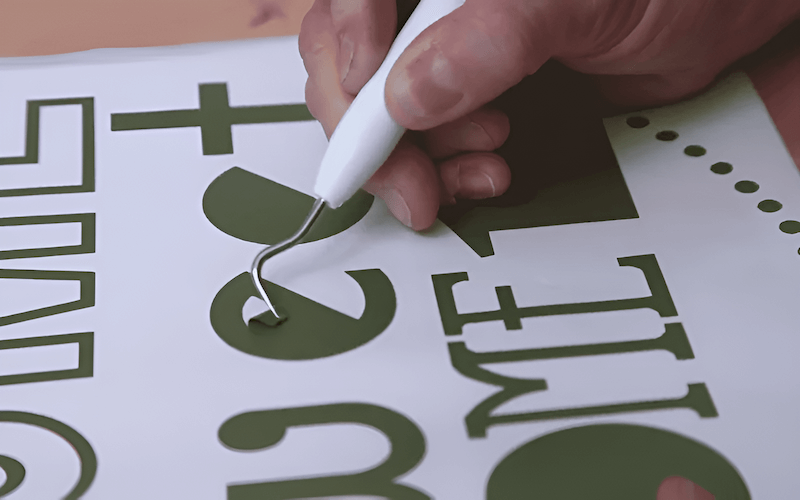
5. Weeding your design
Weeding is the process of removing the excess HTV that is not part of your final design. It’s like carefully peeling away the negative space, leaving only the desired image on the carrier sheet. Here’s how to do it effectively:
- Start with a Corner: Use your weeding tool (which looks like a small, sharp hook) to carefully lift a corner of the excess HTV outside of your design. Gently peel it away from the carrier sheet.
- Work Slowly and Methodically: Continue peeling away the excess HTV. For larger areas, you can often peel away larger sections. For smaller details, use the tip of your weeding tool to carefully lift and remove tiny pieces.
- Inside Letters and Shapes: Don’t forget to weed the “inside” parts of letters (like the insides of ‘O’, ‘A’, ‘B’, ‘P’, ‘R’, etc.) and any enclosed shapes within your design.
- Use Good Lighting: Weeding can be challenging, especially with intricate designs or dark-colored HTV. Ensure you have good lighting to clearly see the cut lines.
- Troubleshooting:
- HTV Lifting with the Carrier Sheet: If the HTV you want to keep starts lifting with the excess, it means it wasn’t cut deeply enough. You might need to increase your blade depth or pressure (and perform another test cut). Gently press the desired HTV back down onto the carrier sheet with your finger or the back of your weeding tool.
- Tiny Details: For extremely small details, use the tip of your weeding tool to “poke” the excess HTV and lift it away. Some people find it helpful to use a straight pin or needle for very fine details.
- Tearing HTV: Weeding tools can occasionally tear HTV. So using moderate force when removing excess HTV is important.
- The Final Result: Once you’ve removed all the excess HTV, you should be left with your design clearly visible on the shiny carrier sheet. The carrier sheet will hold all the pieces of your design in the correct position for application.
Weeding takes practice, so be patient with yourself, especially when starting out. With time and experience, you’ll develop a feel for it and become more efficient.
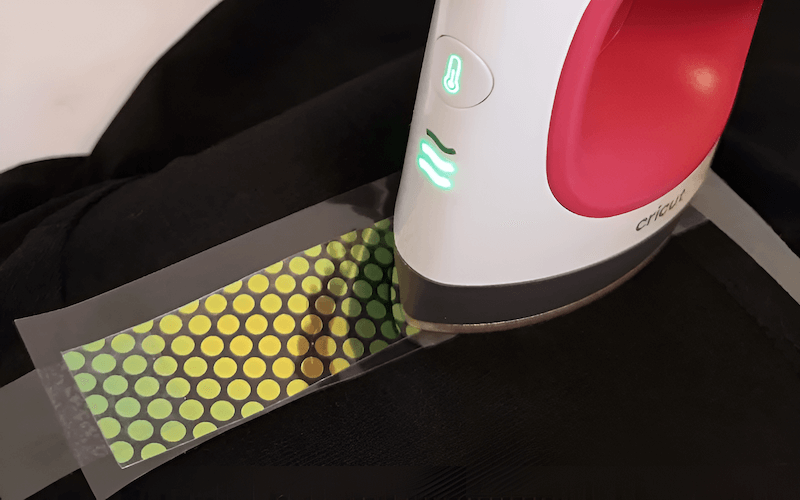
6. Applying your iron-on patch
This is where your hard work comes together! Applying the iron-on patch correctly is crucial for a durable and professional-looking result. We’ll cover two methods: using a Cricut EasyPress (or similar heat press) and using a household iron.
General Preparation (for both methods):
- Preheat your fabric: Before placing the patch, preheat the area where you’ll be applying it for a few seconds (according to the Cricut Heat Guide or your HTV manufacturer’s instructions). This removes moisture and wrinkles, creating a smooth surface for better adhesion.
- Position Your Patch Place the weeded design onto your fabric, with the shiny carrier sheet facing up. The HTV design should be directly against the fabric. Make sure it’s positioned exactly where you want it.
Method 1: Using a Cricut EasyPress (Recommended)
- Consult the Cricut Heat Guide: Go to the Cricut Heat Guide (online or in the Cricut Heat app). Enter your HTV type, base material, and the fact that you’re using an EasyPress. The guide will provide the precise temperature, time, and pressure settings.
- Set the Temperature and Time: Set your EasyPress to the recommended temperature and time.
- Apply Pressure: Place the EasyPress directly onto the carrier sheet, covering the entire design. Apply firm, even pressure for the recommended time. Avoid moving the EasyPress around during the pressing time, as this can cause the design to shift.
- Warm or Cold Peel: The Heat Guide will specify whether your HTV requires a “warm peel” or a “cold peel.”
- Warm Peel: Carefully peel away the carrier sheet while it’s still warm (but not hot).
- Cold Peel: Allow the carrier sheet and fabric to cool completely before peeling.
- Post-Press (Optional but Recommended): After removing the carrier sheet, place a piece of parchment paper or a thin pressing cloth over the design and press again for a few seconds (usually 10-15 seconds). This helps to further secure the HTV.
Method 2: Using a Household Iron
- Settings: Set your iron to the “Cotton/Linen” setting (usually the highest setting) without steam. Let it heat up completely.
- Pressing Cloth: Place a pressing cloth (a thin piece of cotton fabric, like a pillowcase or tea towel) over the carrier sheet. Never apply the iron directly to the carrier sheet or HTV.
- Apply Pressure: Press down firmly with the iron, covering the entire design. Use your body weight to apply as much pressure as possible. Hold the iron in place for the recommended time (consult your HTV manufacturer’s instructions, but generally 30-60 seconds for each section of the design). Unlike with the EasyPress, you will need to move the iron slightly to cover the entire patch, overlapping each section. Ensure you are applying heat to all areas of the patch design.
- Check Adhesion: After pressing, carefully lift a corner of the carrier sheet. If the HTV is sticking to the fabric, continue peeling. If the HTV is lifting with the carrier sheet, replace the pressing cloth and press again, applying more pressure and time.
- Warm or Cold Peel: Follow the manufacturer’s instructions for your specific HTV (warm or cold peel).
- Post-Press: Just like with the EasyPress, a post-press with parchment paper or a pressing cloth is recommended.
Troubleshooting (for both methods):
- Patch Not Sticking: Ensure you’re using enough pressure and heat. Preheating the fabric is also crucial. Double-check your HTV’s instructions.
- HTV Melting or Discoloring: You may be using too much heat or pressing for too long. Reduce the temperature or time and try again.
- Carrier Sheet Sticking: If the carrier sheet won’t peel off, you may have the wrong peel type (warm vs. cold). Let it cool completely and try again.
Optional: Adding a Felt Backing (for extra durability)
- Cut a piece of felt slightly larger than your finished patch
- Apply the patch to fabric.
- Turn item inside out.
- Apply Heat’N Bond on felt.
- Apply felt on top of patch (where it is visible from the inside of the garment).
- Iron.
By following these detailed instructions and troubleshooting tips, you’ll be able to apply your iron-on patches with confidence and achieve professional-looking, long-lasting results.
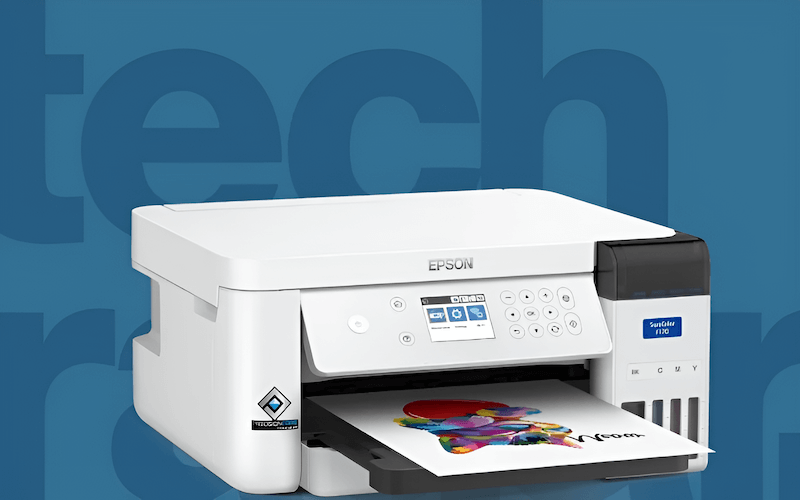
7. Creating Sublimation Patches with Cricut (Optional)
This section explores a more advanced technique: creating sublimation patches. Important Note: This method is significantly different from using HTV and requires specialized materials and equipment. It’s ideal for achieving vibrant, full-color, and highly detailed designs.
What is Sublimation?
Sublimation printing (transferring a design using heat and special inks) is a process where special inks are printed onto sublimation paper and then transferred to a polyester-coated surface (or a fabric with a high polyester count) using heat and pressure. The ink turns into a gas and permanently bonds with the polyester fibers, creating a design that’s incredibly durable and won’t crack, peel, or fade.
Additional Materials Required (beyond the basic list):
- Sublimation Printer: A dedicated printer specifically designed for sublimation inks (e.g., Epson EcoTank converted for sublimation, Sawgrass printers). Regular inkjet printers cannot be used for sublimation.
- Sublimation Ink: Special inks formulated for sublimation printing.
- Sublimation Paper: Paper specifically designed to release sublimation inks when heated.
- Sublimation Patches (Blanks): These are pre-made patches with a polyester coating specifically designed for sublimation. They typically have an adhesive backing.
- Heat Press: A heat press is essential for sublimation. A Cricut EasyPress can work for small patches, but a traditional clamshell or swing-away heat press is recommended for larger and more consistent results.
- Protective Paper: Butcher paper or Teflon sheets to protect your heat press and prevent ink transfer.
Simplified Step-by-Step Guide:
- Design Your Image: Create your design in a graphics software program (like Cricut Design Space, Adobe Photoshop, or Illustrator). Remember that sublimation works best with vibrant colors and high-resolution images.
- Print Your Design: Print your design onto sublimation paper using your sublimation printer. Make sure to mirror the image before printing.
- Prepare the Patch: Place the sublimation patch blank on a clean, flat surface. Use a lint roller to remove any dust or fibers.
- Position the Design: Place the printed sublimation paper face down onto the patch. Secure it with heat-resistant tape to prevent shifting.
- Heat Press:
- Place protective paper (butcher paper or Teflon sheet) underneath the patch and on top of the sublimation paper.
- Consult the patch manufacturer’s instructions for the recommended temperature, time, and pressure settings. Generally, sublimation requires temperatures around 380-400°F (193-204°C) and a pressing time of 45-60 seconds with medium to firm pressure.
- Press the patch according to the instructions.
- Remove and Cool: Carefully remove the patch from the heat press (it will be hot!). Remove the sublimation paper and allow the patch to cool completely.
- Apply to Fabric: Once the sublimation patch is created, you can apply it to your fabric item. Most sublimation patches have a heat-activated adhesive backing. You can use a heat press or, potentially, a Cricut EasyPress (check the patch manufacturer’s instructions) to apply the patch, following a similar process as with HTV patches (though likely with different temperature/time settings).
Important Considerations:
- Sublimation only works on polyester-coated surfaces or fabrics with a high polyester content (at least 65% polyester, but 100% is ideal).
- Sublimation inks are transparent, so they won’t show up well on dark fabrics. White or light-colored fabrics are best.
- Sublimation is a more advanced technique with a steeper learning curve. It’s recommended to research and watch dedicated sublimation tutorials before attempting it.
This simplified guide provides a basic overview. For in-depth instructions, consult specialized sublimation resources and tutorials. This method, while more complex, unlocks incredible design possibilities for truly unique and professional-looking patches.
8. Care and Maintenance
To ensure the longevity and vibrancy of your custom-made iron-on patches, proper care is essential. Here are some guidelines for washing, drying, and general maintenance:
Washing:
- Turn Garment Inside Out: Always turn the garment or item inside out before washing. This protects the patch from abrasion against other clothes or the washing machine drum.
- Use Cold Water: Wash in cold water. Hot water can weaken the adhesive and cause the patch to detach or the colors to fade (especially for HTV patches).
- Gentle Cycle: Use a gentle or delicate wash cycle. Avoid harsh detergents or bleach, which can damage the patch and the fabric.
- Avoid Fabric Softeners: Fabric softeners can also weaken the adhesive bond.
Drying:
- Air Dry (Recommended): The best way to dry items with iron-on patches is to air dry them. Hang them up or lay them flat to dry.
- Low Heat Tumble Dry (If Necessary): If you must use a dryer, use the lowest heat setting and tumble dry on a delicate cycle. Remove the item promptly once it’s dry. Avoid high heat, as it can melt the adhesive or damage the patch.
Ironing:
- Avoid Direct Ironing: Never iron directly onto the patch itself. If you need to iron the garment, turn it inside out and iron on the reverse side.
- Use a Pressing Cloth: If you must iron near the patch, place a pressing cloth (a thin piece of cotton fabric) over the area to protect the patch from the direct heat of the iron.
Storage: Store items with iron-on patches in a cool, dry place. Avoid extreme temperatures or humidity, which can affect the adhesive.
Durability: Properly applied with a suitable adhesive and following the care instructions above, they can be very durable.
Additional tip: If the edges start lifting, you may be able to re-adhere with careful application of heat through a pressing cloth, but this is not guaranteed.
By following these simple care instructions, you can significantly extend the life of your iron-on patches, keeping your customized creations looking their best for years to come.
9. Related Questions
Here are some frequently asked questions about making iron-on patches with Cricut, along with concise answers:
9.1 Can I use regular printer paper to make iron-on patches?
No, regular printer paper will not work. You need either Heat Transfer Vinyl (HTV) for cutting with a Cricut or sublimation paper (with a sublimation printer and inks) for sublimation patches. These materials are specifically designed to transfer designs onto fabric using heat.
9.2 What’s the best type of HTV to use for patches?
A good quality, thin HTV is generally recommended. Siser EasyWeed is a popular choice due to its ease of weeding and durability. However, the best type depends on the desired look and feel. Glitter, flocked, and other specialty HTVs offer unique options.
9.3 Can I make iron-on patches without a Cricut or cutting machine?
Yes, but with limitations. You can purchase pre-made iron-on patches. You can also cut simple shapes from HTV by hand using scissors or a craft knife, but this is not practical for intricate designs.
9.4 My iron-on patch isn’t sticking. What am I doing wrong?
Several factors could be at play:
- Insufficient Heat or Pressure: Make sure you’re using the correct temperature and applying firm, even pressure.
- Incorrect Material Settings: Double-check that you’ve selected the correct material settings on your Cricut and that your iron is on the appropriate setting (usually cotton/linen, no steam).
- Not Preheating Fabric: Preheating the fabric removes moisture and wrinkles, ensuring better adhesion.
- Carrier Sheet Issues: Ensure you’re using the correct peel method (warm or cold) for your specific HTV.
- Fabric Type: Some fabrics are more challenging to adhere to than others. Iron-on patches work best on cotton, polyester, and cotton-poly blends.
9.5 Can I layer HTV to create multi-colored patches?
Yes, you can layer HTV, but there are some limitations. Standard HTV can typically be layered up to 3-4 layers. However, glitter HTV and flocked HTV should generally be used as top layers only. Always consult the HTV manufacturer’s instructions for layering guidelines.
9.6 Can I apply iron on patches on hats?
Yes. But you should use a specialized tool, the Cricut Hat Press, for example.
9.7 How to design iron on patches for Cricut using Design Space?
Use available tools in Design Space such as: Shapes, Upload, Text, Weld, Attach, Offset, Mirror. (Details in section 3)
9.8 How to make iron on patches with cricut maker 3?
I have detailed all the steps above, you just need to follow the steps from designing to applying.
9.9 Can I sew on an iron-on patch for extra security?
Yes, absolutely. If you are making the patch to place on the clothes of your business’s customers, this is also a good choice to make sure the patch is securely attached. You can add a decorative stitch around the edge of the patch after ironing it on, or you can use an iron-on adhesive like Heat N Bond Ultrahold to create a more substantial, sewable patch.
Read more:
Creating custom iron-on patches with a Cricut machine is a rewarding and versatile craft. From designing your unique image in Design Space to cutting, weeding, and finally applying your patch, this process empowers you to personalize clothing, accessories, and more. Whether you’re adding a touch of flair to your own wardrobe or creating unique items for your small business, the possibilities are endless.
Remember to start with simple designs, practice your weeding skills, and always follow the manufacturer’s instructions for your specific HTV and heat source. Don’t be afraid to experiment with different colors, textures, and techniques, including the advanced option of sublimation for vibrant, full-color designs.
The journey of creating custom patches is not just about the finished product; it’s about unleashing your creativity and making something truly unique. So gather your materials, fire up your Cricut, and start transforming ordinary items into personalized masterpieces!
Visit our website https://mypacklove.com/ to explore our product options and request a quote. Contact us today to discuss your specific needs! Let us help you enhance your clothing care and branding efforts.


