


Easy Hand Embroidery: Beginner Stitches And Tips


Curious about the satisfying world of needlecraft but feel intimidated by hand embroidery for beginners? Choosing the right supplies or mastering initial techniques can seem overwhelming. This guide simplifies your start, transforming embroidery into a relaxing DIY craft.
Avoid common beginner frustrations and wasted materials with clear insights into essential embroidery supplies, preparing thread, using an embroidery hoop, and learning 4 foundational stitches. You’ll find easy pattern transfer methods and tips for effective stitching practice, building the confidence needed to tackle your first creative project with ease and enjoyment.
1. Why choose hand embroidery?
Hand embroidery offers a unique blend of creativity and calm. The steady, rhythmic motion of the needle moving through fabric can be deeply therapeutic and relaxing, providing a welcome pause in a busy day. There’s a distinct satisfaction in creating something beautiful and tangible with your own hands, transforming plain cloth into decorative stitching. This handicraft allows for personalizing clothing, creating heartfelt gifts, or adding bespoke touches to home decor.
Furthermore, hand embroidery is a wonderfully portable hobby. A small bag with a hoop, floss, and needles can travel almost anywhere, offering moments of creativity on the go. Unlike the uniformity of machine embroidery, hand stitching imbues each piece with unique character; slight variations become part of its charm. Embracing this skill-based craft as a beginner is about enjoying the process of learning and making, rather than striving for immediate perfection.
1.1 Fabric
Selecting the right fabric is crucial for a smooth start. For a beginner, medium-weight, non-stretchy natural fibers are recommended. Look for 100% cotton fabric, such as quilting cotton or muslin, or linen and linen blends.
These fabric types are generally easy to handle, allow the needle to pass through smoothly, and hold stitches well without puckering or distorting easily. Ensure the piece of base material you choose is several inches larger than your embroidery hoop on all sides to allow for proper tensioning and handling.
1.2 Embroidery hoop

The embroidery hoop is a fundamental tool. Its primary function is to keep the fabric taut, creating a stable, drum-like surface essential for achieving neat and even stitches. For a beginner, a hoop with a 5 or 6-inch diameter offers a manageable working area without being cumbersome.
Wooden hoops are widely available, affordable, and provide a good grip. While plastic hoops also exist and function similarly, wood is a traditional and popular choice. Understanding how to use an embroidery hoop starts with recognizing its role in maintaining proper fabric tension.
1.3 Embroidery floss
Embroidery thread, commonly known as embroidery floss, is the colorful medium of your stitching. The most standard type is six-strand cotton floss, with brands like DMC floss being readily available and offering a vast color palette.
A key characteristic is that it consists of strands – typically six – which are designed to be separated. Pulling out individual strands allows you to adjust stitch thickness, influencing the final look of your work. For starting out, acquiring a few basic, versatile colors is sufficient.
1.4 Needles
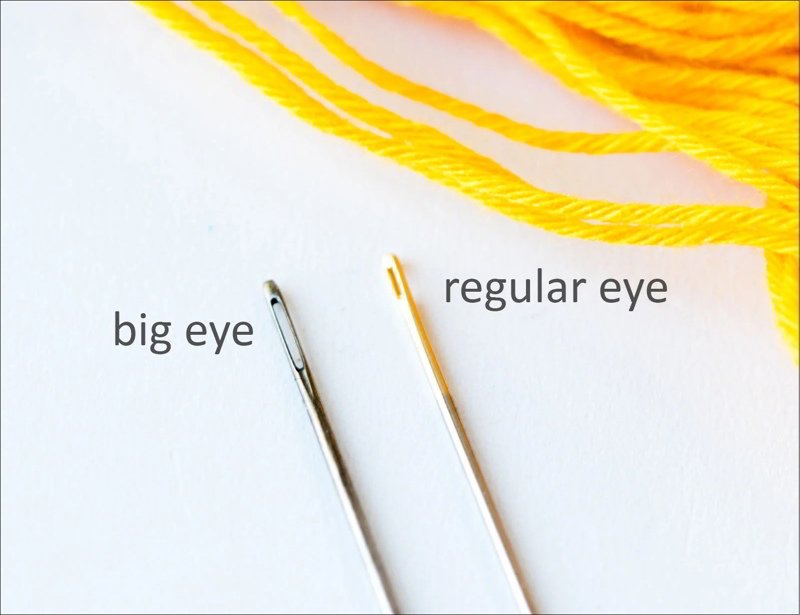
Using the correct needles makes a significant difference. Embroidery needles are specifically designed for this craft. Their key feature is a large eye that easily accommodates the thickness of floss, even multiple strands, unlike the smaller eyes of standard sewing needles.
For versatility as you learn, purchasing an embroidery needle assortment pack, often containing sizes 3 through 9, is a practical choice. This provides options suitable for varying numbers of floss strands and different fabric types.
1.5 Scissors
A small, sharp pair of scissors is indispensable. Often referred to as embroidery scissors or thread snips, their fine points allow for making clean, precise cuts very close to the fabric or thread ends. This helps keep the back of your work tidy and prevents accidental snags on loose threads. While any sharp scissors can work in a pinch, dedicated embroidery scissors offer better control for detailed work.
1.6 Pattern transfer tool
Getting your design onto the fabric requires a pattern transfer tool. For a beginner, one of the most straightforward tools is a water-soluble pen. Its key feature is that the marks wash out completely with plain water after stitching, eliminating worries about visible guidelines on the finished piece.
An alternative is using a sharp pencil very lightly, but heed the caveat: pencil marks are permanent and must be covered entirely by your stitches. Choosing an appropriate transfer method highlights the importance of pattern transfer for accurate results.
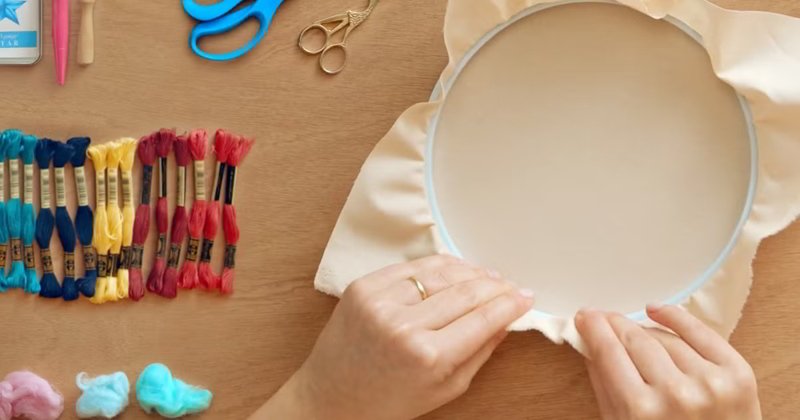
1.7 Preparing your fabric and hoop
Correctly mounting your fabric in the embroidery hoop ensures the necessary tension for neat stitching. Follow these steps for using an embroidery hoop:
- Loosen the screw adjustment on the outer ring of the hoop.
- Separate the inner and outer rings.
- Lay your fabric piece smoothly over the inner ring (the solid one without the screw).
- Place the outer ring (with the screw) over the fabric and the inner ring.
- Gently press the outer ring down so it sits evenly around the inner ring.
- Begin tightening the screw while gently pulling the excess fabric edges taut all around. The goal is a firm, even surface, often described as “drum tight.” This is crucial for good fabric tension. Avoid overtightening the screw to the point where it becomes difficult to loosen later.
1.8 Understanding your floss
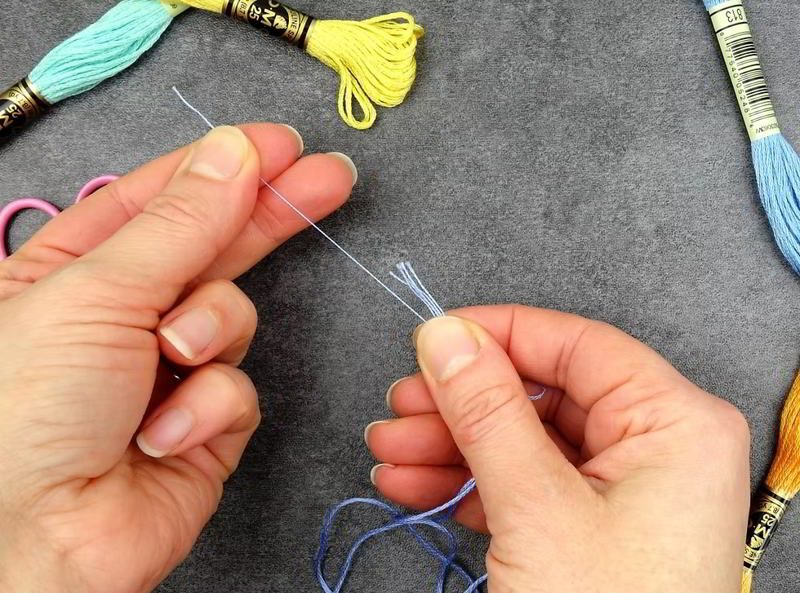
Working with embroidery floss effectively involves a couple of key steps. First, cut a manageable length – a piece from your elbow to fingertips (roughly 18 inches or 45 cm) is often recommended. Longer pieces tend to tangle easily. Remember that standard floss has six strands. For most beginner line stitches, like backstitch or running stitch, you’ll typically use only 2 or 3 strands.
To achieve this, practice separating floss: Hold the floss near one end and use your fingernail or fingertips to isolate the number of strands you need. Gently pull these strands straight up and out, allowing the remaining strands to untwist naturally below your fingers. Repeat if needed to get the desired count. The purpose is to adjust the stitch thickness – fewer strands create finer lines, while more strands result in bolder, thicker stitches.
1.9 Threading the needle
Threading the needle with multiple strands of floss is easier with the right technique and an appropriately sized needle eye.
- Take your separated strands of floss (usually 2 or 3 for beginners).
- A helpful technique is to wet the floss end slightly – briefly moistening the very tip can help bind the fibers together.
- Flatten the end of the floss firmly between your thumb and forefinger.
- Carefully push the flattened, cohesive end through the needle eye.
- Pull several inches of floss through the eye. Unlike regular sewing, you do *not* double the floss over and knot both ends together. Leave one end much longer than the other.
1.10 Starting your thread (the knot)
Securing your thread before the first stitch is essential. For a beginner, the simplest way is using a knot.
- Take the long tail end of the threaded floss (opposite the needle).
- Make a small, standard overhand knot (or a double knot for extra security) right at the very end of the floss.
- Trim the excess tail just beyond the knot, leaving about 1/4 inch (around 5mm).
- From the back side of your hooped fabric, bring the needle up to the front surface at the exact point where you intend to begin your first stitch. The knot will catch on the back, anchoring the thread.
While effective, this method leaves a small bump on the back. Be aware that alternative methods, such as waste knots or techniques for starting embroidery without knots, exist and can create a neater finish on the reverse side, which you might explore later.
2. Getting your design onto fabric: Simple pattern transfer
A reliable pattern transfer method for beginners uses light and a washable marker. Here’s how to use the window or lightbox method with a water-soluble pen:
- Securely tape your printed pattern onto a bright window (during daylight) or a lightbox surface.
- Carefully position your fabric over the pattern, ensuring the design is placed where desired, and tape the fabric smoothly over the pattern. The light shining through allows for pattern tracing.
- Using your water-soluble pen, carefully trace the lines of the pattern directly onto the fabric. Apply steady, even pressure.
- Once tracing is complete, gently remove the tape and lift the fabric off the pattern. Your design is now marked on the fabric, ready to stitch.
For your first attempts, it’s advisable to choose simple designs or beginner patterns. Look for patterns with clear, uncomplicated lines and basic shapes, which are easier to trace accurately and stitch cleanly.
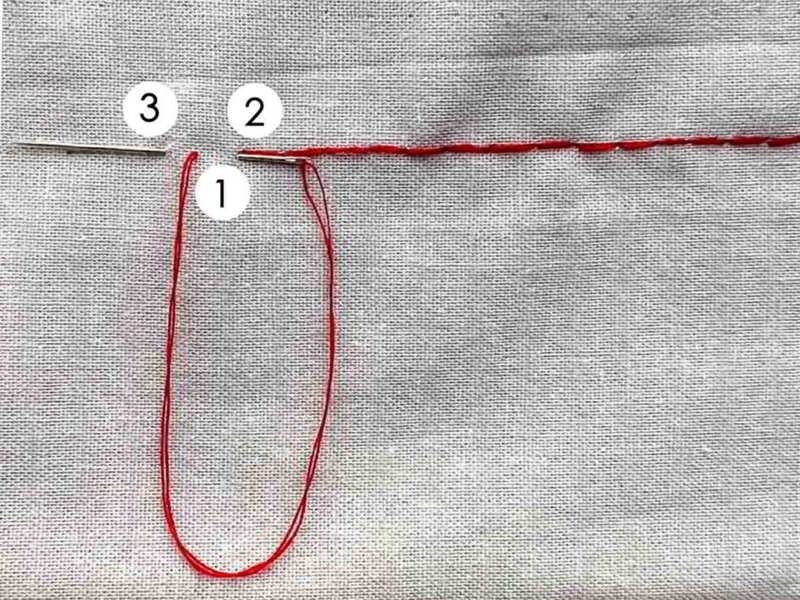
2.1 The running stitch
The running stitch is often considered the most basic embroidery stitch. Visually, it creates a series of dashed lines, resembling a dotted line effect. This stitch is versatile, suitable for creating simple outlines, decorative borders, or even visible mending details on garments. It is considered the easiest stitch to learn, making it an ideal starting point.
How to do the running stitch:
- Bring your needle up from the back of the fabric at your starting point (A).
- Insert the needle back down through the fabric a short distance away (B), creating your first stitch.
- Bring the needle up again a short distance from B (C), leaving an equal-sized gap.
- Insert the needle back down a short distance from C (D).
- Continue this up-and-down motion, aiming for evenly spaced stitches and gaps along your desired line.

2.2 The backstitch
The backstitch is a fundamental hand embroidery technique valued because it creates solid outlines. Unlike the running stitch, it forms a continuous, unbroken line, making it excellent for defining shapes, outlining designs, and stitching text clearly.
How to do the backstitch:
- Bring the needle up from the back at your starting point (A).
- Make one stitch forward, inserting the needle down at point (B).
- Bring the needle up again one stitch length ahead of B, at point (C).
- Now, take the needle *backwards* and insert it down into the *same hole* where the previous stitch ended (point B).
- Bring the needle up again one stitch length ahead, at point (D).
- Insert the needle back down into the hole at the end of the previous stitch (point C). Continue this pattern, always bringing the needle up one stitch length ahead and inserting it back down into the end point of the immediately preceding stitch.
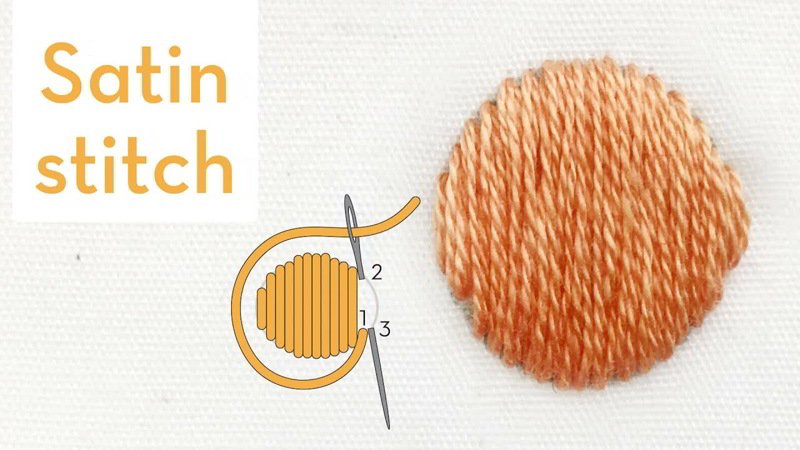
2.3 The satin stitch
The satin stitch is primarily used for filling shapes or covering areas with smooth, solid color. The stitch consists of straight, parallel stitches laid closely side-by-side across a defined area.
How to do the satin stitch:
- Bring the needle up from the back at one edge of the shape you want to fill (A).
- Take the needle straight across the shape and insert it down on the opposite edge (B).
- Bring the needle up again right next to point A (or slightly staggered depending on the shape, ensuring no gap).
- Take the needle straight across again, parallel to the first stitch, and insert it down right next to point B.
- Continue making these parallel stitches, placing them snugly against each other without significant overlapping or leaving fabric visible between them. Maintain even tension – don’t pull the stitches so tight that the fabric puckers.
Tip:
- For larger or more complex shapes, outlining the area with backstitch first can help create a crisp, defined edge to stitch against.
- To maintain a tidy back and conserve floss, avoid carrying the thread long distances across the back of the shape between stitches. Instead, bring the needle up very close to where it last went down. This also saves thread and time. Achieving a perfectly smooth satin stitch takes practice, so start with small, simple shapes.
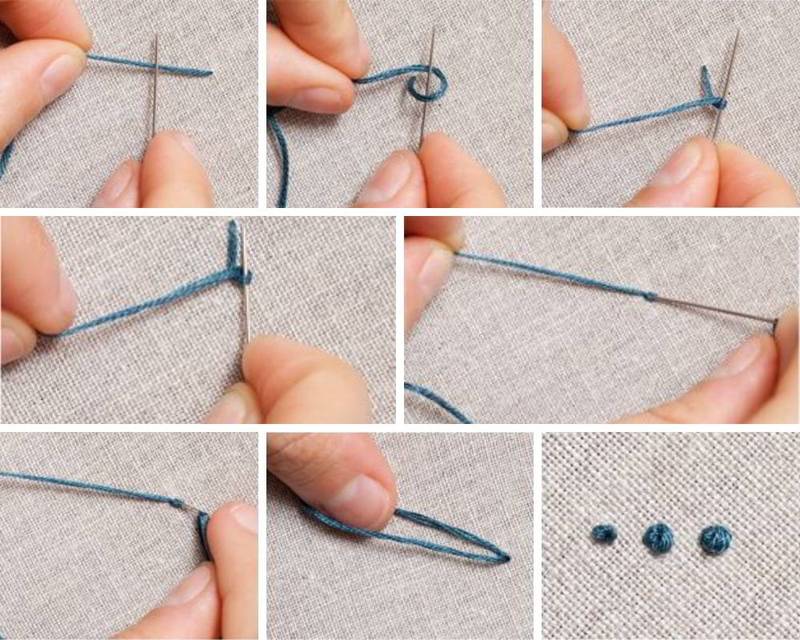
2.4 The french knot
The French knot is a decorative stitch that creates a small, raised bump or knot on the fabric surface. It’s commonly used to add texture and detail, such as flower centers, tiny eyes on figures, or scattered embellishments. Essentially, it forms small dot textures. While versatile, its execution can feel awkward initially, which leads to its reputation for being tricky among beginners.
How to make a French knot:
- Bring the needle up from the back where you want the knot to be (A).
- Hold the working floss extending from the fabric taut with your non-needle hand, pulling it slightly away from the surface.
- With the floss held taut, wrap the floss around the needle itself (close to where it emerges from the fabric) once or twice. For beginners, one or two wraps are usually sufficient; more wraps create a larger knot.
- Crucially, while still holding the floss taut, carefully insert the tip of the needle back into the fabric very close to where it first emerged (point A), but not in the exact same hole. Inserting into the same hole may pull the knot through to the back.
- Gently push the needle all the way through to the back of the fabric. As you do this, allow the wrapped floss to slide down the needle, forming the knot snugly against the fabric surface. Maintain tension on the floss with your other hand until the needle and thread are almost completely pulled through. Don’t release the tension too early, or the knot may loosen or become misshapen. Practice is key to mastering consistent French knots.
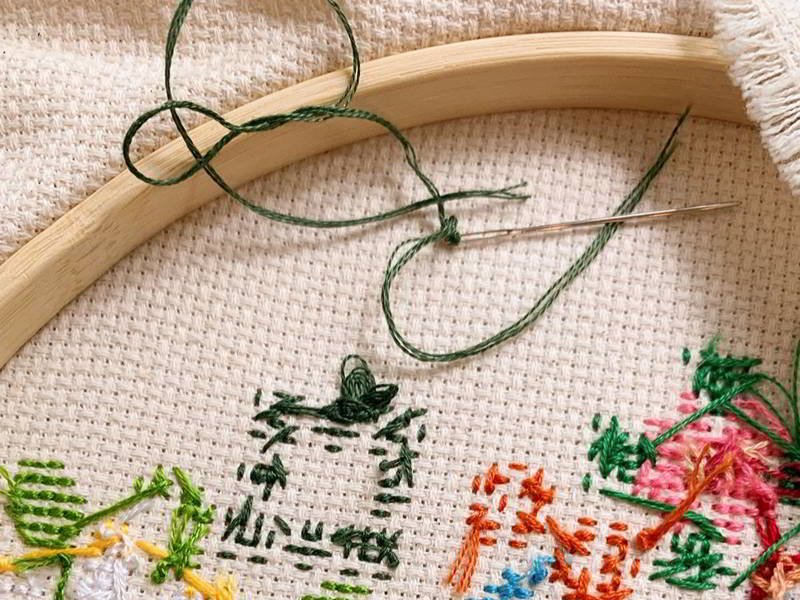
3. Finishing your thread neatly
Securing the thread properly on the back of your work when you finish stitching a section or changing colors is an essential step in finishing embroidery. This prevents stitches from unraveling and keeps the back tidy.
Steps:
- Once your last stitch is complete, turn your embroidery hoop over to view the back side of the fabric.
- Carefully slide your needle under 3 or 4 existing, nearby stitches on the back, ensuring the needle does not poke through to the front of the fabric.
- Pull the thread completely through these stitches.
- Using sharp embroidery scissors, trim the excess thread close to the fabric where it emerged from under the secured stitches.
4. Time to practice! Your first stitches
Now that you’ve learned the basics, it’s time for practice! Use your prepared hoop with fabric (even a scrap piece works perfectly for stitching practice). Grab your water-soluble pen and draw some simple guides: straight lines are perfect for practicing the running stitch and backstitch, focusing on consistent stitch length and spacing. Draw small squares or circles to try filling with satin stitch, working on laying the threads smoothly side-by-side. Make rows of small dots to practice forming consistent French knots.
Don’t worry about perfection at this stage. The goal is to get comfortable with the motions and how the stitches form. Remember, practice improves stitching skill. Each stitch you make builds muscle memory and confidence, preparing you to tackle your first beginner embroidery project. Enjoy the process of learning!
5. Related questions
5.1 How many strands of embroidery floss should I use?
The ideal number of floss strands depends on the stitch and desired effect. For fine lines using backstitch or running stitch, 2 or 3 strands are common. For fuller coverage with satin stitch, you might use 3 to 6 strands. The number of floss strands determines the stitch’s thickness and appearance; experiment to see what you prefer.
5.2 My stitches look uneven. Is that normal for a beginner?
It’s completely normal for beginners to have uneven stitches. Consistency in stitch length and tension develops with practice. Focus on making each stitch deliberately. Embrace the unique quality of handwork; the occasional imperfection is a normal characteristic of hand embroidery and adds charm.
5.3 How should I wash my finished embroidery piece?
Gentle care is best when washing embroidery. Hand wash in cold water using a mild detergent. Avoid vigorous rubbing. Rinse thoroughly. Lay the piece flat on a clean towel to air dry. Be mindful of potential dye run, especially with deeply colored floss; test inconspicuous areas if concerned.
5.4 What are some good first projects for an embroidery beginner?
Good simple projects for beginners include decorating the corner of a tea towel or napkin, stitching a monogram, or creating small decorative hoop art using the basic stitches you’ve learned (running stitch, backstitch, satin stitch, and French knot).
6. What’s next on your embroidery journey?
Once you’re comfortable with the foundational stitches, there’s a whole world of embroidery stitches to explore. You might investigate stitches like the stem stitch or split stitch, which offer different textures for lines and outlines. Learning various finishing techniques, such as how to neatly frame it in the hoop for display, adds a professional touch to your work.
Many beginners find starting with a pre-made beginner embroidery kit helpful, as these conveniently bundle supplies (fabric, floss, needle, hoop) with a pattern and instructions. If your interest in needlecraft grows, you might also explore related areas like cross-stitch for beginners, which uses a gridded fabric and X-shaped stitches, or simple appliqué techniques, involving stitching fabric shapes onto a base fabric.
Read more:
You’ve taken the first steps into the rewarding world of hand embroidery. By working through this guide, you’ve learned how to select essential embroidery supplies, understand how to use an embroidery hoop, thread a needle effectively, perform basic pattern transfer, and execute four foundational stitches: the running stitch, backstitch, satin stitch, and French knot.
This knowledge provides a solid foundation for exploring countless creative possibilities. Remember that patience and practice are key. Be kind to yourself as you learn, enjoy the meditative process, and celebrate the unique pieces you create through this beautiful fiber art. Explore further tutorials and find inspiration to continue developing your skills.


