


Hem Pants At Home: Hand Sew And Machine Guide


This guide provides the tools and knowledge to confidently tackle pant alterations (changing the length or fit of pants) at home. A common issue many face is finding pants that fit perfectly in the waist and hips but are too long. Instead of spending extra money at a tailor, learning how to hem (shorten the length of pant legs by folding and stitching the fabric) pants offers a practical solution.
This article covers two primary methods: hand sewing and using a sewing machine. Each approach has its advantages, and both are explored in detail. Choosing to complete it on your own not only helps save money but also guarantees a customized fit, ensuring the pants fall exactly where preferred.
1. Preparing to hem your pants
1.1 Gathering your supplies
Before starting, assemble the following items:
- Pants: The pair needing hemming.
- Pins: To hold the fabric in place while measuring and sewing.
- Scissors or rotary cutter: Sharp scissors are crucial for a clean cut; a rotary cutter (a tool with a circular blade) and mat can provide even more precision.
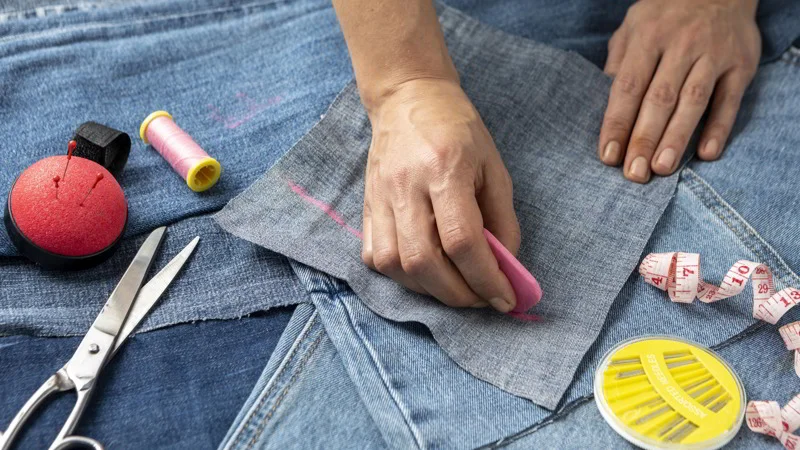
- Tailor’s chalk or fabric marking pencil: Used for marking the fabric where alterations are needed. Tailor’s chalk is specifically designed for marking fabric and easily brushes off.
- Seam ripper: A small tool with a sharp, pointed end used for removing existing stitches.
- Measuring tape or ruler: To accurately measure the desired hem length.
- Iron and ironing board: For pressing the fabric, creating crisp folds, and ensuring a professional-looking finish.
- Thread: Choose a color that closely matches the pants’ fabric.
- Needles
- Sewing machine (optional): If hemming by machine, a sewing machine is required.
1.2 Determining the correct hem length
Achieving the right length is crucial. Follow these steps:
- Try on with shoes: Have the person who will wear the pants put them on, along with the shoes they plan to wear with them most often. This is essential because different shoes have different heel heights, which affect how the pants fall.
- Determine desired “break”: The “break” refers to how much of a crease forms at the bottom of the pants where they meet the shoe. A full break has a significant crease, a half break has a slight crease, and no break means the pants fall straight without a crease.
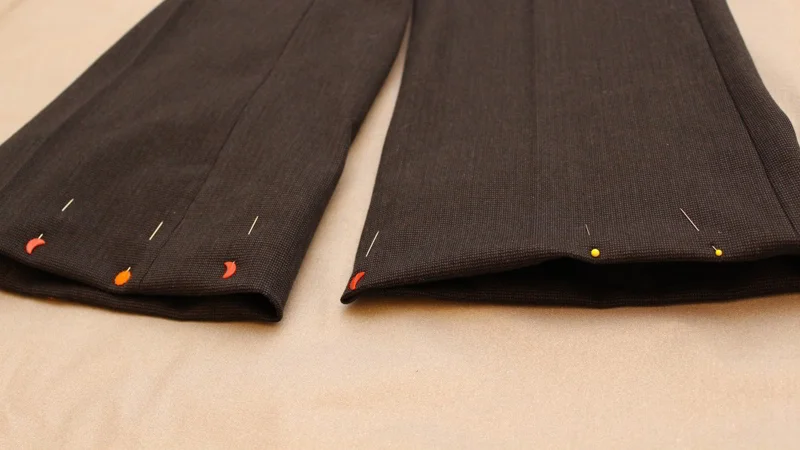
- Fold and pin: Fold the excess fabric up on one leg to the desired length, creating the desired break. Secure the fold with pins, placing them horizontally.
- Check in mirror: Have the wearer look in a full-length mirror to confirm the length and break are satisfactory.
- Repeat on other leg: Once satisfied, repeat the folding and pinning process on the other pant leg, ensuring it matches the first.
- Double-check: Have the wearer try the pants on again to visually check that the length is consistent and looks good.
1.3 Removing the existing hem (if necessary)
If the pants already have a hem that needs to be removed, use a seam ripper. Carefully insert the pointed end of the seam ripper under the stitches of the existing hem. Gently push the seam ripper forward to cut the threads. Work slowly and methodically to avoid accidentally snagging or tearing the fabric of the pants. Remove all the stitches around the entire hem of both pant legs.
1.4 Marking and cutting the fabric
Precise marking and cutting are essential for a neat hem.
- Turn pants inside out: Turn the pants inside out. This makes it easier to work on the hem and ensures that markings are hidden on the inside of the finished garment.
- Measure from pinned line: Using a measuring tape or ruler, measure up from the pinned fold line, not from the bottom edge of the pants. The distance measured will be the hem allowance (extra fabric used to create the hem). A common hem allowance for dress pants is 1 inch to 1 1/2 inches. For jeans, it’s often 1/2 inch to 1 inch.
- Mark cutting line: Use tailor’s chalk or a fabric marking pencil to mark a line all the way around the pant leg at the measured hem allowance. This will be the cutting line. Double-check that this is accurately placed.
- Cut excess fabric: Using sharp fabric scissors, carefully cut along the marked line, removing the excess fabric. Go slowly and make smooth, even cuts.
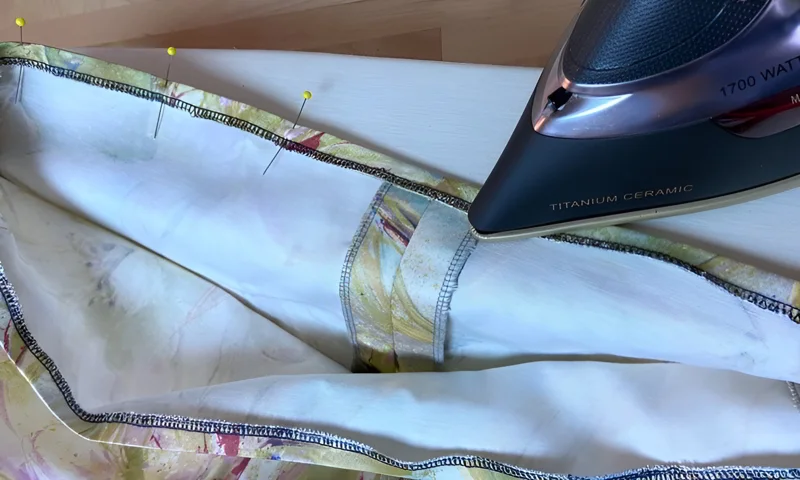
1.5 Pressing the new hem
Pressing creates a crisp, defined fold, making sewing much easier.
- First fold: Fold the raw edge of the fabric up towards the inside of the pant leg by half the total hem allowance. For example, if the total hem allowance is 1 inch, fold up 1/2 inch. Press this fold firmly with the iron.
- Second fold (double fold): Fold the fabric up again by the same amount as the first fold. This encloses the raw edge within the hem, preventing fraying and creating a clean finish. Press this second fold firmly.
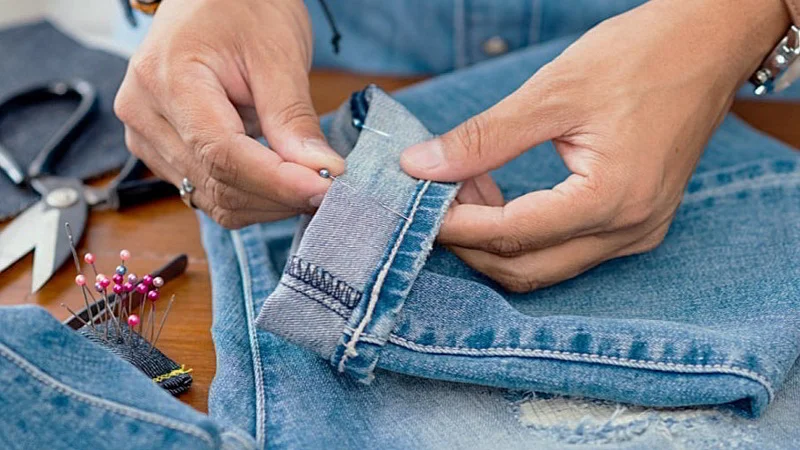
- Pin in place: Insert pins horizontally along the folded edge to secure the hem in place for sewing.
2. How to hem pants by hand
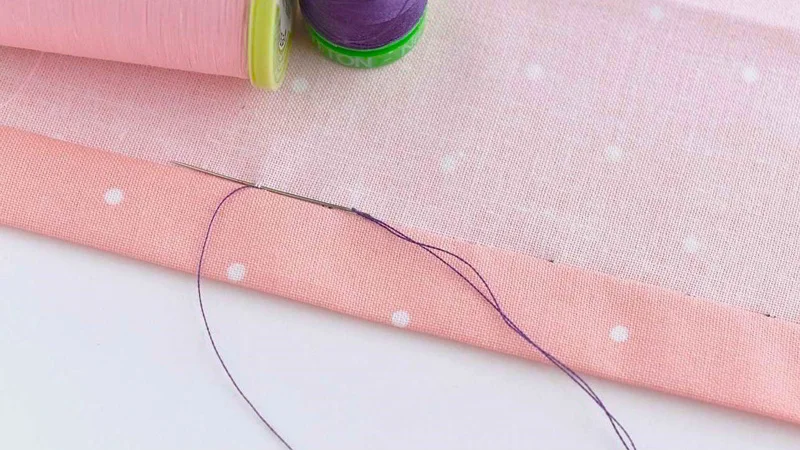
2.1 Threading the needle and knotting the thread
Cut thread: Cut a length of thread about 18-24 inches long. This prevents tangling.
Thread needle: Insert one end of the thread through the eye (the small hole) of the needle.
Bring ends together: Bring the two ends of the thread together so they are even.
Knot the thread:
- Wrap the thread around your index finger once.
- Roll the thread between your index finger and thumb, creating a small loop.
- Slide the loop off your finger.
- Hold the loop and pull the thread ends to tighten the knot.
- Trim ends.
2.2 The blind hem stitch
This stitch creates a nearly invisible hem from the outside of the pants.
- Anchor thread: Starting at a side seam, insert the needle into the folded edge of the hem, between the two layers of fabric. Bring the needle out through the top fold, concealing the knot inside the hem.
- Small stitch in pant leg: Just above the hem, pick up a few threads (2-3) of the main pant leg fabric with the needle. This stitch should be very small.
- Stitch in hem fold: Move the needle about 1/4 to 1/2 inch to the left (or right, if left-handed) and insert it into the folded edge of the hem. Run the needle inside the folded edge for about 1/2 inch.
- Emerge from fold: Bring the needle out of the folded edge.
- Repeat: Repeat steps 2-4, creating a series of small, diagonal stitches that “catch” the pant leg fabric and then travel inside the hem fold. Maintain consistent spacing and tension.
2.3 Completing the hem
Continue the blind hem stitch around the entire circumference of the pant leg, maintaining even spacing and tension. Avoid pulling the thread too tightly, which can cause puckering. When reaching the starting point, overlap the stitches slightly.
To secure the end, make a few small stitches in place, then create a knot by looping the thread around the needle a couple of times before pulling it tight. Finally, bury the thread tail within the hem by inserting the needle into the fold and bringing it out a short distance away, then trimming the thread close to the fabric.
3. How to hem pants with a sewing machine
3.1 Setting up your sewing machine
- Needle: Choose a needle appropriate for the fabric type. For medium-weight fabrics, a universal needle (size 80/12 or 90/14) is usually suitable. For heavier fabrics like denim, use a jeans needle (size 100/16 or 110/18).
- Thread: Select a thread that matches the fabric color and weight. All-purpose polyester thread is a good choice for most fabrics.
- Stitch: Select a straight stitch.
- Stitch length: Set the stitch length to a medium setting (around 2.5-3 mm).
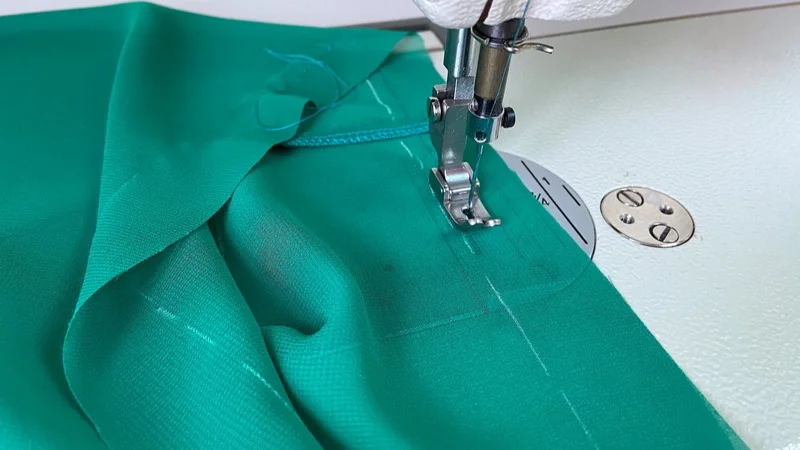
3.2 Sewing the hem
- Position fabric: With the pants still inside out, place the pant leg around the free arm of the sewing machine (if your machine has one). The free arm allows you to sew around the circular pant leg without catching other parts of the fabric. If the machine doesn’t have a free arm, simply sew carefully, making sure to keep the rest of the pant leg out of the way.
- Align needle: Position the needle about 1/8 inch from the top folded edge of the hem.
- Lower presser foot: Lower the presser foot (the part that holds the fabric down).
- Begin sewing: Start sewing slowly and carefully, guiding the fabric gently. Maintain a consistent distance from the folded edge.
- Sew around: Continue sewing all the way around the pant leg, overlapping the stitching slightly at the end.
3.3 Backstitching
Backstitching (sewing backward and forward over the same spot) secures the beginning and end of stitching, preventing it from unraveling. At the beginning and end of the hem, sew a few stitches forward, then engage the reverse lever or button on the sewing machine and sew a few stitches backward over the previous stitches. Then, continue sewing forward (at the beginning) or release the reverse lever (at the end).
4. Hemming different types of pants
4.1 Hemming jeans
Jeans often have a thicker, more casual hem. A common technique is to preserve the “original hem” look. To do this, instead of completely removing the original hem, measure the desired additional amount to shorten and fold above the original hem. Then, fold the raw edge under and stitch close to the original hemline, using a heavy-duty needle and thread that matches the original topstitching. This maintains the characteristic look of jeans. Some key tips when hemming denim:
- Use a heavy-duty or jeans needle (size 90/14, 100/16, or 110/18).
- Use a thicker thread designed for denim or topstitching.
- Increase the stitch length slightly.
- Sew slowly, especially over thick seams.
4.2 Hemming dress pants
Dress pants typically require a more discreet, invisible hem. The hand-sewn blind hem stitch is ideal for this. Alternatively, many sewing machines have a blind hem stitch setting. If using a machine blind hem stitch, follow the machine’s instructions carefully, as the process can vary slightly between models. The key is to ensure that the stitches are barely visible on the right side of the pants. Key tips:
- Use a fine needle (size 70/10 or 80/12).
- Use fine thread that matches the fabric color perfectly.
- Press the hem meticulously for a crisp finish.
4.3 Hemming delicate fabrics
Hemming delicate fabrics like silk, chiffon, or lace requires extra care to prevent snags, puckering, or damage.
- Needle: Use a very fine, sharp needle, such as a Microtex needle (size 60/8 or 70/10).
- Thread: Use fine thread, such as silk thread or a fine polyester thread.
- Handling: Handle the fabric gently to avoid stretching or distorting it.
- Stitch length: Use a shorter stitch length.
- Pressing: Use a pressing cloth (a piece of thin fabric placed between the iron and the delicate fabric) to protect the fabric from direct heat.
5. Troubleshooting common hemming problems
5.1 Uneven hem
An uneven hem is usually caused by inaccurate measuring or cutting.
- Cause: Inconsistent measuring when marking the hem allowance, or cutting the fabric unevenly.
- Solution: If the hem is significantly uneven, it may be necessary to remove the stitching, re-measure, re-mark, and re-sew. For minor unevenness, careful pressing and stretching the shorter sections slightly while ironing can sometimes help.
5.2 Puckering fabric
Puckering (wrinkling or bunching of the fabric) can occur for several reasons.
- Cause: Tension issues (thread too tight), incorrect needle or thread for the fabric, or uneven feeding of the fabric through the sewing machine.
- Solution: Check the thread tension on the sewing machine and adjust if necessary. Make sure to use the correct needle and thread type for the fabric. If using a sewing machine, ensure the fabric is feeding evenly; a walking foot (a special presser foot that helps feed multiple layers of fabric evenly) can be helpful. When hand sewing, avoid pulling the thread too tightly.
5.3 Visible stitches
Visible stitches on the outside of the pants can detract from a professional finish.
- Cause: Using the wrong stitch type, incorrect thread color, or (when hand sewing) making stitches that are too large or catching too much of the outer fabric.
- Solution: If using a sewing machine, make sure to use a blind hem stitch setting (if available) or a straight stitch with a very small stitch length. If hand sewing, practice the blind hem stitch, ensuring to catch only a few threads of the outer fabric with each stitch. Always use a thread color that matches the fabric as closely as possible.
5.4 Thread breaking
Thread breaking can be a frustrating issue during the process.
- Cause: Using old or poor-quality thread; thread is too thin for the fabric; incorrect needle type; too much tension on the thread.
- Solution: Make sure to use a new, good-quality thread, choose the correct needle and thread, and check the tension of the sewing machine.
6. Achieving a professional finish
6.1 Pressing the finished hem
After sewing, give the finished hem a final press with the iron. This sets the stitches and creates a crisp, clean edge. Use a steam setting or a damp pressing cloth for best results.
6.2 Topstitching (optional)
Topstitching is a line of stitching sewn on the outside of the garment, close to an edge or seam. On pants, it’s sometimes used along the hem of jeans for a decorative and reinforcing effect. If desired, topstitch along the hem using a slightly longer stitch length and a thread color that matches or contrasts with the fabric, depending on the desired look.
6.3 Trimming loose threads
Carefully trim any loose threads close to the fabric, both on the inside and outside of the hem. This provides a neat and professional finish, preventing the threads from unraveling or becoming visible.
7. Related questions
7.1 Can I hem pants without sewing?
While sewing provides the most durable and professional-looking results, there are temporary alternatives, such as hem tape (a fusible adhesive tape that bonds fabric together when ironed) or fabric glue. However, these are generally not as strong or long-lasting as sewing.
7.2 How much does it cost to get pants hemmed?
The cost of professional hemming varies depending on location, tailor, and the complexity of the alteration, but it typically ranges from $10 to $25 per pair.
7.3 What kind of thread should I use?
It depends on the fabric. As mentioned earlier, all-purpose polyester thread works well for most common fabrics. For dress pants, ensure the color matches perfectly. For jeans, consider a heavy-duty or denim thread. For delicate fabrics, use a fine thread like silk or fine polyester.
Read more:
Learning to hem pants is a valuable skill that can save money and ensure a perfect fit. Whether opting for hand sewing or using a sewing machine, the process is achievable with patience and practice. By following the steps outlined in this guide, anyone can confidently alter their pants to the desired length, achieving a professional and polished look. For further assistance with complex tailoring and other services, consider exploring Packlove for all sewing supplies.


