How to Iron On Scout Patches: The Ultimate Guide
Embarking on the journey of scouting is a significant milestone, marked by achievements and participation symbolized by various patches. For scouts and parents, properly attaching these patches to the uniform is a crucial step in showcasing dedication and progress.
This guide delivers all the essential information, tips, and techniques needed to master the art of ironing on scout patches, ensuring they are displayed securely and neatly. From understanding the advantages and disadvantages of iron-on patches to detailed, step-by-step instructions, this comprehensive guide covers everything from preparation to troubleshooting, and even alternative attachment methods.
Whether it’s a Boy Scout, Girl Scout, Cub Scout, Daisy, or Brownie patch, the goal is to help ensure that every scout’s accomplishments are presented with pride.
1. Why ironing on scout patches is a popular choice
1.1 Advantages of iron-on patches
Iron-on patches offer a convenient and efficient way to display achievements on scout uniforms. Compared to sewing, the application process is significantly faster, making it an ideal choice for busy parents and scouts.
The method requires no special skills or tools beyond a standard household iron and an ironing board, providing a straightforward solution accessible to everyone. Many prefer to strengthen the bond with extra stitches, but iron-on patches can offer a time-saving and easier solution. You can also visit the Scout Shop for additional assistance if needed.

1.2 Disadvantages of iron-on patches
While convenient, iron-on patches do have some potential drawbacks. One common concern is the risk of damage to the uniform if the iron is too hot or applied for too long. This is especially true for materials that are not heat-resistant. However, following instructions carefully and using a pressing cloth can significantly mitigate this risk.
Another issue is that patches may not adhere well to all types of fabric, particularly those with textured surfaces or waterproof coatings. In such cases, reinforcing the patch with fabric glue or a few stitches can ensure a secure hold. Sewing is a more permanent solution, and even a few simple stitches around the perimeter of the patch can make a significant difference.
Finally, some iron-on patches may start to peel off after repeated washing or wear. Applying a small amount of fabric glue to the edges before ironing, or stitching the patch after ironing, can prevent this issue.
2. Essential supplies for ironing on scout patches
Before getting started, ensure that all the essential items for a smooth and successful patch application are gathered. Proper preparation can prevent common issues and ensure a professional-looking result. The following list includes required items:
- Scout uniform: The foundation of the patch application process is, of course, the scout uniform itself. This could be a Boy Scout, Girl Scout, Cub Scout, Daisy, or Brownie uniform, depending on the scout’s affiliation. Ensure that the uniform is clean and free of any dirt or debris, as this can interfere with the patch’s adhesion.
- Iron-on patches: These are the stars of the show. Make sure the specific patches, whether it’s Boy Scout patches, Girl Scout patches, Cub Scout patches, Daisy patches or Brownie patches, are ready to be applied.
- Iron: A standard household iron is all that’s needed. The key is to use an iron with adjustable temperature settings.
- Ironing board: A firm, heat-resistant surface is crucial for successful ironing. An ironing board provides a stable and safe platform for the process.
- Pressing cloth: A pressing cloth, typically made of cotton or muslin, acts as a protective barrier between the iron and the patch/uniform.
3. Step-by-step guide: How to iron on scout patches
3.1 Prepare your uniform and workspace
Begin by ensuring the scout uniform is clean and free of wrinkles. A smooth surface is essential for optimal patch adhesion. Lay the uniform flat on a heat-resistant ironing board. Make sure the area where the patch will be applied is easily accessible and that there are no folds or creases beneath it.
3.2 Position your patches
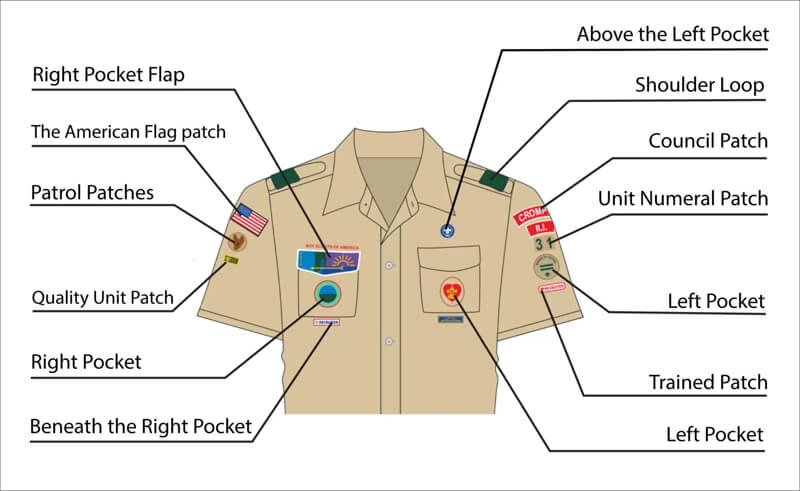
Carefully position each patch on the uniform according to the official guidelines provided by the Boy Scouts of America (BSA) or the Girl Scouts of the USA (GSUSA). Correct placement is crucial not only for aesthetics but also for adhering to the standards of the scouting organization.
The Scout Shop may offer additional assistance. Use a ruler or measuring tape to ensure accurate alignment and spacing. Double-check the placement before proceeding to the next step. It’s recommended to refer to the official BSA or GSUSA uniform guides, often available online or at the local Scout Shop, for specific placement instructions.

3.3 Prepare your iron
Set the iron to the appropriate temperature setting for the uniform’s fabric. For most polyester-cotton blend uniforms, a medium heat setting is usually recommended. It’s very important to avoid using the steam setting, as moisture can interfere with the adhesive’s ability to bond to the fabric. Allow the iron to heat up completely before applying it to the patch.
3.4 Apply the patch
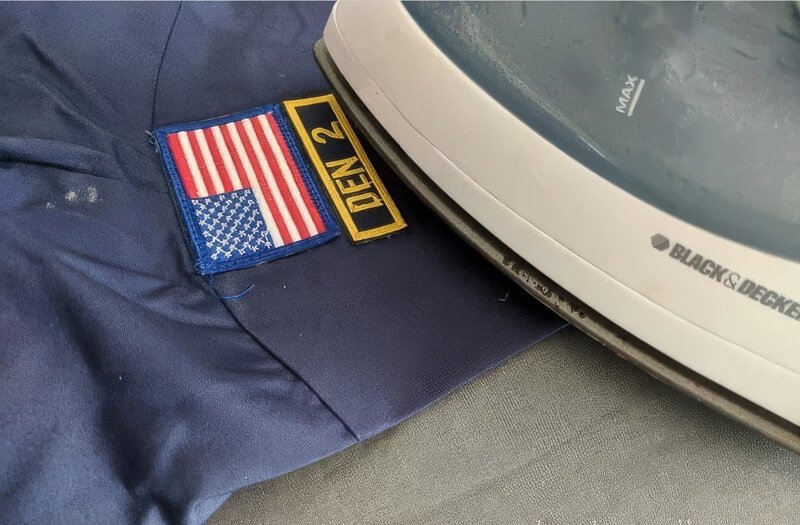
Place the patch on the desired location on the uniform, ensuring the adhesive side is facing down. Cover the patch with a pressing cloth. This is a non-negotiable step. The pressing cloth protects both the patch and the uniform fabric from direct heat, preventing scorching or melting.
3.5 Ironing the patch
With the iron fully heated and the pressing cloth in place, firmly press the iron down onto the pressing cloth, directly over the patch. Apply consistent, even pressure. Avoid any sliding or circular motions; instead, hold the iron in place for the recommended time, usually around 30-45 seconds. Precise timing may vary depending on the patch manufacturer’s instructions and the fabric of the uniform, so it’s essential to check any guidelines provided with the patch.
3.6 Cool down and check
After ironing, carefully remove the pressing cloth and allow the patch and uniform to cool completely. This cooling period is essential for the adhesive to set properly. Once cooled, gently check the edges of the patch to ensure it has fully adhered to the fabric. If any areas are not securely attached, repeat Steps 3.4 and 3.5, focusing on the loose sections.
4. Troubleshooting: Common problems and solutions
4.1 Patch not sticking
If a patch fails to stick, it could be due to insufficient heat, inadequate pressure, or an incompatible fabric type. To fix this, try re-applying the patch with a higher temperature and for a longer duration. For a more secure bond, you can also use fabric glue or sew the patch.
4.2 Uniform scorching or melting
Scorching or melting of the uniform is a serious concern, typically caused by excessive heat. Always use a pressing cloth between the iron and the patch/uniform. Double-check the iron’s temperature setting, ensuring it’s appropriate for the uniform’s fabric. It’s also essential to avoid leaving the iron in one spot for too long.
4.3 Patch edges lifting
Even after initially successful ironing, the edges of a patch may start to lift over time, especially with frequent wear and washing. To address this, several solutions can be employed. First, try re-ironing the edges using a pressing cloth and firm pressure. If that doesn’t work, consider applying a small amount of fabric glue or sewing the patch for a permanent hold.

4.4 Adhesive residue
When you remove iron-on patches from the uniform, they may be leaving adhesive residues. To address this, you can try many solutions, such as placing a pressing cloth or a piece of parchment paper over the affected region. You might also attempt rubbing alcohol or acetone on the residue.
5. Alternative patch attachment methods
While ironing is a popular method for attaching scout patches, it’s not the only option.
5.1 Sewing patches
Sewing patches onto a uniform offers the most secure and durable attachment.
Pros:
- Durability: Sewn-on patches are far less likely to detach than iron-on patches.
- Suitable for all fabrics: Sewing works on virtually any fabric, including those that are not suitable for ironing.
- Professional look: When done neatly, sewing can give a clean, professional appearance.
Cons:
- Time-consuming: Sewing is significantly more time-consuming than ironing.
- Skill required: Sewing requires some basic sewing skills, either by hand or with a machine.
- Potential for fabric damage: If not done carefully, sewing can puncture or pucker the fabric.
5.2 Using fabric glue
Fabric glue offers a no-sew alternative to ironing and sewing. It’s a relatively quick and easy method, requiring no special skills.
Pros:
- Ease of use: Fabric glue is simple to apply, requiring no sewing or ironing.
- Speed: Applying fabric glue is generally faster than sewing.
- No heat required: Fabric glue eliminates the risk of heat damage to the uniform.
Cons:
- Durability: Fabric glue is generally less durable than sewing, especially with frequent washing.
- Mess potential: Fabric glue can be messy if not applied carefully.
- Not suitable for all fabrics: Some fabric glues may not work well on all types of fabric.
5.3. Using Badge Magic
Badge Magic is a popular product for applying scout patches.
Pros:
- Easy to apply: Using Badge Magic is easy for attaching patches
- Removability: Badge Magic is removable.
Cons:
- Durability: This is a temporary solution, so it will not be as durable as other solutions.
6. Using a heat press for scout patches
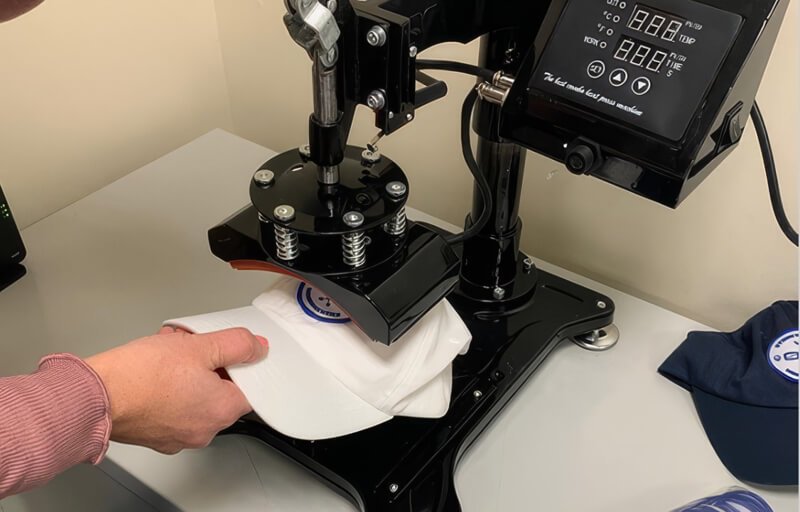
For those who frequently apply patches or want a more professional and consistent result, a heat press can be a worthwhile investment. A heat press is a machine that uses heated plates to apply heat and pressure to a surface, typically fabric.
Brief instructions:
- Set the heat press to the recommended temperature for the patch and fabric.
- Place the uniform on the lower platen of the heat press.
- Position the patch on the uniform, adhesive side down.
- Close the heat press and apply pressure for the recommended time (usually 10-20 seconds).
- Open the heat press and allow the patch and uniform to cool completely.

7. Removing iron-on scout patches
There may be times when patch removal is necessary, such as when a scout advances in rank, a patch is incorrectly placed, or a uniform is being repurposed. Removing iron-on patches requires care to avoid damaging the underlying fabric.
Numbered steps:
- Apply heat: Place a pressing cloth over the patch to be removed. Using an iron on a medium heat setting (no steam), apply heat to the patch for about 10-15 seconds. This will soften the adhesive.
- Gentle lifting: Using tweezers or your fingers (if the fabric is not too hot), carefully try to lift a corner of the patch.
- Work slowly: Once a corner is lifted, continue to gently peel the patch away from the fabric, applying more heat as needed.
- Residue removal: After removing the patch, there may be some adhesive residue left on the uniform.
- Washing: Once the residue is removed, wash the uniform according to its care instructions to remove any remaining traces of the adhesive remover.
8. Related questions
Here are some frequently asked questions related to ironing on scout patches:
8.1 Can I iron patches onto any type of fabric?
Not all fabrics are suitable for ironing. Polyester-cotton blends, which are common for scout uniforms, are generally safe. However, delicate fabrics like silk or lace, or materials with a waterproof coating, may be damaged by heat.
8.2 How long do iron-on patches last?
The lifespan of an iron-on patch depends on several factors, including the quality of the adhesive, the frequency of washing, and the type of wear the uniform experiences. While iron-on patches can provide a reasonably durable bond, they are generally not as long-lasting as sewn-on patches.
8.3 Can I re-iron a patch that has started to peel off?
Yes, often you can re-iron a patch that has started to peel.
8.4 What’s the best temperature setting for ironing on scout patches?
The optimal temperature setting depends on the fabric of the uniform. For most polyester-cotton blend uniforms, a medium heat setting is usually recommended.
8.5 What should I do if I accidentally scorch the uniform?
If the uniform is accidentally scorched, act quickly. Apply a solution of hydrogen peroxide to the affected area.
8.6 Where can I find official guidelines for patch placement?
The official websites of the Boy Scouts of America (BSA) and the Girl Scouts of the USA (GSUSA) provide detailed uniform guides that specify the correct placement for various patches.
Read more:
Ironing on scout patches is a valuable skill for scouts and parents, representing a tangible way to display achievements and participation. By following the detailed steps, from preparing the uniform and workspace to troubleshooting common problems, one can ensure patches are applied securely and neatly, maintaining the integrity of the uniform.


