


Sewing with Knit Fabric: Tips for Perfect Stretch Seams


Navigating the world of knit fabrics can feel like entering a whole new dimension of sewing. Unlike their woven counterparts, knits possess a unique stretch and drape that can present exciting possibilities, but also a few initial hurdles for beginners. This article provides the tools to begin a knit sewing adventure, to address common fears, and to provide skills for beautiful, professional-looking results.
The looped structure of knit fabrics offers comfort and versatility, but their benefits can only be harnessed by understanding a different approach to techniques. From needles and stitches to handling and finishing, this guide lays the foundation for confidently tackling any knit project, ensuring that the inherent challenges of knit fabrics become opportunities for creativity.
1. Understanding knit fabrics: More than just stretch
1.1 What makes knit fabric different from woven fabric?
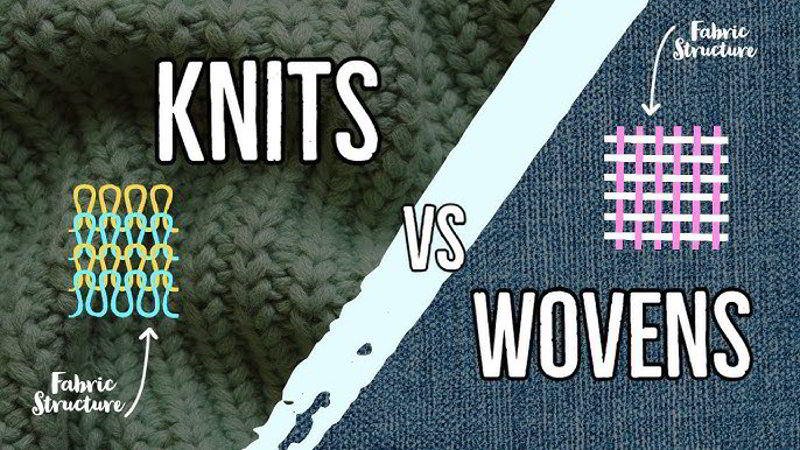
Looped structure vs. woven structure
Knit fabrics and woven fabrics represent two fundamentally different methods of textile construction. Woven fabrics, familiar from materials like quilting cotton or denim, are created by interlacing two sets of yarns at right angles to each other.
This creates a stable, grid-like structure. Knit fabrics, on the other hand, are formed by a single yarn (or a set of yarns) that is continuously looped, much like hand knitting. This looped structure is what gives knit fabrics their inherent stretch.
Inherent stretch and recovery
The looped construction of knit fabric is directly responsible for its elasticity. When a knit fabric is pulled, the loops can change shape, allowing the fabric to extend. When the tension is released, the loops tend to return to their original shape, giving the fabric its “recovery.”
The degree of stretch and recovery can vary widely depending on the type of knit, the fiber content, and the tightness of the loops. Some knits have a high stretch percentage and excellent recovery, while others have less stretch and may remain slightly stretched out after being pulled.
Drape and flow
Knit fabrics are generally known for their excellent drape and fluidity. Because the loops can move and shift easily, knit fabrics tend to fall softly and conform to curves. This contrasts with many woven fabrics, which can be stiffer and hold their shape more rigidly. The drape of a knit fabric can be influenced by its weight, fiber content, and the type of knit construction.
Why different techniques are required
The unique properties of knit fabric—its stretch, recovery, and drape—mean that standard sewing techniques used for woven fabrics may not be suitable. Sewing seams that don’t stretch can lead to popped stitches when the garment is worn.
The choice of needle is also crucial; a sharp needle designed for wovens can damage the loops of a knit fabric. Different stitch types are needed to accommodate the stretch and prevent issues like wavy seams.
1.2 Common types of knit fabric and their uses
- Jersey (single knit): Jersey is a versatile and widely available knit fabric. It’s characterized by having distinct “right” and “wrong” sides. The right side has vertical ribs (wales), while the wrong side has horizontal rows (courses). Jersey is typically lightweight to medium weight and has good drape. It’s commonly used for T-shirts, dresses, and casual wear. Cotton jersey is breathable, while rayon jersey offers enhanced drape.
- Double knit: As the name suggests, double knits are created with two layers of loops interlocked together. This construction makes them more stable and less prone to curling than single knits. Double knits often have a smoother surface and are less likely to show through. They’re suitable for a wider range of garments, including structured dresses, skirts, and jackets.
- Interlock knit: Interlock knit is a variation of rib knit construction. Similar to double knit, it is more stable and does not curl, making it easier to work with, especially for beginners.
- Rib knit: Rib knits are characterized by prominent vertical ribs, formed by alternating knit and purl stitches. This structure gives them excellent stretch and recovery, making them ideal for cuffs, neckbands, and fitted garments. Rib knits can vary in weight and rib size.
- Ponte knit (Ponte di Roma): Ponte knit is a type of double knit that is particularly stable and durable. It has minimal stretch, making it a good choice for beginners. Ponte is often used for structured garments like tailored pants, skirts, and jackets.
- Sweater knits: This is a broad category encompassing a variety of knit fabrics designed to mimic hand-knitted sweaters. They can range from fine, lightweight knits to bulky, textured knits. Fiber content can vary widely, including wool, acrylic, cotton, and blends.
- Lycra/spandex blends: These terms are often used interchangeably to refer to fabrics containing elastane, a synthetic fiber that provides exceptional stretch and recovery. Even a small percentage of Lycra or spandex can significantly increase the stretch of a knit fabric. These blends are commonly used for activewear, swimwear, and form-fitting garments.
1.3 Decoding knit fabric: Weight, stretch percentage, and fiber content
How to determine fabric weight
Fabric weight is typically measured in either grams per square meter (GSM) or ounces per square yard (oz/sq yd). A higher number indicates a heavier fabric. Lightweight knits (e.g., under 150 GSM or 4 oz/sq yd) are suitable for T-shirts and drapey garments. Medium-weight knits (e.g., 150-250 GSM or 4-7 oz/sq yd) are more versatile. Heavyweight knits (e.g., over 250 GSM or 7 oz/sq yd) are best for structured garments or outerwear. If the fabric weight isn’t listed, it can sometimes be estimated by comparing it to fabrics with known weights.
Understanding stretch percentage (and direction of greatest stretch – DOGS)
Stretch percentage refers to how much a fabric can stretch beyond its original length. It’s usually expressed as a percentage. To measure stretch percentage, a 4-inch (10 cm) piece of fabric is typically used. Hold the fabric against a ruler, and gently stretch it to its maximum comfortable extent. If the 4-inch piece stretches to 6 inches, that’s a 50% stretch (2 inches of stretch / 4-inch original length = 0.5 or 50%).
The direction of greatest stretch (DOGS) is the direction in which the fabric stretches the most. Most knits have more stretch across the width (crosswise grain) than along the length (lengthwise grain). However, this isn’t always the case, so it’s essential to check. The DOGS is crucial for pattern placement, as it usually needs to go around the body for proper fit and movement.
The importance of fiber content (cotton, polyester, rayon, blends)
The fiber content of a knit fabric significantly affects its properties:
- Cotton: Cotton is breathable, absorbent, and comfortable to wear. It tends to have less stretch and recovery than synthetic fibers.
- Polyester: Polyester is durable, wrinkle-resistant, and quick-drying. It often has good stretch and recovery, especially when blended with spandex.
- Rayon (viscose): Rayon is known for its excellent drape and soft hand. It’s absorbent but can be less durable than cotton or polyester.
- Blends: Blends combine the properties of different fibers. For example, a cotton-spandex blend offers the comfort of cotton with the added stretch and recovery of spandex.
Understanding the fiber content helps in choosing the right fabric for a project and in anticipating how the fabric will behave during sewing and wearing.
2. Essential tools and supplies for sewing with knits
2.1 Choosing the right sewing machine needle
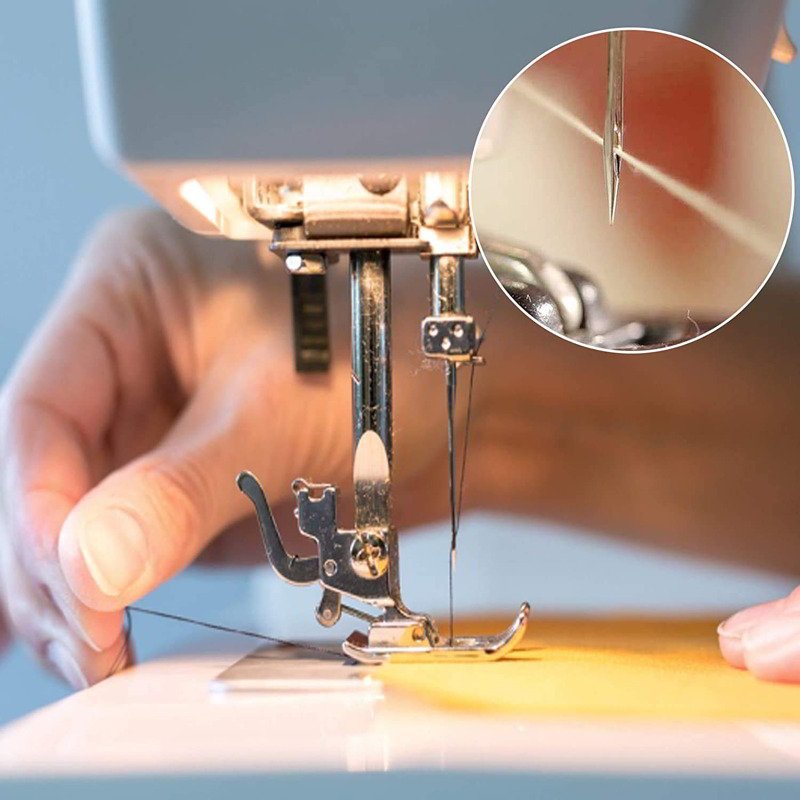
Using the correct sewing machine needle is paramount when working with knit fabrics. The wrong needle can lead to skipped stitches, snags, or even holes in the fabric. Unlike woven fabrics, which require sharp needles to pierce the tightly interlaced threads, knits benefit from needles with rounded tips that gently push between the loops of the fabric.
Ballpoint needles vs. stretch needles vs. universal needles
- Ballpoint needles: These needles have a rounded tip that is specifically designed to slip between the knit loops without damaging them. They are the most common and versatile choice for a wide range of knit fabrics, including jersey, rib knits, and double knits.
- Stretch needles: Stretch needles have a slightly more rounded tip and a special scarf (the indentation above the eye) that helps prevent skipped stitches on highly elastic fabrics like Lycra, spandex, and swimwear knits. If experiencing skipped stitches with a ballpoint needle, a stretch needle is the next step.
- Universal needles: Universal needles have a slightly rounded tip, but they are sharper than ballpoint or stretch needles. While they can be used for some stable knits, they are generally not recommended, as they are more likely to cause damage.
Needle size and fabric weight chart
The needle size should be matched to the fabric weight. A finer needle is used for lightweight fabrics, and a heavier needle is used for thicker fabrics. Using the wrong needle size can result in skipped stitches, thread breakage, or fabric damage.
| Needle Size | Fabric Type | Fabric Weight (approximate) |
|---|---|---|
| 70/10 | Lightweight jersey, silk jersey | 4-6 oz (113-170 GSM) |
| 75/11 | Lightweight knits | 4-7 oz |
| 80/12 | Medium-weight jersey, interlock | 6-8 oz (170-227 GSM) |
| 90/14 | Ponte, double knit, scuba | 8-12 oz (227-340 GSM) |
| 100/16 | Heavy sweater knits | 12+ oz (340+ GSM) |
2.2 The best thread for knit fabrics
The thread used for sewing knits should ideally have some degree of stretch to accommodate the movement of the fabric.
Polyester vs. cotton thread
- Polyester thread: Polyester thread is generally preferred for knit fabrics due to its strength, durability, and slight inherent stretch. It’s less likely to break when the fabric is stretched, making it a reliable choice for seams.
- Cotton thread: While cotton thread is suitable for many woven fabrics, it’s generally not recommended for knits. Cotton thread lacks the stretch needed for knit seams and is more prone to breakage. However, a cotton-wrapped polyester thread can be a good compromise, offering the strength of polyester with a cotton-like appearance.
Thread weight considerations
Thread weight refers to the thickness of the thread. A standard all-purpose thread (usually around 40-50 weight) is suitable for most knit fabrics. For very lightweight knits, a finer thread (higher weight number) may be used. For very heavy knits, a slightly thicker thread (lower weight number) might be considered, but it’s usually best to stick with an all-purpose thread and adjust the stitch settings instead.
2.3 Must-have tools
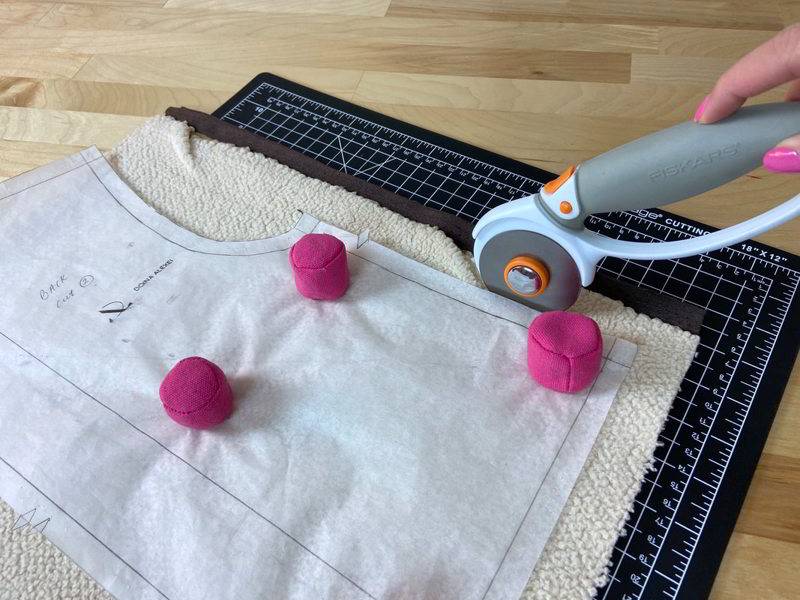
- Rotary cutter and cutting mat: A rotary cutter and self-healing cutting mat allow for fast and accurate cutting of knit fabrics, especially when working with multiple layers or slippery materials. The rotary cutter prevents the fabric from stretching or distorting as it’s cut.
- Sharp scissors: A good pair of fabric scissors is still essential for clipping threads, trimming seam allowances, and cutting smaller pieces.
- Pins (ballpoint pins recommended): Pins are used to hold fabric layers together before sewing. Ballpoint pins, with their rounded tips, are ideal for knits as they won’t snag the fabric. However, regular pins can be used with care, making sure to pin within the seam allowance.
- Measuring tape and seam gauge: Accurate measurements are crucial for any sewing project. A flexible measuring tape is used for taking body measurements and measuring fabric, while a seam gauge is helpful for marking consistent seam allowances.
2.4 Optional tools (but highly recommended)
- Walking foot (or dual feed): A walking foot, also known as an even feed foot, has its own set of feed dogs that work in conjunction with the machine’s feed dogs to feed both layers of fabric evenly. This prevents the top layer from stretching or shifting, which is particularly helpful for knits. Some sewing machines have a built-in dual feed system that performs the same function.
- Serger (overlocker): A serger, also called an overlocker, is a specialized sewing machine that trims the seam allowance, sews the seam, and finishes the edge all in one step. It creates professional-looking, stretchy seams that are ideal for knits. While not essential, a serger is a significant time-saver and produces superior results for knit garments.
- Twin needle: A twin needle creates two parallel rows of stitching on the top of the fabric and a zigzag stitch on the underside. This is a great option for hemming knits, as it creates a stretchy and professional-looking finish that mimics a coverstitch machine.
- Fabric stabilizers (tissue paper, wash-away stabilizer): Fabric stabilizers can be used to provide temporary support to knit fabrics during sewing, preventing stretching or distortion. Tissue paper can be placed under the fabric during seaming and then torn away. Wash-away stabilizer dissolves in water after sewing.
- Iron and pressing cloth: Used to make folds and seams more defined.
3. Preparing knit fabric for sewing
3.1 Pre-washing and drying: Shrinkage and colorfastness
Pre-washing knit fabric before cutting and sewing is a crucial step, often overlooked by beginners, but it can save a lot of heartache later on. Knit fabrics, especially those made from natural fibers like cotton, are prone to shrinkage.
The amount of shrinkage can vary considerably depending on the fiber content, the knit structure, and the manufacturing process. Pre-washing allows the fabric to shrink before it’s made into a garment, ensuring that the finished item will fit correctly after laundering.
Beyond shrinkage, pre-washing also helps to test for colorfastness. Some dyes, particularly darker or more vibrant colors, can bleed during washing. Pre-washing removes any excess dye, preventing it from staining other fabrics or causing discoloration in the finished garment.
It’s important to wash and dry the fabric in the same way that the finished garment will be laundered. For example, if a T-shirt is likely to be machine-washed and tumble-dried, the fabric should be pre-washed and dried using the same settings.
3.2 Finding the grainline and direction of greatest stretch (DOGS)
Understanding the grainline and the direction of greatest stretch (DOGS) is essential for correctly laying out pattern pieces on knit fabric. Unlike woven fabrics, which have a clearly defined lengthwise and crosswise grain, knits can be a bit more challenging to decipher.
The grainline on knit fabric generally runs parallel to the selvedges (the finished edges of the fabric). However, the selvedges can sometimes be distorted or stretched, so it’s not always a reliable indicator. A more accurate way to find the grainline is to look for the vertical rows of loops (wales) on the right side of the fabric. These wales should run parallel to the grainline.
The direction of greatest stretch (DOGS) is, as the name suggests, the direction in which the fabric stretches the most. In most cases, the DOGS runs across the width of the fabric (crosswise grain), from selvedge to selvedge. However, this is not always the case, particularly with some specialty knits. To determine the DOGS, gently stretch the fabric in both directions. The direction with the most significant stretch is the DOGS.
3.3 Cutting knit fabric: Tips for accuracy and preventing distortion
Cutting knit fabric requires a slightly different approach than cutting wovens. The inherent stretch and potential for curling edges can make it tricky to achieve accurate cuts.
Use a rotary cutter and cutting mat (highly recommended)
A rotary cutter and a self-healing cutting mat are the best tools for cutting knit fabrics. The rotary cutter allows for smooth, continuous cuts without lifting the fabric, minimizing distortion. The cutting mat provides a stable surface and protects the work surface.
Cut single layers whenever possible
While it’s tempting to cut multiple layers of fabric at once to save time, cutting knit fabrics in a single layer is generally recommended, especially for beginners. This provides greater control and accuracy, preventing the layers from shifting and stretching. If cutting on the fold, ensure the fabric is perfectly aligned and smooth before cutting.
Use pattern weights and/or pins sparingly
Excessive pinning can distort knit fabric. If using pins, use ballpoint pins and place them within the seam allowance to avoid creating holes. Pattern weights are a good alternative to pins, as they hold the fabric flat without piercing it.
Address curling edges
Some knit fabrics, particularly single knits like jersey, tend to curl at the cut edges. This can make cutting and sewing more difficult. A light spray of fabric starch can help to temporarily stabilize the edges and prevent curling. Alternatively, use a pressing cloth, and press.
4. Setting up your sewing machine for knits
4.1 Choosing the right stitch: Zigzag, stretch stitches, and more
When sewing knit fabrics, selecting the appropriate stitch is as crucial as choosing the correct needle. Because knit fabrics stretch, the seams need to stretch along with them. Using a standard straight stitch for seams on a knit garment can lead to popped stitches and limited movement.
Zigzag stitch settings (width and length)
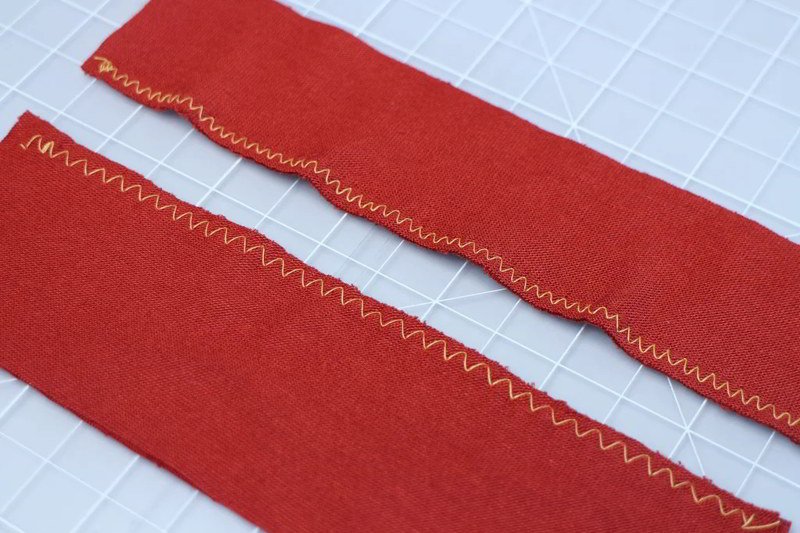
The zigzag stitch is a versatile and widely used stitch for sewing knits. It creates a seam that can stretch without breaking. The width and length of the zigzag stitch can be adjusted to suit different fabrics and seam types.
For general seaming, a narrow to medium zigzag is often recommended. A good starting point is a width of 1.5-2.5mm and a length of 2-3mm. For lightweight knits, a narrower and shorter zigzag may be preferable. For heavier knits, a wider and longer zigzag might be needed. It’s always best to test different settings on scraps of the chosen fabric to find what works best.
Other useful stitches (triple zigzag, overlock stitch)
Many sewing machines offer additional stitches that are suitable for knits:
- Triple zigzag (triple straight stretch stitch): This stitch looks like a reinforced zigzag, with each “zig” and “zag” composed of three small stitches. It provides extra strength and stretch, making it suitable for seams that will experience a lot of stress.
- Overlock stitch (mock overlock stitch): Some machines have a stitch that mimics the look and function of a serger/overlock stitch. It sews the seam and finishes the edge simultaneously. While not as robust as a true serger stitch, it can be a good option for knits.
When to use a straight stitch (and when not to)
A straight stitch should generally be avoided for seams on knit garments that need to stretch. However, there are a few exceptions:
- Stabilizing seams: A straight stitch can be used to stabilize areas that don’t need to stretch, such as shoulder seams. This can be done by sewing a line of straight stitching within the seam allowance before sewing the main seam with a zigzag or stretch stitch.
- Topstitching (with caution): A straight stitch can sometimes be used for topstitching on knits, if the area being topstitched doesn’t need to stretch significantly. However, a narrow zigzag or a twin needle is often a better choice for topstitching knits.
- Areas with clear elastic: If clear elastic is being used to stabilize a seam (e.g., in swimwear or activewear), a straight stitch can be used to attach the elastic, as the elastic itself provides the stretch.
4.2 Adjusting tension and presser foot pressure
Lowering the presser foot pressure
Fine-tuning the presser foot pressure is a critical adjustment that’s often overlooked, but it can make a significant difference in the quality of knit seams. Knit fabrics, especially those that are lightweight or have a lot of stretch, can be easily distorted by excessive pressure from the presser foot.
This can lead to wavy seams, stretched-out fabric, and uneven feeding. Most sewing machines have a dial or lever that allows adjusting the presser foot pressure. The exact location and markings may vary depending on the machine model, so refer to the manual.
Lowering the pressure reduces the amount of force exerted on the fabric, allowing it to feed through the machine more smoothly and evenly. The ideal pressure setting will depend on the specific fabric being used. A good starting point is to reduce the pressure by one or two increments from the default setting.
Test sew on scraps of fabric, and continue to adjust the pressure until the fabric feeds smoothly without stretching or puckering. For very lightweight or delicate knits, it may be necessary to reduce the pressure significantly.
4.3 Test sewing: Always make a sample!
Before starting on the actual garment, it’s essential to test the chosen stitch, needle, thread, and tension settings on scraps of the same fabric. This allows for fine-tuning the settings to achieve the best results without risking damage to the project. Sew a few sample seams, stretching them gently to check for skipped stitches, thread breakage, or wavy seams. Adjust the settings as needed until the seams are strong, stretchy, and lie flat.
5. Sewing techniques for knit fabrics
5.1 Seaming techniques
Seaming knit fabrics requires a combination of the right stitch, proper fabric handling, and, optionally, the use of specialized tools like a serger. The goal is to create seams that are strong, stretchy, and lie flat without puckering or waving.
Using a zigzag stitch (or stretch stitch) on a regular sewing machine
As previously discussed, a zigzag stitch (or a specialized stretch stitch) is the primary method for seaming knits on a regular sewing machine. Here’s a step-by-step approach:
- Pinning: Use ballpoint pins (or carefully placed regular pins within the seam allowance) to hold the fabric layers together. Avoid excessive pinning, which can distort the fabric.
- Stitch selection: Select the zigzag stitch (or a stretch stitch like a triple zigzag or mock overlock stitch) on the sewing machine.
- Settings: Adjust the stitch width and length as needed. A good starting point is a width of 1.5-2.5mm and a length of 2-3mm.
- Test sewing: Always test the stitch on scraps of the fabric first, adjusting the settings as needed.
- Sewing the seam: Sew the seam with a consistent seam allowance, guiding the fabric gently without stretching it.
- Backstitching: Backstitch at the beginning and end of the seam to secure the stitches.
- Pressing (optional): Press after finishing sewing.
Using a serger (overlocker)
A serger is a specialized machine that creates professional-looking, stretchy seams on knits. It trims the seam allowance, sews the seam, and finishes the edge all in one step.
- Threading: Thread the serger according to the manufacturer’s instructions. This typically involves threading 3 or 4 spools of thread.
- Settings: Adjust the serger’s settings (stitch length, differential feed) according to the fabric type.
- Test sewing: Test the stitch on scraps of the fabric.
- Sewing the seam: Feed the fabric through the serger, allowing it to trim the seam allowance and sew the seam.
- Finishing: Serger seams don’t typically require backstitching. The serger creates a chain stitch that is self-locking.
Preventing fabric stretching and distortion
- Walking foot (or dual feed): As mentioned earlier, a walking foot (or a built-in dual feed system) is highly recommended for sewing knits. It helps to feed both layers of fabric evenly, preventing stretching and distortion.
- Lowering presser foot pressure: Reducing the presser foot pressure can also help to prevent stretching.
- Fabric stabilizers: Tissue paper or wash-away stabilizer can be placed under the fabric during sewing to provide additional support and prevent stretching.
- Gentle handling: Avoid pulling or stretching the fabric while sewing. Let the machine’s feed dogs do the work.
Reinforcing seams (optional)
For seams that will experience a lot of stress, such as shoulder seams or crotch seams, reinforcement may be desired.
- Stay tape: Stay tape (a narrow, stable tape) can be sewn into the seam allowance to provide extra stability.
- Clear elastic: Clear elastic can be sewn into the seam allowance, particularly in areas like shoulder seams, to provide both support and stretch.
5.2 Hemming techniques
Hemming knit fabrics requires techniques that maintain the stretch of the fabric while creating a neat and professional-looking finish. Several methods can be used, depending on the desired look and the available tools.
Single fold hem (using a zigzag stitch or twin needle)
This is a simple and common hemming technique for knits.
- Fold and press: Fold the fabric edge up to the desired hem allowance and press.
- Stitch: Stitch close to the folded edge using a zigzag stitch, a twin needle, or a coverstitch machine (if available). A zigzag stitch will provide stretch, while a twin needle will create two parallel rows of stitching on the top and a zigzag on the underside, mimicking a coverstitch.
Double fold hem (using a zigzag stitch or twin needle)
This hem provides a cleaner finish, as the raw edge is enclosed within the fold.
- Fold and press (twice): Fold the fabric edge up by a small amount (e.g., 1/4 inch) and press. Then, fold it up again by the remaining hem allowance and press again.
- Stitch: Stitch close to the inner folded edge using a zigzag stitch, a twin needle, or a coverstitch machine.
Coverstitch hem (using a coverstitch machine)
A coverstitch machine creates a professional-looking hem with two or three rows of stitching on the top and a looped stitch on the underside. This stitch is highly stretchy and durable.
- Fold and press: Fold the fabric edge up to the desired hem allowance and press.
- Stitch: Feed the fabric through the coverstitch machine, aligning the needles with the desired position on the hem.
Banded hem (using knit bands)
This technique involves attaching a separate band of knit fabric to the hem edge. It’s often used for necklines, cuffs, and hems on casual garments.
- Cut the band: Cut a strip of knit fabric (often rib knit) to the desired width and length (usually slightly shorter than the hem circumference to provide a snug fit).
- Sew the band: Fold the band in half lengthwise, right sides together, and sew the short ends together to form a loop.
- Attach the band: Divide the band and the hem edge into quarters and mark with pins. With right sides together, match the quarter marks and pin the band to the hem edge, stretching the band slightly to fit. Sew the band to the hem edge using a zigzag stitch or a serger.
5.3 Necklines and armholes
Finishing necklines and armholes on knit garments requires techniques that maintain stretch and prevent the edges from stretching out of shape. Common methods include using knit binding, self-fabric binding, or ribbing.
Knit binding (using a separate strip of knit fabric)
Knit binding involves encasing the raw edge of the neckline or armhole with a narrow strip of knit fabric.
- Cut the binding: Cut a strip of knit fabric (often a contrasting color or a coordinating print) to the desired width and length (usually slightly shorter than the neckline or armhole circumference to provide a snug fit).
- Attach the binding: Fold the binding in half lengthwise, wrong sides together, and press. Pin the binding to the right side of the neckline or armhole, matching the raw edges and stretching the binding slightly to fit. Sew the binding to the neckline or armhole using a zigzag stitch or a serger.
- Finish the binding: Fold the binding to the wrong side, encasing the raw edge, and pin in place. Stitch in the ditch (in the seam between the binding and the garment) from the right side, or use a twin needle to secure the binding.
Self-fabric binding (using the same fabric as the garment)
This technique is similar to knit binding, but the binding strip is cut from the same fabric as the garment. The process is the same as for knit binding.
Ribbing (using rib knit fabric)
Ribbing is a highly stretchy knit fabric that is often used for neckbands, cuffs, and waistbands.
- Cut the ribbing: Cut a strip of rib knit fabric to the desired width and length (usually significantly shorter than the neckline or armhole circumference to provide a snug, elastic fit).
- Sew the ribbing: Fold the ribbing in half lengthwise, right sides together, and sew the short ends together to form a loop.
- Attach the ribbing: Divide the ribbing and the neckline or armhole edge into quarters and mark with pins. With right sides together, match the quarter marks and pin the ribbing to the neckline or armhole edge, stretching the ribbing significantly to fit. Sew the ribbing to the neckline or armhole edge using a zigzag stitch or a serger.
6. Troubleshooting common knit sewing problems
Sewing with knits, while rewarding, can sometimes present unique challenges. Understanding the common problems and their solutions is key to achieving professional-looking results.
6.1 Wavy seams
Causes: Wavy seams are often caused by the fabric stretching during sewing. This can be due to excessive presser foot pressure, stretching the fabric while sewing, or not using a walking foot (or dual feed).
Solutions:
- Lower presser foot pressure: Reduce the pressure exerted by the presser foot.
- Use a walking foot (or dual feed): This helps to feed both layers of fabric evenly.
- Don’t stretch the fabric: Avoid pulling or stretching the fabric while sewing. Let the machine’s feed dogs do the work.
- Use fabric stabilizers: Tissue paper or wash-away stabilizer can help prevent stretching.
- Steam pressing: After sewing, use steam from an iron (without pressing down) to help shrink the seam back to its intended shape.
6.2 Skipped stitches
Causes: Skipped stitches occur when the needle fails to catch the bobbin thread. This can be due to using the wrong needle type or size, a dull or damaged needle, incorrect threading, or tension issues.
Solutions:
- Use the correct needle: Use a ballpoint or stretch needle designed for knits.
- Check needle size: Match the needle size to the fabric weight.
- Replace the needle: Use a new, sharp needle.
- Rethread the machine: Ensure the machine is threaded correctly, both the top thread and the bobbin.
- Check tension: Adjust the thread tension if necessary.
- Stretch needle: For highly elastic fabrics, try using a stretch needle.
6.3 Thread breakage
Causes: Thread breakage can be caused by using the wrong thread type, poor-quality thread, incorrect threading, tension issues, or a dull or damaged needle.
Solutions:
- Use polyester thread: Polyester thread is generally recommended for knits due to its strength and stretch.
- Use high-quality thread: Avoid old or brittle thread.
- Rethread the machine: Ensure the machine is threaded correctly.
- Check tension: Adjust the thread tension if necessary.
- Replace the needle: Use a new, sharp needle.
- Check needle size: Match needle with the type of fabric.
6.4 Fabric puckering
Causes: Fabric puckering can be caused by tension issues, incorrect stitch settings, or uneven fabric feeding.
Solutions:
- Adjust tension: Fine-tune the thread tension.
- Check stitch settings: Ensure the stitch length and width are appropriate for the fabric.
- Use a walking foot (or dual feed): This helps to feed both layers of fabric evenly.
- Lower presser foot pressure: Reduce the pressure exerted by the presser foot.
6.5 Needle breaking
Causes: Needle breakage can be caused by using the wrong needle size for the fabric weight, hitting a pin, forcing the fabric through the machine, or a dull or damaged needle.
Solutions:
- Use the correct needle size: Match the needle size to the fabric weight.
- Avoid pins: Remove pins before they reach the needle.
- Don’t force the fabric: Let the machine’s feed dogs do the work.
- Replace the needle: Use a new, sharp needle.
6.6 Uneven feeding
Causes: Presser foot pressure, incorrect stitch settings, not using a walking foot
Solutions:
- Use a walking foot (or dual feed): This helps to feed both layers of fabric evenly.
- Lower presser foot pressure: Reduce the pressure exerted by the presser foot.
7. Advanced knit sewing techniques (optional)
This section provides a brief overview of more advanced techniques for working with knit fabrics.
7.1 Working with sheer or delicate knits
Sheer and delicate knits, such as mesh or lightweight silk jersey, require extra care during handling and sewing. Use a very fine ballpoint needle (size 70/10 or smaller), fine thread, and a short stitch length. Fabric stabilizers, such as tissue paper or wash-away stabilizer, are often essential to prevent stretching and distortion.
7.2 Pattern adjustments for knits (negative ease)
Some knit patterns are designed with negative ease, meaning the pattern measurements are smaller than the body measurements. This is because the stretch of the fabric allows the garment to fit snugly. When working with patterns designed for knits, it’s crucial to choose the correct size based on the pattern’s finished measurements and the stretch percentage of the fabric.
7.3 Sewing zippers and closures on knits
Inserting zippers and other closures into knit garments can be challenging due to the stretch of the fabric. Stabilizing the area around the closure with interfacing or stay tape is often necessary. Special techniques, such as using a stretchable interfacing or a knit stay tape, may be required to maintain the stretch of the garment.
7.4 Other advanced techniques
- Working with different fabric weights and knit types requires careful consideration of needle size, stitch settings, and handling techniques.
- Other advanced techniques include specialized seam finishes, working with textured knits, and color blocking with knits.
8. Related questions
8.1 Can I sew knits without a serger?
Absolutely! While a serger is helpful for sewing knits, it’s not essential. A regular sewing machine with a zigzag stitch (or other stretch stitches) can be used to sew knit seams and hems successfully.
8.2 What is the best stitch for sewing knits?
A zigzag stitch is the most versatile stitch for sewing knits on a regular sewing machine. Other options include a triple zigzag stitch, a mock overlock stitch, or a twin needle for hemming.
8.3 Do I need to pre-wash knit fabric?
Yes, pre-washing knit fabric is highly recommended to allow for shrinkage and to test for colorfastness.
8.4 How do I prevent knit fabric from stretching while sewing?
Use a walking foot (or dual feed), lower the presser foot pressure, use fabric stabilizers, and avoid pulling or stretching the fabric while sewing.
8.5 How to choose the right size pattern when working with the fabric?
It is important to carefully compare your measurements with the extent to which the fabric can stretch.
Read more:
Sewing with knit fabrics opens up a world of possibilities for creating comfortable, stylish, and versatile garments. While knits may seem intimidating at first, understanding the unique properties of these fabrics and mastering a few key techniques will empower even beginners to tackle knit projects with confidence.
From choosing the right needle and thread to adjusting machine settings and employing proper handling techniques, every step contributes to achieving professional-looking results. Don’t be afraid to experiment, practice on scraps, and embrace the stretch!


