


Sewing Your Clothes: A Beginner’s Complete Guide


Interested in learning to make your own clothes but don’t know where to start? This complete guide provides the essential foundation. Discover the rewarding benefits of sewing: crafting unique styles beyond mass production, achieving a perfect custom fit, and controlling garment quality.
Understand the crucial tools you’ll need, from selecting a suitable sewing machine to choosing easy-to-handle woven fabrics like cotton. Learn to decode sewing patterns, master basic machine techniques, and follow clear steps for accurate preparation and construction. Start your handmade wardrobe journey confidently with guidance on simple first projects and overcoming common beginner hurdles.
1. Why start sewing your own clothes?
1.1. Crafting your unique style: Beyond mass production
Ready-to-wear fashion often follows fleeting trends, presents limited sizing options, and can vary significantly in quality. Sewing your own garments offers a departure from these constraints. You gain the freedom to select fabrics, colors, and patterns that truly resonate with your personal style, turning clothing creation into a fulfilling creative outlet.
There’s a unique satisfaction in wearing something made by your own hands, a tangible expression of individuality unattainable through mass-produced items. These DIY projects allow you to build a wardrobe piece by piece, reflecting exactly who you are.
1.2. The fit factor: Customization and comfort
A frequent frustration with store-bought clothing stems from standardized sizing that rarely accommodates the diversity of human body shapes. Common fit issues abound. Learning to sew empowers you to create clothing that is customizable to your specific form.
By taking accurate body measurements and applying them during the sewing process, even with simple pattern adjustments, you can achieve a significantly better fit. This translates directly to enhanced comfort and garments that flatter your unique silhouette, something often missing off the rack.
1.3. Quality you control: Understanding garment construction
The process of making clothes provides invaluable insight into garment construction. You learn firsthand how pieces come together and why certain techniques are used. This knowledge allows you to make conscious choices about materials, opting for higher quality fabrics and employing durable sewing methods.
The result is often handmade clothing that possesses greater longevity than many fast-fashion alternatives. Building your wardrobe this way emphasizes value and the potential for garments to last for years, not just a season.
2. Gearing up: Your essential beginner sewing toolkit
2.1. Choosing your first sewing machine: Essential features vs. fancy extras
Embarking on your sewing journey doesn’t necessitate the most expensive sewing machine on the market. A reliable, basic model is perfectly sufficient for learning and creating a wide range of garments. Focus on sewing machine basics rather than being swayed by a multitude of decorative stitches you likely won’t use initially. Key features for a beginner sewing machine include:
- Straight stitch: The fundamental stitch for most seams.
- Zigzag stitch: Essential for finishing raw edges and sewing knits.
- Backstitch capability: Needed to lock stitches at the beginning and end of seams.
- Adjustable stitch length and width: Allows control over stitch appearance and function.
- Reliable tension: Consistent tension is crucial for balanced stitches (where the top and bottom threads meet neatly between fabric layers).
Consider reputable brands known for user-friendly basic models. Additionally, well-maintained second-hand machines, particularly older metal-bodied Singer models, are often prized for their durability and straightforward operation. Don’t feel pressured to invest heavily; reliability is the priority.
2.2. Must-have hand tools: Cutting, measuring, marking & pinning
Alongside your machine, a few hand tools are indispensable. Here’s your essential sewing tools list:
- Fabric scissors: Invest in a quality pair and dedicate them only to cutting fabric to maintain their sharpness.
- Paper scissors: Use these for cutting out paper patterns, preserving your fabric shears.
- Measuring tape: A flexible tailor’s tape is crucial for taking body measurements and measuring fabric.
- Seam gauge: A small ruler with a sliding marker, handy for checking small measurements like seam allowances and hems accurately.
- Pins: Used to hold fabric pieces together before and during sewing. Glass-head pins are preferable as they won’t melt if accidentally touched by an iron.
- Pincushion or magnetic holder: Keeps pins safely organized and accessible.
- Fabric marking tool: Options include tailor’s chalk (brushes off easily), water-soluble pens (disappear with water), or disappearing ink pens (fade over time). Choose based on your fabric and project duration. Use on the wrong side of the fabric.
- Seam ripper: An essential tool for removing stitches when mistakes happen – consider this a learning tool, not a sign of failure. Everyone uses one!
2.3. Don’t skip the pressing tools: Iron and board essentials
Pressing is a non-negotiable step for achieving professional-looking results in sewing. This involves using an iron and ironing board not just at the end, but consistently during the construction process. Pressing helps to “set” stitches into the fabric, flatten seam allowances, create crisp edges for hems and collars, and meld interfacing (a stabilizing fabric layer) to fabric pieces.
A standard household iron and a sturdy ironing board are all you need to start. Neglecting to press as you sew will invariably result in a garment that looks homemade rather than handmade.
3. Understanding the building blocks: Fabric and patterns
3.1. Fabric fundamentals: Why woven fabrics are your first friend
Understanding basic fabric types is key. Fabrics generally fall into two categories: woven and knit. Woven fabric (like quilting cotton, linen, chambray, or poplin) is created by interlacing threads at right angles, resulting in a stable material with minimal stretch along its lengthwise and crosswise grains. Knit fabric (like t-shirt jersey or sweater knits) is made from interlocking loops of yarn, giving it inherent stretch.
For beginners, starting with woven fabrics is highly recommended. Their stability makes them significantly easier to cut accurately and sew without excessive shifting or stretching, offering a more forgiving introduction to handling fabric under the needle. Your fabric choice heavily influences the sewing experience.
3.2. Choosing beginner-friendly fabrics: Cotton, linen, and stable blends
When selecting your first fabrics, prioritize ease of handling. Recommended fabrics for beginners include several types of wovens:
- Quilting cotton: Stable, easy to press, available in countless prints and solids. While sometimes slightly stiffer than apparel cotton, it’s excellent for practice and simple structured garments.
- Medium-weight cotton fabric: Look for poplin or broadcloth. These are smooth, relatively crisp, and sew beautifully.
- Chambray: A lightweight fabric often resembling denim but much easier to work with.
- Linen fabric or linen blends: Linen offers a beautiful natural texture and becomes softer with washing. While it wrinkles, medium-weight linen is quite stable and pleasant to sew.
Initially, avoid fabrics that are very slippery (like satin or silk), very thick or stiff (heavy denim, canvas), or very stretchy (like spandex blends or slinky knits), as these present unique challenges better tackled with more experience.

3.3. Decoding sewing patterns: Reading the envelope and basic symbols
Sewing patterns are your blueprint. The pattern envelope contains crucial information – learning pattern reading basics is essential. Key elements typically found on the envelope back include:
- Front illustration/photo: Shows the finished garment.
- Back line drawings: Technical sketches showing different design options (“views”) included in the pattern.
- Size chart: Lists body measurements to help you select the correct pattern size.
- Fabric recommendations: Suggests suitable fabric types and sometimes weights.
- Notions list: Details other required items like zippers, buttons, elastic, interfacing.
- Yardage requirements: Tells you how much fabric is needed for each view and size, often for different fabric widths.
Inside, the pattern tissue pieces have important pattern markings. Some fundamental symbols to recognize are:
- Grainline arrow: A long line with arrows at one or both ends; must be aligned parallel to the fabric’s selvage (the finished edge) or lengthwise grain.
- Fold line: Indicates that the pattern edge should be placed along the fold of the fabric.
- Notches: Diamond or triangular shapes along cutting lines, used to match adjacent pattern pieces accurately.
- Dots/Squares: Used for alignment, marking points like dart tips or pocket placements.
Focusing on these basics will help you navigate beginner sewing patterns effectively.
3.4. Where to find simple patterns: Indie vs. “big 4” options
Patterns are available from various sources. Independent (“indie”) pattern companies often focus on modern designs, frequently offer digital PDF patterns you print at home, and are known for very detailed, photo-rich instructions, which can be helpful for beginners. Examples include Tilly and the Buttons, Grainline Studio, and Closet Core Patterns.
The traditional “Big 4” pattern companies (Simplicity, McCall’s, Butterick, Vogue) offer a vast range of styles, are widely available in fabric stores, and often have sales. They usually include multiple sizes in one envelope.
Regardless of the source, look specifically for patterns labeled “beginner,” “easy,” “simple,” or those featuring few pattern pieces (check the line drawings on the envelope back). Online pattern marketplaces and local fabric stores are both excellent resources for finding beginner patterns.
4. Your first date with the sewing machine
4.1. Getting started: Threading the machine and winding the bobbin
Correctly threading machine components is fundamental for achieving good stitch quality. Improper threading is the most common cause of stitch problems. While specific paths vary between models, the general process involves guiding the upper thread from the spool through a series of guides and tension discs, down to the needle.
Winding the bobbin (the small spool that holds the lower thread) also follows a specific path on your machine, usually involving the handwheel and a bobbin winding spindle. Crucially, always refer to your specific sewing machine’s manual. The manual provides diagrams and step-by-step instructions tailored to your model. Don’t guess – proper threading and bobbin placement are essential sewing machine basics.
4.2. Practice makes progress: Sewing straight lines and backstitching on scraps
Before attempting your first project, dedicate time to practice on scrap fabric (ideally similar to your project fabric). This builds familiarity with controlling the machine’s speed and guiding the fabric.
- Sewing a straight stitch: Place the fabric under the presser foot (the metal piece holding the fabric down), lower the foot, and gently press the foot pedal. Focus on guiding the fabric smoothly with your hands – avoid pushing or pulling it forcefully, as the machine’s feed dogs (the textured metal bits under the fabric) will move it automatically. Aim for consistent, straight lines.
- Backstitching: This technique locks stitches at the beginning and end of a seam to prevent unraveling. Most machines have a backstitch lever or button. Sew forward a few stitches, press and hold the backstitch control to sew backward over those stitches, release, and then continue sewing forward. Repeat at the end of the seam.
- Practice curves and corners: Once comfortable with straight lines, practice sewing gentle curves and pivoting at corners (stop with the needle down in the fabric, lift the presser foot, pivot the fabric, lower the foot, and continue sewing).
These basic sewing skills are foundational.
4.3. Understanding seam allowance: Why it matters
Seam allowance is the distance between the cut edge of the fabric and the line of stitching. Sewing patterns specify the required seam allowance (common examples are 5/8 inch or 1.5 cm, 1/2 inch or 1.2 cm, or 1/4 inch or 6 mm). Maintaining a consistent seam allowance throughout your project is critical for accurate sewing.
If your seam allowances are uneven or incorrect, the garment pieces will not fit together properly, leading to size and shape issues in the final product. Most sewing machine throat plates (the metal plate under the needle) have etched lines marking common seam allowance measurements. Learn to use these guides by aligning the edge of your fabric with the appropriate line as you sew.
5. Prep work is key: Measure twice, cut once
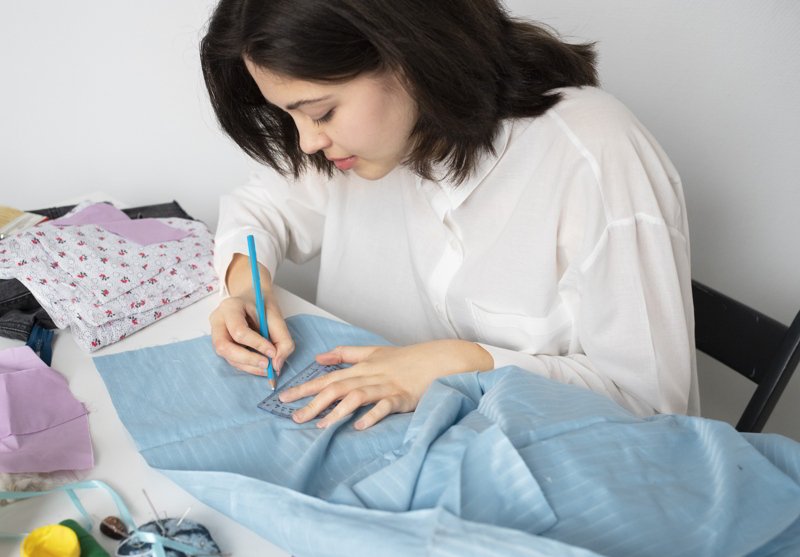
5.1. Taking accurate body measurements: The foundation of fit
Accurate body measurements are the cornerstone of a well-fitting garment. Always use current measurements, as bodies can change. You’ll need a flexible measuring tape. Key measurements often required include:
- Bust/Chest: Measure around the fullest part of your bust/chest, keeping the tape parallel to the floor.
- Waist: Measure around your natural waistline (usually the narrowest part of your torso), keeping the tape snug but not tight.
- Hips: Measure around the fullest part of your hips and seat, keeping the tape parallel to the floor.
Wear fitted clothing or undergarments similar to what you’ll wear with the finished garment when taking measurements. Stand naturally and don’t pull the tape too tight. It’s often helpful to have someone assist you for greater accuracy. Record these measurements carefully.
5.2. Fabric preparation: The importance of pre-washing
This step is crucial and often overlooked by beginners: always pre-wash (and dry) your fabric before cutting out pattern pieces. Most fabrics, especially natural fibers like cotton, linen, and rayon, are prone to shrinking when first laundered. Pre-washing fabric ensures that any shrinkage happens before you cut and sew.
Skipping this step can result in a finished garment that shrinks after the first wash, potentially becoming too small or distorted. Launder the fabric using the same method (machine wash/dry, hand wash, etc.) and temperature you intend to use for the finished garment. After washing and drying, press the fabric to remove wrinkles before proceeding with fabric preparation.
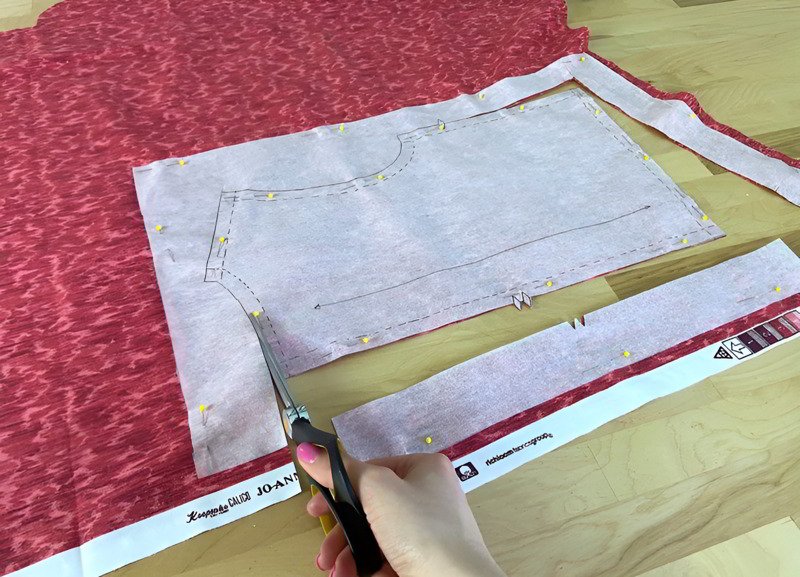
5.3. Pattern layout and cutting: Grainlines and precision
Careful pattern layout and cutting are essential for a successful outcome. First, prepare your fabric by pressing it smooth and folding it according to the pattern instructions (often lengthwise, matching selvage to selvage – the finished woven edges). Lay out the paper pattern pieces on the fabric efficiently, minimizing waste.
Pay critical attention to the grainline arrow on each pattern piece; this arrow must be perfectly parallel to the fabric’s selvage or the lengthwise grain (the direction of the threads running parallel to the selvages). Use a measuring tape or ruler to ensure accuracy.
Pieces marked “Place on Fold” should have that edge aligned precisely with the fabric fold. Secure the pattern pieces using pattern weights or pins placed within the seam allowances. Use sharp fabric cutting techniques: employ long, smooth strokes with your fabric scissors, keeping the fabric flat on the table. Cut precisely along the pattern lines. Accuracy here prevents problems later.
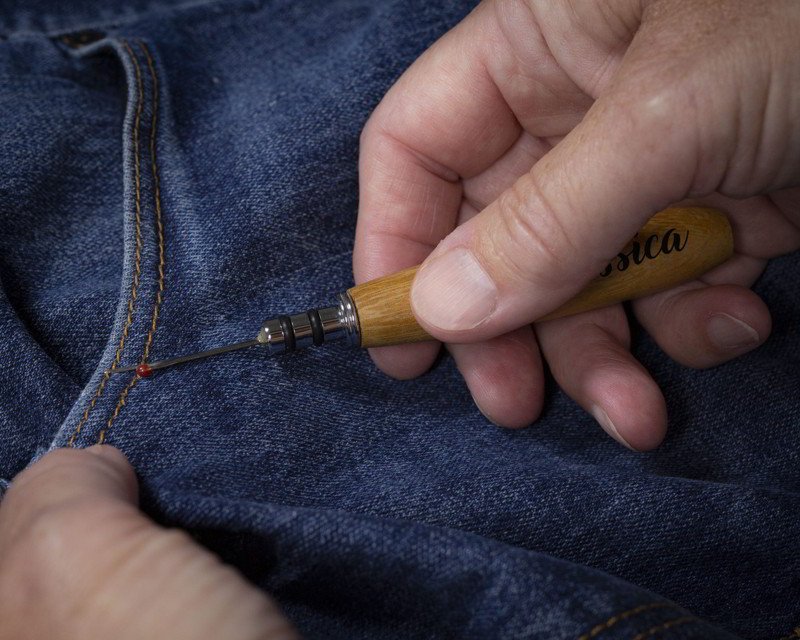
5.4. Transferring essential markings from pattern to fabric
Before removing the paper pattern pieces from your cut fabric, you must transfer important pattern markings. These markings (like notches, dots, squares, dart lines, or buttonhole placements) are crucial guides for accurately aligning and sewing the garment pieces together. Common methods include:
- Tailor’s Tacks: Small hand-sewn loops of thread used for marking points on both layers of fabric simultaneously.
- Marking Pen/Chalk: Use a fabric marking tool (chosen earlier) to draw symbols or lines directly onto the wrong side of the fabric.
- Clipping Notches: Make small snips (about 1/4 inch or 6mm deep) into the seam allowance at notch locations. Be careful not to clip beyond the seam allowance.
Choose the method best suited to your fabric and preference. Don’t skip this step; these markings are vital for construction.
6. Constructing your first simple garment
6.1. Choosing an easy first project: Skirts, tote bags, or simple tops
Selecting appropriate beginner sewing projects sets you up for success. Start with items that involve mostly straight seams and basic techniques. Good options include:
- Simple Elastic Waist Skirts: These require minimal fitting and introduce techniques like creating a casing for elastic. Look for skirt patterns specifically designed for beginners
- Basic Tote Bags: Excellent for practicing straight seams, attaching handles, and potentially adding a simple lining.
- Pillowcases: A classic beginner project that reinforces straight seams and basic hemming.
- Boxy Tops or Tunics: Garments with simple shapes (rectangular pieces), minimal curves, and no complex closures like zippers or set-in sleeves.
These easy sewing projects build confidence and allow you to practice fundamental skills on simple garments with a forgiving fit.
6.2. Following instructions: Understanding sewing steps
Before cutting or sewing, read through all the pattern instructions from beginning to end. This gives you an overview of the construction process and helps anticipate upcoming steps. Follow the instructions sequentially, as they are usually ordered logically. Familiarize yourself with common sewing techniques terminology:
- Sew/Stitch: Join fabric pieces with the sewing machine.
- Press: Use an iron to flatten seams or create creases as directed.
- Trim: Cut away excess fabric, often used to reduce bulk in seam allowances.
- Clip: Make small cuts into the seam allowance on curved seams (usually inward curves) to help them lie flat.
- Notch: Make small wedge-shaped cuts out of the seam allowance on outward curves.
If you encounter unfamiliar terms or techniques, don’t hesitate to look them up. Online resources like sewing blogs and YouTube tutorials offer visual explanations for countless dressmaking fundamentals.
6.3. Sewing basic seams: Right sides together (RST)
A fundamental concept in garment sewing is stitching seams with the Right Sides Together (RST). The “right side” refers to the outer, visible side of the fabric (the side you want showing on the finished garment). Place the two fabric pieces you intend to join so their right sides are facing each other.
Align the raw edges that will form the seam. Pin the pieces together, usually placing pins perpendicular to the edge within the seam allowance. When you sewing seams this way, the stitching and the raw edges of the seam allowance will be hidden on the inside of the garment once the piece is turned right side out. Remember to remove pins just before the needle reaches them to avoid breaking the needle.
6.4. Simple seam finishes: Preventing fraying (zigzag, pinking)
Finishing the raw edges of the seam allowances inside your garment is important for durability and a neat appearance. Unfinished edges, especially on woven fabrics, tend to fray with washing and wear. Seam finishing prevents this. Two simple methods suitable for beginners are:
- Zigzag Stitch: Use your sewing machine’s zigzag stitch setting. Sew a line of zigzag stitches along the raw edge of each seam allowance (either separately or together after pressing). This encloses the threads and prevents unraveling.
- Pinking Shears: These scissors have serrated blades that cut a zigzag edge. After sewing and pressing the seam (usually open), trim the edge of each seam allowance with pinking shears. This method is quick but less durable than a zigzag stitch, best for stable fabrics that don’t fray excessively.
These techniques provide a clean finish inside your handmade items.
6.5. The power of pressing: Ironing seams as you go
As mentioned earlier, pressing with an iron is not optional; it’s integral to quality sewing. Reiterate: press each seam immediately after stitching it. Follow the pattern instructions – usually, this involves pressing the seam allowances open (flattening them to either side of the stitch line) or pressing them both to one side.
Pressing seams flat as you construct the garment accomplishes several things: it makes subsequent steps (like matching intersecting seams or topstitching) much easier and more accurate, reduces bulk, and ultimately gives your finished garment a crisp, professional look. Don’t wait until the end; press as you go.
7.1. Troubleshooting basic stitch issues (looping, skipped stitches)
Even with careful preparation, stitch issues can arise. Here’s basic troubleshooting for common problems:
- Looped Threads: If loops appear on the top or bottom of your fabric, the first step is always to completely re-thread the machine – both the upper thread and the bobbin. Ensure the presser foot is up while threading the top thread and down when threading the needle. Check that the bobbin is inserted correctly according to your manual.
- Skipped Stitches: This can be caused by a dull, bent, or incorrect needle. Ensure you’re using the right type and size needle for your fabric and that it’s inserted correctly (usually flat side to the back). Replace the needle if unsure. Lint buildup in the bobbin area can also cause skipped stitches; clean this area regularly following your manual’s instructions.
- Tension Issues: If re-threading and checking the needle doesn’t solve looping or puckering, sewing machine tension might need adjustment. Balanced tension results in stitches looking the same on top and bottom. Consult your manual before adjusting tension dials, and make small adjustments, testing on scrap fabric each time. Incorrect tension is less common than threading errors for beginners.
7.2. Embracing the seam ripper: Mistakes are learning opportunities
Mistakes are an inevitable and valuable part of the learning curve in sewing. Don’t view them as failures! The seam ripper is an essential tool for every sewist, regardless of experience level. Learn to use it carefully: gently slide the pointed tip under a stitch and push forward to cut the thread, or use the tip to pick out individual stitches.
Work slowly to avoid cutting the fabric itself. Unpicking a seam provides a chance to understand why the mistake happened and how the garment pieces fit together. Remember, mistakes happen, and correcting them reinforces your understanding of construction.
7.3. Patience and consistency: Building your sewing skills over time
Learning to sew takes time and patience. Don’t expect perfection on your first try. Sewing skills are built incrementally through consistent practice. Try to set aside regular time for sewing, even if it’s just short sessions. Focus on understanding each step and technique rather than rushing to finish.
Celebrate your progress, no matter how small. Completing even a simple project successfully is a significant achievement. Embrace the process of skill-building, enjoy the journey, and be kind to yourself as you learn.
8. Thinking ahead: Finishing touches and next steps
8.1. Simple finishing techniques (hems, elastic casings)
Once the main construction is done, finishing techniques give your garment a completed look. Two common finishes you’ll encounter early on are:
- Hems: Creating a neat edge at the bottom of garments (skirts, pants, sleeves). A simple double-fold hem involves folding the raw edge up towards the wrong side by a small amount (e.g., 1/4 inch), pressing, then folding again by a larger amount (e.g., 1/2 inch or more), pressing, and stitching close to the inner folded edge.
- Elastic Casings: Creating a channel to insert elastic, often used for waistbands on skirts or pants. This typically involves folding the top edge of the fabric down towards the wrong side, pressing, folding again to create a channel wide enough for the elastic, pressing, and stitching near the inner edge, leaving an opening to insert the elastic.
Mastering these basic hems and casings opens up many simple garment possibilities.
8.2. Basic labels: A thought for future projects or small ventures?
As you create garments you’re proud of, the final touch that separates a homemade project from a handmade masterpiece is a professional label. This is where Packlove comes in.
Adding a custom woven label or a soft satin printed tag with your name or brand not only instills a sense of pride but also elevates your garment’s perceived value. If you’re thinking of gifting your creations or even starting a small clothing business, consistent branding is key.
At Packlove, we specialize in providing high-quality, customizable labels and hang tags perfect for home sewists and emerging brands. A simple, elegant label is the signature your beautiful work deserves. Explore our options to give your creations the polished, professional finish they’ve earned.
8.3. Finding community and further learning
The sewing world is vast and supportive. Continue your learning journey by exploring various resources:
- Online Sewing Blogs and Websites: Many offer detailed tutorials, pattern reviews, and tips.
- YouTube Tutorials: An invaluable resource for visual learners, covering virtually every sewing technique imaginable.
- Social Media: Platforms like Instagram (using hashtags like #sewing, #handmadewardrobe) connect you with a global sewing community for inspiration and advice.
- Local Fabric Stores: Often offer classes, workshops, and knowledgeable staff who can provide guidance.
- Sewing Books: Offer comprehensive guides on techniques and pattern fitting.
Connecting with other sewists, whether online or in person, provides encouragement, troubleshooting help, and endless inspiration for your next project. Utilize these sewing tutorials and community spaces.
9. Related questions
9.1. What’s the difference between quilting cotton and apparel cotton for clothes?
While both are cotton, there are typical differences. Quilting cotton is generally medium-weight, woven tightly for durability in quilts, often has a slightly stiffer drape, and comes in a vast array of prints designed primarily for quilting aesthetics. Its standard width is often around 42-44 inches.
Apparel cottons encompass a wider range of weaves and weights specifically designed for clothing, prioritizing drape, softness, and comfort against the skin. Examples include cotton lawn and voile (lightweight, soft drape), poplin and broadcloth (smooth, slightly crisp), chambray (lighter weight, often with a denim-like look), and twill (durable, diagonal weave).
While some quilting cottons can work for simple, structured garments like aprons or basic skirts, apparel cottons generally offer a better feel and hang for most clothing items.
9.2. Can I really sew clothes with a very basic or second-hand machine?
Absolutely. You do not need an expensive, feature-laden machine to sew beautiful clothes. A reliable basic machine – whether new or a well-maintained second-hand model – that provides a good straight stitch and a functional zigzag stitch is entirely sufficient for a vast range of garment sewing projects.
Many older, all-metal machines (like vintage Singers) are highly sought after for their durability and stitch quality. Focus on ensuring the machine is in good working order (runs smoothly, tension is manageable) rather than the number of bells and whistles. Reliability and essential stitch functions are far more important than decorative options when starting out.
9.3. How do I choose the correct pattern size if my measurements fall between sizes?
This is a common situation. First, carefully compare all your key measurements (bust, waist, hip) to the pattern company’s size chart. If you fall between sizes, check the pattern envelope or instructions for guidance; some companies advise sizing up or down based on the garment’s intended fit (e.g., choose based on bust for tops/dresses, hips for pants/skirts).
Another crucial piece of information, if provided, is the “finished garment measurements.” These tell you the actual dimensions of the sewn garment, allowing you to gauge the amount of “ease” (the difference between body measurements and garment measurements, affecting fit and comfort).
Often, for simpler adjustments, it’s recommended to choose the larger size that accommodates your largest measurement and then make adjustments to take in other areas. Blending between sizes on the pattern pieces (“grading”) is a more advanced technique you can learn later.
9.4. Is it generally cheaper to make your own clothes than to buy them?
The answer is nuanced: it depends. Compared to fast fashion prices, sewing your own clothes using quality fabric might not always be cheaper, especially when factoring in the cost of patterns, notions (thread, zippers, buttons), tools, and your time. However, compared to high-end designer or boutique clothing, sewing often allows you to achieve a similar level of quality and unique design at a lower cost.
The primary motivations for many home sewists are often not solely cost savings but rather the ability to achieve a perfect fit, control over fabric quality and ethics, the enjoyment of the creative process, and the creation of a unique, personalized wardrobe that truly reflects their style – values that mass-market clothing often cannot provide.
9.5. Beyond skirts and bags, what other simple sewing projects can I try next?
Once you’re comfortable with the basics, several other beginner-friendly projects can help you build skills:
- Simple Aprons: Great for practicing straight seams, topstitching, and potentially attaching pockets or ties.
- Pyjama Pants: Often feature simple patterns with straight leg seams and are excellent practice for creating elastic casings or drawstrings.
- Cushion Covers: Especially those with an “envelope back” closure, which avoids zippers or buttons.
- Simple Scarves: Perfect for getting comfortable with different fabric types and practicing neat edge finishes or hems.
- Easy Tops/Tunics: Look for patterns labeled “easy” or “beginner” that might introduce slightly more shaping (like simple darts) or basic neck/armhole facings, but still avoid complex closures or sleeve insertions.
Choose projects that introduce one or two new techniques at a time to steadily grow your confidence and abilities.
Read more:
Embarking on the path of sewing your own clothes is an accessible and deeply rewarding endeavor. As we’ve explored, it begins with understanding the motivations—seeking unique style, achieving a perfect fit, and controlling quality. Equipping yourself with essential tools, selecting beginner-friendly fabrics and patterns, and mastering fundamental techniques like accurate cutting, consistent seam allowances, and the crucial step of pressing are the building blocks.
Your sewing journey doesn’t stop at the final stitch. To make each handmade piece truly shine with a professional mar – ready to be cherished, gifted, or sold – Packlove is here to help you with the finishing touches. Explore our custom clothing labels, hang tags, and premium packaging solutions like poly mailers and zipper bags. Elevate your creations from handmade to high-end. Start building your brand with Packlove today!


