


SPI for Patches: Stitch Density, The Ultimate Guide


When launching or refining a clothing line, patch application is crucial. What is a good SPI for patches? Stitches Per Inch (SPI) significantly impacts patch durability and aesthetics. This guide, tailored for wholesale and retail business owners, explains SPI in plain English.
A proper SPI prevents patches from detaching, fraying, or damaging fabric. Learn how to choose the optimal SPI for various fabrics (silk, denim) and patch types (embroidered, woven, PVC, iron-on). Troubleshoot common problems and avoid issues. We will also explore expert tips on how to choose the best quality patch. Gain the knowledge to make informed decisions, creating visually appealing, long-lasting patches that enhance your clothing line’s value.
1. Understanding Stitches Per Inch (SPI)
1.1 What Does SPI Mean?
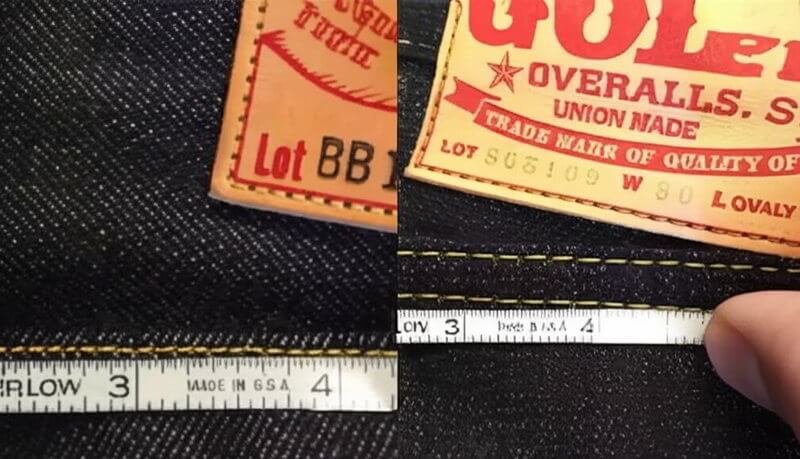
SPI, or Stitches Per Inch, is precisely what it sounds like: the number of stitches a sewing machine creates within one inch of a seam. Imagine a tiny ruler laid along your stitch line; SPI is the count of individual stitches you’d see within that one-inch space. A higher SPI means more stitches packed closely together, while a lower SPI indicates fewer, more spaced-out stitches.
While it’s not typically practical to manually measure SPI on every garment, understanding the concept is key. Most modern sewing machines have settings that allow you to adjust the stitch length, which directly controls the SPI. Shorter stitch lengths result in higher SPI, and longer stitch lengths result in lower SPI.
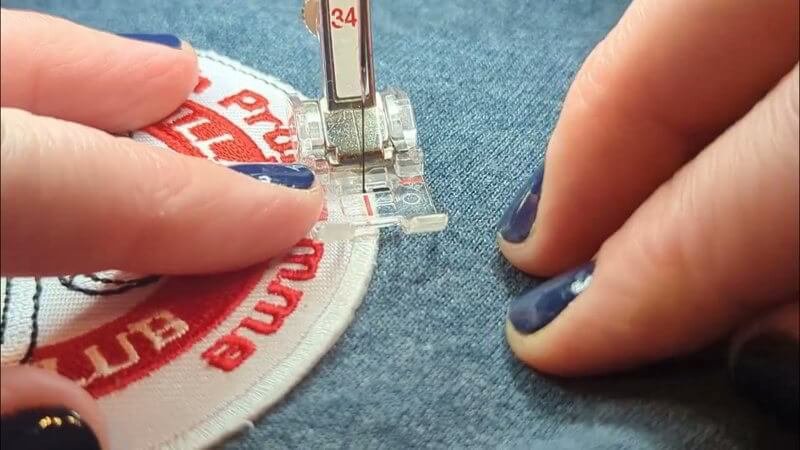
1.2 How SPI Affects Patch Application
The SPI you choose directly impacts the strength and overall integrity of how your patch is attached. Think of it like this: each stitch is a tiny anchor point holding the patch to the fabric. More anchors (higher SPI) generally mean a more secure hold. However, it’s not always a case of “more is better.”
The relationship between SPI and stitch strength is fundamental. A higher SPI creates a denser, tighter seam, which distributes stress more evenly across the patch and fabric. This is especially important for patches that will experience frequent wear and tear.
1.3 Factors that influence the best SPI
The best SPI will help the patch stick firmly to the fabric surface, look nice, and be durable over time. To choose the right SPI, businesses need to consider a few things:
- Too High (Too Many Stitches): While a very high SPI might seem like the most secure option, it can actually be detrimental. Packing too many stitches into a small area can weaken the fabric, causing it to pucker, tear, or even shred, especially with delicate materials.
- Too Low (Too Few Stitches): Conversely, a very low SPI creates a weak and unstable attachment. The patch is more likely to fray, peel away, or become completely detached, particularly with washing and regular use.
- The Material of the Fabric: Different fabrics have different thicknesses and weaves. Thin fabrics need a higher SPI, while thick fabrics need a lower SPI.
- Patch Type: Each type of patch has a different material and thickness, so the SPI also needs adjusting.
- Sewing Method: Sewing by hand or by machine, and the type of sewing machine used, also affect the choice of SPI.
- Desired Look: Sometimes, businesses want to sew patches with a certain style, and that also affects the SPI.
2. Choosing the Right SPI for Your Fabric
This section provides practical guidance on selecting the appropriate SPI based on different fabric types. It’s crucial to remember that these are general recommendations, and testing on a scrap piece of fabric is always recommended before applying a patch to your final garment.
2.1 Lightweight Fabrics
- Examples: Chiffon, silk, lace, organza, and voile are all examples of lightweight, often delicate, fabrics. These materials require a gentle touch and a higher SPI.
- Recommended SPI Range: Aim for an SPI range of 12-15.
- Explanation: A higher SPI creates a finer, less bulky seam that won’t overwhelm or damage these delicate fabrics. The closer stitches provide sufficient hold without creating excessive stress points.
- Needle and Thread Recommendations: Use a fine, sharp needle (size 60/8 or 70/10) and a lightweight, fine thread (e.g., silk or fine cotton thread). This combination minimizes the risk of snagging or tearing the fabric.
2.2 Medium-Weight Fabrics
- Examples: Cotton, linen, polyester blends, quilting cottons, and flannel fall into the medium-weight category. These fabrics are generally more durable and easier to work with.
- Recommended SPI Range: A range of 8-12 SPI is typically suitable.
- Explanation: This SPI range provides a good balance between strength and flexibility, creating a secure attachment without causing puckering or stiffness.
- Needle and Thread Recommendations: Use a universal needle (size 75/11 or 80/12) and an all-purpose polyester or cotton thread.
2.3 Heavyweight Fabrics
- Examples: Denim, canvas, leather, upholstery fabric, and heavy twill are considered heavyweight fabrics. These materials require a lower SPI and a more robust approach.
- Recommended SPI Range: Opt for a lower SPI range of 6-8.
- Explanation: A lower SPI allows the needle and thread to penetrate these thick materials more easily, creating a strong, durable seam. Too high an SPI could lead to needle breakage and skipped stitches.
- Needle and Thread Recommendations: Use a heavy-duty needle (size 90/14, 100/16, or even a leather needle) and a thicker thread, such as heavy-duty polyester or nylon thread.
2.4. Stretch Fabrics
- Examples: Spandex, knit fabrics (like jersey), and stretch denim all have significant stretch properties.
- Recommended SPI Range and Stitch Type: For stretch fabrics, the SPI itself is less critical than the type of stitch used. A zig-zag stitch is essential. A narrow zig-zag can use an SPI of around 8-12, while a wider zig-zag might use a lower SPI (6-8).
- Explanation: A zig-zag stitch allows the seam to stretch with the fabric, preventing the stitches from breaking and the patch from detaching. A straight stitch on a stretch fabric will almost certainly fail.
- Needle and Thread Recommendations: Use a ballpoint or stretch needle (size 75/11 or 90/14) to avoid piercing and damaging the fabric’s fibers. An all-purpose polyester thread is generally suitable, as it has some inherent stretch.
3. Choosing the Right SPI for Your Patch Type
Just as the fabric type influences the ideal SPI, the type of patch you’re using also plays a significant role. Different patch materials have varying thicknesses, stiffness, and construction, all of which affect how they should be attached.
3.1. Embroidered Patches
- Recommended SPI Range: Generally, you’ll want to use an SPI that’s slightly higher than what you’d use for the base fabric alone. For example, if you’re attaching an embroidered patch to medium-weight cotton (where you’d normally use 8-12 SPI), aim for 10-14 SPI for the patch application.
- Explanation: Embroidered patches are themselves made of dense stitching. A slightly higher SPI helps to ensure that your attachment stitches are securely anchoring into the patch’s base material, and not just sitting on top of the embroidery threads.
3.2. Woven Patches
- Recommended SPI Range: The recommended SPI for woven patches is often similar to embroidered patches, but it can sometimes be slightly lower, depending on the weave’s tightness. A range of 8-12 SPI is usually a good starting point.
- Explanation: Woven patches are generally less dense than embroidered patches. While you still need a secure attachment, you don’t necessarily need the extra-high SPI that might be required for very dense embroidery.
3.3. PVC Patches
- Recommended SPI Range: PVC patches often require a lower SPI, typically in the range of 6-8.
- Explanation: PVC (polyvinyl chloride) is a thick, relatively stiff, and non-porous material. A lower SPI helps to avoid excessive perforation of the fabric and reduces the risk of needle breakage. Too many stitches close together can actually weaken the PVC and the surrounding fabric.

3.4. Iron-On Patches
- Explanation: This is a crucial point: Iron-on patches are not meant to be solely ironed on. The heat-activated adhesive provides a temporary bond, but sewing is absolutely essential for a permanent and durable attachment. The SPI recommendations here apply to the sewing you should do after ironing the patch in place.
- Recommended SPI Range: The SPI for sewing an iron-on patch depends primarily on the fabric to which you’re attaching it. Follow the fabric-specific guidelines provided in the previous section.
- Emphasis: Always reinforce iron-on patches with stitching.
4. Troubleshooting Common Patch Application Problems
Even with careful planning, things can sometimes go wrong during patch application. This section addresses some of the most frequent issues and provides practical solutions.
4.1. Patch Puckering
Causes: Patch puckering, where the fabric surrounding the patch wrinkles or bunches up, is a common problem. It’s often caused by:
- Too High SPI: An excessively high SPI can put too much stress on the fabric, causing it to pull and pucker.
- Wrong Fabric/Thread Combination: Using a heavy thread on a delicate fabric, or a thread that doesn’t match the fabric’s properties, can contribute to puckering.
- Incorrect Tension: If your sewing machine’s tension is too tight, it can pull the fabric and cause puckering.
- Lack of Stabilizer: For thin or stretchy fabrics, a stabilizer (a backing material that provides temporary support) can help prevent puckering.
Solutions:
- Adjust SPI: Reduce the SPI to a more appropriate level for the fabric type.
- Choose the Right Thread: Use a thread that matches the fabric’s weight and fiber content.
- Adjust Tension: Check your sewing machine’s tension settings and adjust them if necessary. Consult your machine’s manual for specific instructions.
- Use a Stabilizer: Apply a lightweight, tear-away or wash-away stabilizer to the back of the fabric before attaching the patch.
4.2. Patch Fraying
Causes: Fraying, where the edges of the patch unravel, is usually due to:
- Too Low SPI: Insufficient stitches don’t adequately secure the edges of the patch.
- Inadequate Thread Coverage: The stitches might not be close enough to the edge of the patch, leaving the raw edges exposed.
- Patch Material: Some patch materials are inherently more prone to fraying than others.
Solutions:
- Increase SPI: Use a higher SPI to create a denser, more secure seam around the patch’s perimeter.
- Use a Zig-Zag Stitch: A zig-zag stitch provides better edge coverage than a straight stitch, helping to prevent fraying.
- Seal the Edges: For patches made of fray-prone materials, consider using a fray-check liquid or a very narrow zig-zag stitch along the raw edges before attaching the patch.
4.3. Patch Coming Loose
Causes: A patch that detaches from the fabric is often the result of:
- Too Low SPI: Insufficient stitches create a weak attachment.
- Weak Thread: Using a thread that’s too thin or not strong enough for the fabric and patch type can lead to breakage.
- Improper Application: Skipping the sewing step with iron-on patches, or not securing the stitches properly, can cause the patch to come loose.
Solutions:
- Increase SPI: Use a higher SPI to create a stronger, more durable attachment.
- Use Stronger Thread: Choose a heavy-duty thread, especially for heavier fabrics and patches.
- Sew After Ironing: Always sew iron-on patches, even if the adhesive seems strong initially.
- Secure Stitches: Backstitch at the beginning and end of your stitching to prevent unraveling.
4.4. Needle Breaking or Skipping Stitches
Causes:
- Wrong Needle Size: Using a needle that’s too fine for the fabric or patch thickness can cause it to break.
- Too High/Low SPI for Dense Material: An excessively high SPI on a very dense patch (like PVC) can make it difficult for the needle to penetrate, leading to breakage. Conversely a too low SPI can cause skipped stitches.
- Dull Needle: A dull needle will struggle to penetrate the fabric and patch, increasing the risk of breakage.
- Machine Problems: Sometimes the issue is not with the SPI or needle, but is in the timing of the machine itself.
Solutions:
- Choose the Correct Needle: Use the appropriate needle size and type for the fabric and patch material (see the recommendations in previous sections).
- Adjust SPI: If working with a very dense patch, reduce the SPI. For lightweight fabrics, increase as appropriate.
- Replace Needle: Use a new, sharp needle.
- Service Machine: If needles continue to break with the correct settings, take the machine in for servicing.
5. Related Questions
5.1 Can I use the same SPI for all types of patches?
No, the ideal SPI varies depending on the patch material (embroidered, woven, PVC, etc.) and the fabric to which it’s being applied.
5.2 What if my sewing machine doesn’t have SPI settings?
Most modern sewing machines control SPI through stitch length settings. A shorter stitch length corresponds to a higher SPI (more stitches per inch), while a longer stitch length corresponds to a lower SPI (fewer stitches per inch).
5.3 Should I use a special stitch type for attaching patches?
For most patches, a straight stitch is sufficient, provided the SPI is appropriate. However, for stretch fabrics, a zig-zag stitch is essential to allow the seam to stretch with the fabric.
5.4 How do I know if my SPI is correct?
The best way to determine the correct SPI is to test on a scrap piece of fabric that’s the same as your garment material. Apply a small piece of the patch material using your chosen SPI and stitch type. Examine the results:
- Is the patch securely attached?
- Is there any puckering or distortion of the fabric?
- Does the stitching look neat and even?
- If attaching to a stretch fabric, does the seam stretch without breaking?
Adjust the SPI and repeat the test until you achieve a satisfactory result.
5.5 What is the best kind of patch?
Choosing the “best” patch depends entirely on the project and aesthetic a business wants!
- Embroidered patches Classic look, textured, and durable. Great for detailed designs.
- Woven patches: Similar to embroidered, but can achieve finer details and a smoother surface. Good for intricate logos.
- PVC patches: Modern, 3D effect, waterproof, and very durable. Ideal for a bold, rugged look.
- Iron-on patches: Convenient for initial placement, but always require sewing for long-term durability.
Read more:
Mastering what is a good SPI for patches is crucial for durable, aesthetically pleasing results. This guide has demystified SPI, highlighting its impact on patch longevity. Remember: higher SPI generally increases strength, while lower SPI suits thicker materials.
Fabric and patch type significantly influence the optimal SPI. Crucially, always test on scrap fabric first. Experimentation and attention to detail are key to professional-quality patch application, enhancing your clothing line’s value. By understanding these core principles, you’re equipped to make informed decisions and avoid common pitfalls. For further sewing tips and custom patch information, explore our other resources.


