


Iron-On Elbow Patches: Easy No-Sew Repair and Style

2 April, 2025
Worn elbows on favorite sweaters or shirts are a common frustration. It’s disheartening when a beloved garment starts showing its age, especially in such a visible spot. But throwing away perfectly good clothing because of a small hole or worn area isn’t ideal, either. This is where iron-on elbow patches come in as a fantastic solution – they’re not only a practical fix but also a stylish way to customize and extend the life of clothes.
This article will provide a complete, step-by-step guide to applying iron-on elbow patches. Readers will learn how to easily repair worn elbows or holes, and even add a personalized touch to clothing, all without needing to sew.
The focus is on providing an accessible, no-sew solution that anyone can use, regardless of their crafting experience. The value is clear: save money, save clothes, and express personal style with a simple, effective technique. Let’s start!
1. Why Choose Iron-On Elbow Patches?
Iron-on elbow patches provide a quick, easy, and affordable alternative to sewing or replacing damaged clothing. Their versatility allows for both discreet repairs and stylish customization, offering a durable solution for worn elbows. They’re perfect for DIY fashion, upcycling, and anyone seeking a no-sew, convenient fix.
2. Materials and Tools You’ll Need
To successfully apply iron-on elbow patches, gather the following items:
- Iron-on elbow patches: Choose the desired material, color, and size. Common materials include leather, suede, cotton, felt, and denim.
- Garment: The shirt, sweater, or jacket that needs patching.
- Iron: A standard household iron.
- Ironing board: A firm, heat-resistant surface for ironing.
- Press cloth: A thin, clean piece of cotton fabric (like a tea towel or handkerchief) to protect the garment and patch from direct heat.
- Scissors: To trim any excess patch material or threads, if necessary.
- Measuring tape or ruler: To accurately measure and position the patches.
- Pins: To temporarily hold the patches in place before ironing.
3. Choosing the Right Elbow Patches
Selecting the perfect elbow patches involves considering a few key factors to ensure they meet specific needs and preferences:
Material:
- Leather: Offers a classic, durable, and often more formal look. Great for jackets and blazers.
- Suede: Provides a soft, textured appearance, adding a touch of sophistication.
- Cotton: A versatile and breathable option, available in various colors and patterns. Suitable for casual wear.
- Felt: A soft, affordable, and easy-to-work-with material, often used for crafting and decorative patches.
- Denim: A sturdy and casual choice, perfect for jeans jackets and other denim garments.
Consider the garment’s fabric and overall style when choosing a patch material. For example, a leather patch might look out of place on a lightweight cotton shirt, while a denim patch would be a good match for a denim jacket.
Size:
Measure the worn area on the elbow to determine the appropriate patch size. The patch should be large enough to cover the damage completely, with at least a 1/2-inch (1.3 cm) overlap on all sides.
Shape:
While oval and rectangular patches are the most common, other shapes are available (circles, hearts, etc.). Choose a shape that complements the garment’s style and personal preferences.
Color and Design:
Decide whether to match the patch color to the garment for a subtle repair or choose a contrasting color or design for a more noticeable and decorative effect.
Fabric Compatibility:
Ensure the patch material is compatible with the garment’s fabric. Most patches work well with cotton, denim, and other sturdy fabrics. However, delicate fabrics like silk or lace may not be suitable for iron-on patches.
Durability and Washability:
Consider how often the garment will be worn and washed. Choose a patch material that can withstand the expected wear and tear and washing conditions. Check the patch’s care instructions to ensure it’s compatible with the garment’s care requirements.
| Material | Durability | Washability | Appearance | Cost |
|---|---|---|---|---|
| Leather | High | Varies | Formal, Classic | Moderate-High |
| Suede | Moderate | Varies | Sophisticated | Moderate |
| Cotton | Moderate | Good | Casual | Low-Moderate |
| Felt | Low | Fair | Crafty | Low |
| Denim | High | Good | Casual | Low-Moderate |
4. Step-by-Step Guide to Ironing On Elbow Patches
This step-by-step guide will walk through the process of applying iron-on elbow patches, ensuring a secure and professional-looking result.
4.1 Step 1: Prepare the Garment
Before applying the patches, it’s essential to prepare the garment properly. Start by washing and drying the garment according to its care instructions. This removes any dirt, sizing, or finishes that could interfere with the patch’s adhesion. Once the garment is clean and dry, iron it thoroughly to remove any wrinkles. A smooth surface is crucial for optimal bonding.
4.2 Step 2: Position the Patch
Accurately positioning the patch is key to a successful application. Here are two reliable methods:
- The Wear-and-Mark Method: Put on the garment and bend the elbow. Have someone mark the center of the elbow (the point of greatest wear) with a pin or fabric marker. This ensures the patch will be placed directly over the area that needs reinforcement.
- The Measurement Method: Measure the distance from the wrist to the elbow along the outside seam of the sleeve. Divide this measurement in half to find the approximate center point of the elbow. Mark this point on both sleeves.
Once the elbow center is marked, center the patch over the mark, ensuring it completely covers any worn areas or holes. Use pins to secure the patch in place, preventing it from shifting during the ironing process.
4.3 Step 3: Prepare the Iron
Set the iron to the temperature recommended on the patch’s instructions. This is crucial for proper adhesion and to avoid damaging the garment or the patch. Crucially, make sure the steam function is turned OFF. Steam can prevent the adhesive from bonding properly and may even damage some patch materials. Allow the iron to heat up completely before proceeding.
4.4 Step 4: Iron the Patch
Place the press cloth over the patch and garment. This protects both the patch and the garment from direct heat, preventing scorching or melting. With the iron heated and steam off, press firmly down on the patch, applying even pressure.
Hold the iron in place for the recommended time specified in the patch’s instructions (usually 15-30 seconds). Then, use a slow, circular motion to ensure all edges of the patch receive even heat and pressure. Pay particular attention to the edges, as these are the most likely to lift if not properly bonded.
4.5 Step 5: Cool and Check
Remove the iron and the press cloth. Allow the patch to cool completely. This is essential for the adhesive to set properly. Do not touch or move the patch while it’s still warm. Once cooled, gently tug on the edges of the patch to check its adhesion. If any edges feel loose, repeat Step 4, focusing on the areas that need more bonding.
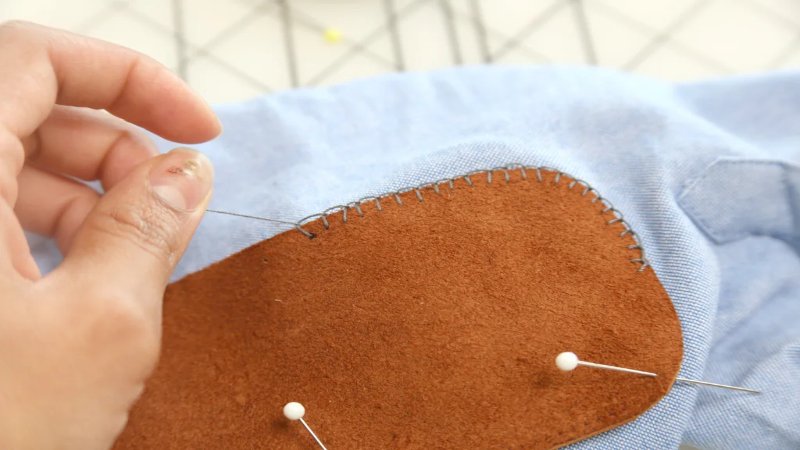
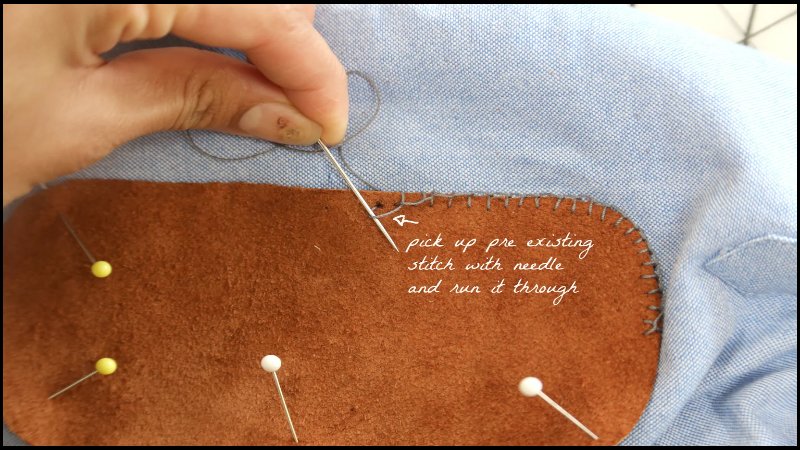
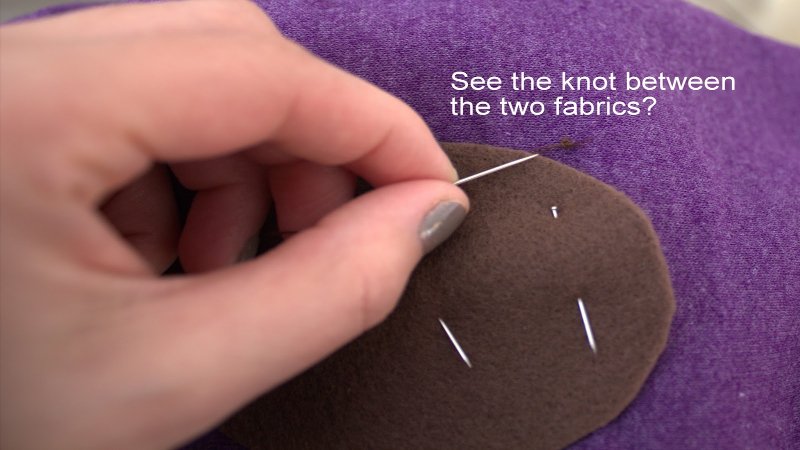
4.6 Step 6: Reinforce with Stitching (Optional)
While iron-on patches are designed to be a no-sew solution, adding a few stitches around the perimeter can provide extra durability, especially for garments that are frequently washed or subjected to heavy wear. This step is entirely optional but recommended for those seeking maximum longevity.
Hand-sewing or machine-sewing can be used, depending on preference and skill level. A simple running stitch or blanket stitch around the edge of the patch will provide extra security.
5. Troubleshooting Common Problems
Even with careful application, sometimes issues can arise when working with iron-on patches. Here’s how to address some common problems:
- Patch Not Sticking:
- Insufficient Heat: Ensure the iron is set to the correct temperature and is fully heated before applying.
- Uneven Pressure: Apply firm, even pressure across the entire patch, especially the edges.
- Dirty Surface: Make sure the garment is clean and free of any residue or fabric softener, which can interfere with adhesion.
- Old Patch: The adhesive on older patches may degrade over time. If using an old patch, consider purchasing a new one.
- Fabric Compatibility: Some fabrics, particularly those with a very smooth or textured surface, may not be ideal for iron-on patches.
- Patch Peeling:
- Poor Adhesion: This often stems from insufficient heat or pressure during application. Try reapplying heat, focusing on the peeling edges.
- Washing Too Soon: Allow the patch to fully cure for at least 24-48 hours before washing the garment.
- Harsh Detergents or High Heat: Use a mild detergent and wash the garment in cold water. Avoid high heat in the dryer.
- Scorching:
- Incorrect Iron Setting: Always follow the patch’s instructions for the correct iron temperature.
- No Press Cloth: Using a press cloth is essential to protect the garment and patch from direct heat.
- Ironing Too Long: Avoid holding the iron in one place for too long. Use a slow, circular motion.
- Uneven Adhesion:
- Uneven Pressure: Ensure even pressure is applied across the entire patch.
- Wrinkled Garment: Iron the garment thoroughly before applying the patch to create a smooth surface.
- Steam: Make sure the iron is free of steam.
- Fabric Damage:
- Incompatible Fabric: Delicate fabrics like silk or lace may not be suitable for iron-on patches. Always test a small, inconspicuous area first.
- Excessive Heat: Use the correct iron setting and avoid overheating the fabric.
6. Caring for Garments with Iron-On Patches
Proper care is essential to maintain the appearance and longevity of garments with iron-on patches. Here are some guidelines:
- Washing Instructions:
- Gentle Cycle: Wash the garment inside out on a gentle cycle to minimize friction and protect the patch.
- Cold Water: Use cold water to prevent the adhesive from weakening and the patch from shrinking or fading.
- Mild Detergent: Avoid harsh detergents, bleach, or fabric softeners, which can damage the patch and adhesive.
- Drying Instructions:
- Low Heat: If using a dryer, tumble dry on a low heat setting or, preferably, air dry the garment.
- Air Dry: Air drying is the gentlest option and helps prevent damage to the patch. Hang the garment or lay it flat to dry.
- Avoid Direct Sunlight: Prolonged exposure to direct sunlight can fade the patch and weaken the adhesive.
- Ironing Instructions:
- Avoid Ironing Directly: Never iron directly on the patch, as this can melt the adhesive or damage the patch material.
- Iron Inside Out: If ironing is necessary, turn the garment inside out and iron on a low heat setting.
- Use a Press Cloth: Place a press cloth between the iron and the garment to provide an extra layer of protection.
- Dry Cleaning:
- Check Patch Material Compatibility: Some patch materials, such as leather or suede, may require professional dry cleaning. Check the patch’s care instructions before dry cleaning the garment.
- Inform the Dry Cleaner: Inform the dry cleaner about the presence of the iron-on patch and its material to ensure they use appropriate cleaning methods.
7. Related Questions
7.1 Can I iron on elbow patches to any type of fabric?
While iron-on patches work well on many fabrics, they’re not suitable for all. Sturdy materials like cotton, denim, canvas, and polyester blends are generally good choices. Delicate fabrics like silk, lace, rayon, or those with a low melting point should be avoided, as the heat from the iron can damage them.
Highly textured fabrics may also present a challenge, as the adhesive may not bond evenly. Always check the patch’s instructions and test a small, inconspicuous area first if unsure.
7.2 How long do iron-on elbow patches last?
The lifespan of an iron-on patch depends on several factors: the quality of the patch itself, the thoroughness of the application process, and how the garment is cared for. A high-quality patch, applied correctly to a suitable fabric and cared for properly (gentle washing, low heat drying), can last for several years, even with regular wear.
However, patches on frequently worn or heavily used items may show wear sooner. Reinforcing the patch with stitching can significantly extend its life.
7.3 Can I remove an iron-on elbow patch if I change my mind?
Removing an iron-on patch can be tricky, and it’s not always possible to do so without leaving some residue or potentially damaging the garment. The adhesive is designed to be permanent. However, if removal is necessary, it can be attempted by reheating the patch with an iron (using a press cloth) to soften the adhesive and then carefully peeling it off. Any remaining residue might be treated with a fabric-safe adhesive remover, but always test this on an inconspicuous area first.
7.4 What’s different between iron-on patches and sew-on patches?
The difference is simple: Iron-on patches use heat-activated adhesive for quick and easy application, no sewing skills needed. Sew-on patches require stitching, offering a more secure and permanent attachment, often preferred for heavy-duty use or frequently washed items.
7.5 Where to buy the best elbow patches?
Elbow patches are available at a wide variety of stores, both off line and online. Consider checking local craft stores. For example:
- Craft Stores: Stores like Jo-Ann Fabrics, Michaels, and Hobby Lobby often carry a selection of iron-on patches.
- Fabric Stores: Local fabric stores may also have patches, particularly those specializing in garment construction.
- Online Retailers: Websites like Amazon, Etsy, and specialized online fabric stores offer a vast array of patches in various materials, sizes, and designs.
Read more:
Iron-on elbow patches offer a remarkably simple, affordable, and effective way to repair worn clothing, add a personal touch, and extend the life of beloved garments. This step-by-step guide has covered everything from choosing the right patches to applying them correctly and caring for them properly.
With a little practice and attention to detail, anyone can achieve a successful and professional-looking result. So, instead of discarding that favorite sweater or shirt with worn elbows, consider giving it a new lease on life with iron-on patches. It’s a quick and rewarding project that can save money, reduce waste, and unleash creativity.